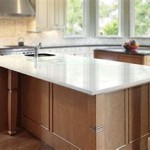
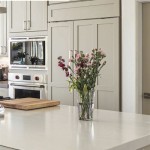
How Do You Make My Kitchen Cabinets Look New Again?
Kitchen cabinets often bear the brunt of daily life, accumulating grease, grime, and wear over time. Restoring them to their original glory can significantly improve the overall aesthetic of a kitchen without undergoing a costly and disruptive full renovation. The process involves thorough cleaning, potential repairs, and possibly refinishing or painting, each step contributing to a renewed and revitalized appearance.
Effective restoration of kitchen cabinets requires a methodical approach and careful execution. Neglecting proper preparation or using inappropriate materials can lead to unsatisfactory results or even damage the cabinets. Therefore, understanding the necessary steps and techniques is crucial for achieving a successful outcome.
Deep Cleaning for Immediate Improvement
The first and often most impactful step in revitalizing kitchen cabinets is a thorough cleaning. Years of accumulated grease, food splatters, and dust can make even well-maintained cabinets appear dull and aged. Before embarking on any more extensive restoration work, a deep cleaning will reveal the true condition of the cabinets and may be sufficient to achieve the desired improvement.
The cleaning process should begin with removing all items from inside the cabinets and drawers. This allows for complete access to all surfaces and prevents the accidental contamination of stored items with cleaning solutions. Once the cabinets are empty, dust and loose debris should be brushed or vacuumed away.
Selecting the appropriate cleaning solution is crucial to avoid damaging the cabinet finish. For most painted or laminate cabinets, a mixture of warm water and mild dish soap is sufficient. Avoid harsh chemicals or abrasive cleaners, which can scratch or dull the surface. For wood cabinets, a wood-specific cleaner or a solution of oil soap may be more appropriate, but it’s always prudent to test the cleaner in an inconspicuous area first.
Apply the cleaning solution using a soft cloth or sponge, working in sections. Pay particular attention to areas around handles and hinges, where grease and grime tend to accumulate. For stubborn stains or grease buildup, a paste of baking soda and water can be gently applied and left to sit for a few minutes before being wiped away. Always wipe cabinets dry with a clean cloth to prevent water spots or damage to the finish.
Hardware, such as knobs and pulls, should also be cleaned. These can be removed and soaked in warm, soapy water to loosen grime. A small brush, such as an old toothbrush, can be used to scrub away dirt from intricate details. After cleaning, rinse the hardware thoroughly and dry it completely before reattaching it to the cabinets.
If, after cleaning, the cabinets still appear lackluster, consider using a cabinet polish or wax specifically designed for the material of your cabinets. This can help to restore the shine and protect the finish from future wear. Follow the manufacturer's instructions carefully when applying these products.
Repairing Damage and Addressing Wear
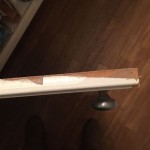
Beyond simple cleaning, many kitchen cabinets require repairs to address damage such as scratches, dents, or loose hinges. Addressing these issues not only improves the appearance of the cabinets but also extends their lifespan and functionality.
Scratches and dents can often be repaired using wood filler or touch-up paint. For shallow scratches on wood cabinets, a furniture touch-up marker or crayon matching the cabinet's stain can be used to conceal the imperfection. Deeper scratches and dents may require filling with wood filler. Apply the filler according to the manufacturer's instructions, allowing it to dry completely before sanding it smooth and applying a matching stain or paint.
Loose hinges are a common problem, often caused by stripped screw holes. To repair a stripped screw hole, insert small wooden dowels or toothpicks into the hole along with wood glue. Once the glue has dried, trim the excess dowels or toothpicks flush with the surface and re-drill the screw hole. This provides a more secure anchor for the screws.
For doors that are warped or misaligned, adjusting the hinges may be necessary. Most cabinet hinges have adjustment screws that allow for fine-tuning of the door's position. Consult the hinge manufacturer's instructions or online resources for guidance on adjusting specific types of hinges.
If the cabinet doors or drawer fronts are significantly damaged or outdated, replacing them may be a more cost-effective option than refinishing the entire cabinet. Many companies specialize in manufacturing replacement cabinet doors and drawer fronts to match existing cabinet styles and finishes.
In cases where the cabinet boxes themselves are damaged, such as water damage or structural instability, professional repair or replacement may be required. Attempting to repair heavily damaged cabinet boxes without the necessary expertise can lead to further damage or safety hazards.
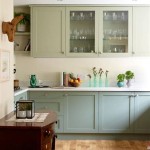
Refinishing or Painting for Drastic Transformation
When cleaning and repairs are insufficient to achieve the desired aesthetic, refinishing or painting the kitchen cabinets can provide a dramatic transformation. These processes involve removing the existing finish, preparing the surface, and applying a new finish or paint.
Refinishing is typically the preferred option for wood cabinets where the natural grain and beauty of the wood are desired. This process involves stripping the existing finish, sanding the wood smooth, and applying a new stain or clear coat. Stripping agents can be used to remove the old finish, but caution should be exercised as some strippers contain harsh chemicals. Always wear appropriate protective gear, such as gloves and eye protection, and work in a well-ventilated area.
After stripping, the wood surface must be thoroughly sanded to remove any remaining residue and create a smooth base for the new finish. Start with a coarse grit sandpaper and gradually work down to a finer grit to achieve a polished surface. Dust should be diligently removed between each sanding pass.
Once the wood is prepared, a stain can be applied to enhance its natural color and grain. Choose a stain that complements the overall design of the kitchen and apply it evenly using a brush or cloth. After the stain has dried, a clear coat, such as varnish or polyurethane, is applied to protect the wood and provide a durable, water-resistant finish. Multiple coats of clear coat may be necessary to achieve the desired level of protection and sheen.
Painting is a popular option for both wood and laminate cabinets, offering a wide range of color choices and a more uniform appearance. Before painting, the cabinet surfaces must be thoroughly cleaned and primed to ensure proper adhesion of the paint. Priming is particularly important for laminate cabinets, as paint may not adhere well to the slick surface without a primer.
When selecting paint, choose a high-quality paint specifically designed for cabinets or furniture. These paints are typically more durable and resistant to chipping and scratches than standard wall paints. Apply the paint in thin, even coats using a brush, roller, or sprayer. Multiple coats may be necessary to achieve full coverage and a smooth finish. Sand lightly between coats to remove any imperfections and improve adhesion.
Regardless of whether refinishing or painting, proper preparation is crucial for a successful outcome. Taking the time to thoroughly clean, repair, and prepare the cabinet surfaces will result in a more durable and aesthetically pleasing finish that will last for years to come.

Kitchen Cabinet Makeover 101 Make Your Cabinets Look New Again Allen Brothers Painting

Make An Old Kitchen Look New Again By Refinishing The Cabinets Seattle Times

How To Update Your Kitchen Cabinets Without Replacing Them Real Estate U S News

Makeover Ideas To Update Your Kitchen Cabinets

How To Make Old Cabinets Look New With Paint

Making Your Old Kitchen Cabinets Look New Again Specialized Refinishing Co

7 Ways To Make Your Kitchen Cabinets Look Expensive

How To Do A Kitchen Makeover Cabinet Doors N More

How To Paint Kitchen Cabinets In 7 Simple Steps

Distressed Kitchen Cabinets How To Distress Your
Related Posts