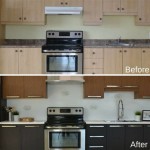
How to Refinish Stained Kitchen Cabinets: A Comprehensive Guide
Stained kitchen cabinets are a classic and versatile choice that can add character and warmth to any kitchen. However, over time, they can become dull, scratched, or stained. Refinishing your cabinets can breathe new life into your kitchen and give it a fresh, updated look.
Step 1: Preparation
Before you begin refinishing, it's important to prepare the cabinets properly. This includes removing all hardware, doors, and drawers. Clean the cabinets thoroughly with a degreaser to remove any dirt or grease. Sand the cabinets lightly with a fine-grit sandpaper to create a smooth surface for the new finish.
Step 2: Stripping the Old Finish
Once the cabinets are prepared, you need to strip the old finish. There are several methods you can use, including chemical strippers, heat guns, or sanding. Chemical strippers are effective but can be harsh, so it's important to follow the manufacturer's instructions carefully. Heat guns can be used to soften the finish, making it easier to scrape off. Sanding is the most labor-intensive method, but it can be done with a power sander to save time.
Step 3: Cleaning and Sanding
After the old finish has been removed, it's important to clean the cabinets thoroughly with a degreaser to remove any residual stripper or sanding dust. Sand the cabinets again with a fine-grit sandpaper to smooth out any rough spots and create a good surface for the new finish.
Step 4: Applying the New Finish
Now it's time to apply the new finish. You can choose between a variety of finishes, including stain, paint, or lacquer. If you're staining the cabinets, apply it in thin, even coats, allowing each coat to dry completely before applying the next. If you're painting the cabinets, apply two to three coats of paint, sanding lightly between each coat for a smooth finish. If you're using lacquer, apply several thin coats, sanding lightly between each coat and allowing the final coat to cure for several days before using the cabinets.
Step 5: Reassembly
Once the finish has dried completely, it's time to reassemble the cabinets. Reinstall the doors and drawers, and attach any hardware. Adjust the doors and drawers as needed to ensure they open and close smoothly.
Additional Tips
Here are a few additional tips to help you refinish your kitchen cabinets successfully:
- Test the finish on an inconspicuous area first to ensure you're happy with the results.
- Use a high-quality brush or roller for a smooth, even finish.
- Allow the finish to dry completely before using the cabinets.
- Follow the manufacturer's instructions carefully for all products you use.
Conclusion
Refinishing stained kitchen cabinets is a challenging but rewarding project that can transform the look of your kitchen. By following these steps and taking your time, you can achieve professional-looking results that will last for years to come.

Cabinet Refinishing Guide

Cabinet Refinishing An 8 Step Guide For Pro Painters Ppc

Staining Your Wood Cabinets Darker Young House Love

Refinish Kitchen Cabinets Without Stripping

Refinishing Kitchen Cabinets Modern Refacing Made Easy Wisewood

The Fast Affordable Way To Upgrade Your Kitchen Cabinet Refinishing

How To Refinish Wood Cabinets The Easy Way Love Remodeled

Should I Paint Or Refinish My Kitchen Cabinets

Naperville Kitchen Cabinet Refinishers 630 922 9714 Geneva Refacing Resurfacing

How To Refinish Wood Cabinets The Easy Way Love Remodeled
Related Posts


