How To Add Filler to Kitchen Cabinets
Kitchen cabinet fillers are essential components in kitchen design and installation. They are used to fill gaps between cabinets, walls, and appliances, ensuring a seamless and aesthetically pleasing appearance. Proper installation of filler pieces not only enhances the visual appeal of the kitchen but also improves functionality by providing necessary clearances and preventing damage. This article provides a comprehensive guide on how to add fillers to kitchen cabinets, covering the purpose, different types, necessary tools, and step-by-step installation process.
Filler pieces are typically made of wood or MDF (Medium Density Fiberboard) and are available in various widths and finishes to match the existing cabinetry. They serve multiple crucial functions in a kitchen remodel or new construction project. Beyond simply filling gaps, fillers provide structural support, prevent doors and drawers from hitting adjacent walls or appliances, and allow for proper hardware installation. Understanding the role of fillers is paramount to achieving a professional and functional kitchen layout.
Understanding the Purpose of Cabinet Fillers
The primary function of cabinet fillers is to address the imperfections and variations inherent in wall construction and cabinet manufacturing. Walls are rarely perfectly straight or 90 degrees, and cabinets, while manufactured to specific dimensions, can have slight discrepancies. Fillers bridge these gaps and create a uniform, finished look.
A critical role of cabinet fillers is preventing door and drawer collision. When cabinets are placed directly against a wall, the doors or drawers may not be able to fully open without hitting the wall. Fillers provide the necessary clearance, allowing for full functionality and preventing damage to the cabinetry and surrounding surfaces. This is particularly important in corner cabinets or where appliances such as refrigerators are adjacent to cabinets.
Furthermore, fillers provide a surface for hardware installation. In some cases, cabinet hardware, such as pulls and knobs, may require a solid surface for secure attachment. Fillers can provide this surface, especially when cabinets are installed close to walls or other obstructions. This ensures that hardware is properly installed and functions correctly, contributing to the overall usability and longevity of the kitchen design.
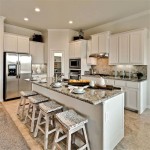
Fillers also contribute to the overall aesthetic appeal of the kitchen. By creating a consistent and seamless look, fillers hide any gaps or imperfections, resulting in a polished and professional finish. This attention to detail elevates the overall design and enhances the value of the kitchen.
Types of Cabinet Fillers
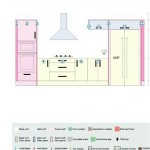
There are several types of cabinet fillers, each designed for specific applications and locations within the kitchen design. Selecting the appropriate type of filler is crucial for achieving the desired aesthetic and functionality.
Standard Fillers:
These are the most common type of filler and are typically used to fill gaps between cabinets and walls or appliances. They are available in various widths, ranging from 1 inch to 6 inches or more, and can be easily cut to size to fit the specific gap. Standard fillers are usually made of wood or MDF and are finished to match the existing cabinetry.Scribe Fillers:
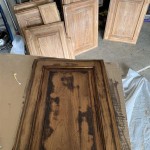
Scribe fillers are designed to accommodate uneven walls. They have a wider profile on one edge, which allows them to be scribed to the wall's contour. Scribing involves tracing the wall's shape onto the filler and then cutting the filler along that line. This creates a seamless fit between the cabinet and the wall, even if the wall is not perfectly straight. Scribe fillers are essential for achieving a professional look in kitchens with irregular wall surfaces.Decorative Fillers:
These fillers are designed to add visual interest to the kitchen design. They may feature decorative moldings, fluted details, or other embellishments. Decorative fillers are typically used at the ends of cabinet runs or in prominent locations to enhance the overall aesthetic. They can be used to create a more custom and high-end look.Corner Fillers:
These fillers are specifically designed for use in corners where cabinets meet at a 90-degree angle. They provide the necessary clearance for doors and drawers to open without hitting adjacent cabinets or walls. Corner fillers are typically angled or curved to maximize space and functionality in the corner area.Appliance Fillers:
These fillers are used to fill gaps between cabinets and appliances, such as refrigerators or dishwashers. They ensure a consistent and uniform appearance and prevent debris from falling into the gaps. Appliance fillers are often finished to match the appliance or the surrounding cabinetry.Step-by-Step Installation Guide
Proper installation of cabinet fillers requires careful planning, precise measurements, and attention to detail. The following step-by-step guide provides a comprehensive overview of the installation process.
Step 1: Preparation and Planning:
Before beginning the installation, gather all necessary tools and materials, including the cabinet fillers, measuring tape, level, pencil, saw (circular saw or miter saw), drill, screws, wood glue, clamps, and safety glasses. Carefully measure the gaps that need to be filled and determine the required width and length of the filler pieces. Consider any obstructions or irregularities that may affect the installation, such as pipes, electrical outlets, or uneven walls.Step 2: Cutting the Filler Pieces:
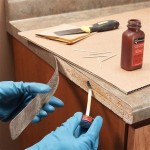
Using a saw, carefully cut the filler pieces to the required dimensions. Ensure that the cuts are straight and accurate to avoid any gaps or inconsistencies. If using a scribe filler, use a pencil to trace the contour of the wall onto the filler. Then, use a jigsaw or other appropriate tool to cut the filler along the scribed line.Step 3: Fitting the Filler Pieces:
Before permanently attaching the filler pieces, test fit them in the gaps to ensure a proper fit. Check for any gaps or inconsistencies and make any necessary adjustments. If using a scribe filler, ensure that the scribed edge fits snugly against the wall.Step 4: Attaching the Filler Pieces:
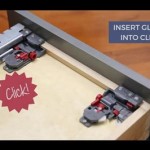
There are generally two methods for attaching filler pieces: using screws or using wood glue and clamps. For attaching with screws, pre-drill pilot holes through the filler pieces and into the adjacent cabinet frame. This will prevent the wood from splitting and ensure a secure connection. Apply wood glue to the back of the filler piece and then screw it into place. Use clamps to hold the filler piece in place while the glue dries.For attaching with wood glue and clamps, apply a generous amount of wood glue to the back of the filler piece and then clamp it firmly in place against the adjacent cabinet frame. Ensure that the filler piece is aligned properly and that the clamps are evenly distributed to provide uniform pressure. Allow the glue to dry completely according to the manufacturer's instructions, typically 24 hours.
Step 5: Finishing the Installation:
Once the filler pieces are securely attached, inspect the installation for any imperfections. Fill any nail holes or gaps with wood filler and sand smooth. If necessary, apply a touch-up paint or stain to match the existing cabinetry. Finally, clean the area and remove any debris.Adding fillers to kitchen cabinets is a critical step in ensuring a professional and functional kitchen design. By understanding the purpose of fillers, selecting the appropriate type, and following a step-by-step installation process, homeowners and contractors can achieve a seamless and aesthetically pleasing result. This attention to detail enhances the overall value and usability of the kitchen.

How To Use Filler Panels With Your Cabinets House Home

How To Install Cabinet Filler Strips

How To Install Cabinet Filler Strips

Step By Guide To Cutting And Installing Cabinet Fillers

How To Use Filler Panels With Your Cabinets House Home

How To Use Filler Panels With Your Cabinets House Home

6 Filler Tray Base Cabinet Momplex Vanilla Kitchen Ana White

How To Use Filler Panels With Your Cabinets House Home

Stylish Kitchen Cabinet Wall Filler

Kitchen Cabinet Fillers 3 Facts You Must Know Homelane Blog
Related Posts