How to Add Wood Trim to Kitchen Cabinets
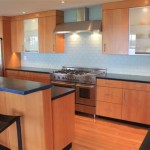
Adding wood trim to your kitchen cabinets is a simple and affordable way to upgrade their look. Wood trim can add a touch of elegance, sophistication, or charm to your kitchen, and it can also help to protect your cabinets from wear and tear. In just a few hours, you can add wood trim to your cabinets and give your kitchen a whole new look.
Materials & Tools
To add wood trim to your kitchen cabinets, you will need the following materials:
- Wood trim (in the desired size, style, and finish)
- Wood glue
- Nails or screws
- Hammer or nail gun
- Sandpaper
- Wood putty
- Paint or stain (optional)
Once you have all of your materials, you can begin the process of adding wood trim to your cabinets.
Step 1: Preparation
The first step is to prepare the cabinets for the trim. This involves cleaning them thoroughly and removing any old hardware. You may also need to sand the cabinets lightly to create a smooth surface for the trim.
Step 2: Measure and Cut the Trim
Next, you need to measure and cut the trim to fit your cabinets. Be sure to measure twice and cut once to avoid any mistakes. You can use a miter saw or a hand saw to cut the trim. If you are using a hand saw, be sure to use a miter box to help you make accurate cuts.
Step 3: Apply Wood Glue
Once you have cut the trim, you need to apply wood glue to it. Be sure to apply the glue evenly to the entire surface of the trim. This will help to ensure a strong bond between the trim and the cabinets.
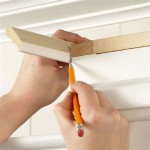
Step 4: Attach the Trim
Now you can attach the trim to the cabinets. You can use nails or screws to do this. If you are using nails, be sure to pre-drill the holes to avoid splitting the wood. If you are using screws, be sure to use a countersink bit to countersink the screws below the surface of the wood.
Step 5: Sand and Finish
Once the trim is attached, you can sand it and finish it as desired. You may want to sand the trim lightly to remove any rough edges. You can also apply a coat of paint or stain to the trim to match the cabinets or to give it a different look.
Conclusion
Adding wood trim to kitchen cabinets is a simple and affordable way to upgrade their look. By following these steps, you can add wood trim to your cabinets in just a few hours and give your kitchen a whole new look.

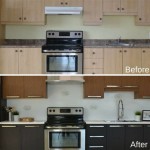
How To Add Trim And Paint Your Laminate Cabinets

From Drab To Fab Adding Trim Cabinets

From Drab To Fab Adding Trim Cabinets

Adding Moldings To Your Kitchen Cabinets Remodelando La Casa

How To Add Trim And Paint Your Laminate Cabinets

How To Add Trim And Paint Your Laminate Cabinets

Adding Shaker Trim To Flat Panel Cabinets Hometalk

Easy And Inexpensive Cabinet Updates Adding Trim To Cabinets Drawers The Rozy Home

How To Get A Custom Cabinet Look Using Trim Sincerely Marie Designs

Kitchen Diy Shaker Style Cabinets Cherished Bliss
Related Posts