How to Apply Contact Paper to Kitchen Cabinets Like a Pro
Contact paper is a versatile and budget-friendly way to transform the look of your kitchen cabinets without the hassle and expense of a full-scale renovation. Applying contact paper to kitchen cabinets can be a DIY project with a little preparation and the right techniques.
Here's a step-by-step guide to help you get started:
1. Prepare the Cabinets
Thoroughly clean and dry the cabinet surfaces to remove dirt and grease. Use a degreasing cleaner or rubbing alcohol to ensure proper adhesion. Remove all cabinet hardware, such as knobs and handles.
2. Measure and Cut the Contact Paper
Measure the cabinet doors and drawer fronts. Cut the contact paper to the desired size, leaving a couple of inches of excess around the edges. Use a sharp utility knife and a straight edge for precision cuts.
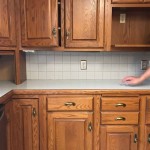
3. Apply the Contact Paper
Starting from one corner, peel back a small section of the contact paper backing and align it with the edge of the cabinet. Smooth out the paper using a squeegee or a clean cloth, removing any air bubbles as you go. Work gradually, peeling back the backing and smoothing as you proceed.
4. Trim the Excess
Once the contact paper is applied, use a utility knife and a straight edge to trim the excess around the edges. Cut the paper as close to the edge as possible for a clean finish.
5. Reinstall the Hardware
Place the cabinet hardware back onto the doors and drawer fronts. If there are any holes in the contact paper where the hardware mounts, use a small utility knife to make clean cuts for the screws or bolts.
Tips for Success
- Use a squeegee or a clean cloth to apply even pressure and remove air bubbles.
- Overlap the contact paper slightly around edges and corners for a more durable finish.
- Work in a well-ventilated area as contact paper fumes can be strong.
- Use a hair dryer on a low heat setting to activate the adhesive if you encounter any lifting.
- Clean the contact paper regularly with a mild detergent and water to maintain its appearance.
By following these steps, you can successfully apply contact paper to your kitchen cabinets and enjoy a transformed look without breaking the bank. Remember to take your time, work carefully, and enjoy the satisfaction of a DIY project well done.

Diy Kitchen Cabinet Makeover With Only Contact Paper Al Friendly

Diy Countertop Cabinet With Only Contact Paper

How To Update Cabinets Using Contact Paper Al Kitchen Makeover Cover

How To Update Cabinets With Contact Paper The Handyman S Daughter

Diy Contact Paper Kitchen Counters The Interior Diyer

Contact Paper In The Kitchen 5 Places

Transform Your Kitchen With Contact Paper For Countertops Cabana State Of Mind

How To Update Cabinets With Contact Paper The Handyman S Daughter

Kitchen Cabinet Contact Paper Update Kelly Leigh Creates

Temporary Contact Paper Kitchen Cabinet Decorations Pink Stripey Socks
Related Posts