Essential Aspects of Attaching Kitchen Cabinet Handles
Installing kitchen cabinet handles is a crucial step in completing the overall look and functionality of your kitchen. While it may seem like a simple task, there are several essential aspects to consider to ensure a professional-looking and durable installation.
1. Gather the Necessary Tools and Materials
Before starting, ensure you have the necessary tools and materials, including:
- Kitchen cabinet handles
- Screwdriver or drill
- Screws
- Drill bit (if necessary)
- Measuring tape
- Level
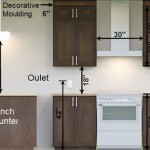
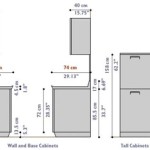
2. Determine the Handle Placement
The placement of your handles plays a significant role in the aesthetics and functionality of your cabinets. Here are some general guidelines:
- For cabinet doors, position the handles horizontally at the center or slightly above the center.
- For drawers, place the handles horizontally, centered on the drawer front.
- Maintain consistent spacing between handles on adjacent cabinets.
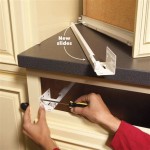
3. Mark the Screw Holes
Use a measuring tape and level to mark the screw holes accurately. Measure the distance between the screw holes on the handle and transfer these measurements to the cabinet surface. Mark the center of each screw hole with a pencil.
4. Drill Pilot Holes (if necessary)
For some cabinets, especially those made of hard materials, drilling pilot holes can help prevent the wood from splitting. Use a drill bit slightly smaller than the screw diameter and drill a shallow hole at each screw mark.
5. Attach the Handles
Align the handle with the marked screw holes and insert the screws. Use a screwdriver or drill to tighten the screws securely, ensuring they are flush with the handle. Avoid overtightening, as this can damage the handle or cabinet.
6. Check the Alignment
Once all the handles are installed, use a level to check their alignment. Adjust the screws if necessary to ensure that the handles are level and parallel.
7. Tips for a Professional-Looking Result
Here are some additional tips to achieve a polished and professional-looking installation:
- Use screws that match the color and finish of your handles.
- Clean up any sawdust or debris after drilling.
- Avoid placing handles too high on doors, as this can make them difficult to open.
- If you encounter any problems, don't hesitate to consult a professional.
Conclusion
Attaching kitchen cabinet handles is a straightforward task that can greatly enhance the appearance and functionality of your kitchen. By following these essential aspects, you can ensure a solid and professional-looking installation that will last for years to come.

How To Install Cabinet Handles Ultimate Stress Free Tips

How To Install Cabinet Handles Ultimate Stress Free Tips

How To Install Hardware Like A Pro Kitchen Renovation House Of Hepworths

How To Install Cabinet Handles Ultimate Stress Free Tips

How To Install Kitchen Cabinet Handles Detailed Guide 2024

Mistakes To Avoid When You Install Kitchen Cabinet Pulls Free Template

How To Install Cabinet Handles Ultimate Stress Free Tips

Fix It If Cabinet Handles Installed Wrong Green With Decor

Learn How To Place Kitchen Cabinet Knobs And Pulls Cliqstudios

How To Install Cabinet Door Handles Pulls Decorative Hardware Installation
Related Posts