How To Attach Kitchen Wall Units
Attaching kitchen wall units is a crucial step in any kitchen renovation or installation project. Proper installation ensures the safety and longevity of the units, preventing potential hazards and costly repairs. This article provides a comprehensive guide to the process, covering preparation, installation techniques, and essential safety considerations.
Before embarking on the installation, a thorough understanding of the process and the required tools is essential. Proceeding without proper knowledge can lead to uneven mounting, structural damage, or even the collapse of the units. This guide aims to equip individuals with the necessary information to successfully install kitchen wall units with confidence and precision.
Planning and Preparation
The foundation of a successful wall unit installation lies in meticulous planning and preparation. This phase involves several critical steps that ensure accurate placement, structural integrity, and a smooth installation process.
1. Accurate Measurement and Layout: The first step is to accurately measure the available wall space and determine the optimal placement of the wall units. Consider the overall kitchen design, the location of existing appliances, and the desired height of the units. A laser level is invaluable for establishing a perfectly horizontal line across the wall, serving as the primary guide for unit placement. This line is typically established based on the height of the base cabinets, ensuring a uniform and aesthetically pleasing alignment between the upper and lower units.
Use a stud finder to locate the wall studs behind the drywall. These studs are the primary structural supports and will be used to securely anchor the wall units. Mark the stud locations clearly on the wall using a pencil or marker. If studs are not aligned with the desired unit placement, additional bracing or support structures may be necessary. Note the distance between each unit and the total width of all units combined. This information will be crucial when transferring measurements to the wall.
2. Assess Wall Condition: Carefully inspect the wall for any imperfections, such as unevenness, cracks, or moisture damage. These issues must be addressed before proceeding with the installation. An uneven wall surface can compromise the stability of the units, resulting in uneven gaps and potential structural problems. Repair any cracks or holes with patching compound and ensure the wall is dry and free of moisture. If the wall is severely uneven, consider using shims to create a level surface for mounting the units. Moisture problems must be addressed to prevent mold growth and structural degradation.
3. Gather Necessary Tools and Materials: Having the right tools and materials readily available is crucial for a streamlined installation process. Essential tools include a stud finder, laser level (or spirit level), drill with various drill bits, screwdriver (both manual and electric), measuring tape, pencil, safety glasses, and a ladder or step stool. Ensure you have a selection of screws specifically designed for attaching cabinets to wall studs. Consider using cabinet installation screws, which are designed with a large head and coarse threads for maximum holding power. Also, gather any necessary shims, wood filler, and touch-up paint to address minor imperfections.
4. Unpack and Inspect Units: Carefully unpack each wall unit and inspect it for any damage that may have occurred during shipping. Check for scratches, dents, or other imperfections. Ensure that all necessary hardware, such as shelves, hinges, and handles, is included. Familiarize yourself with the unit's assembly instructions and identify any pre-drilled holes or mounting points. If any damage is found, contact the supplier immediately to arrange for a replacement or repair. It is much easier to address these issues before the installation process begins.
Step-by-Step Installation Process
With the planning and preparation complete, the next step is to proceed with the actual installation of the kitchen wall units. This phase requires careful attention to detail and a systematic approach to ensure accurate and secure mounting.
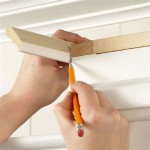
1. Install a Ledger Board: A ledger board is a temporary support structure that helps to hold the wall units in place during installation. It is a horizontal piece of lumber that is attached to the wall at the desired height of the bottom of the units. The ledger board provides crucial support, allowing you to work hands-free and ensuring that the units are level and properly aligned. Use the laser level to mark the desired height of the bottom of the units on the wall. Attach the ledger board to the wall studs using screws, ensuring it is securely fastened. The ledger board should be long enough to support the entire length of the wall units being installed.
2. Position and Secure the First Unit: Carefully lift the first wall unit into position, resting it on the ledger board. Ensure the unit is flush against the wall and aligned with the marked stud locations. Use a level to verify that the unit is perfectly vertical and horizontal. Once satisfied with the position, pre-drill pilot holes through the back of the unit and into the wall studs. Use cabinet installation screws to securely attach the unit to the studs. Ensure the screws are long enough to penetrate the studs deeply, providing a strong and stable connection.
3. Install Subsequent Units (using Clamps): After the first unit is securely fastened, proceed with installing the remaining units. Lift the next unit into position, resting it on the ledger board and butting it against the adjacent unit. Use clamps to hold the two units tightly together, ensuring a seamless connection. Verify that the units are level and aligned with each other. Pre-drill pilot holes through the sides of the units where they meet and insert screws to join them together. This process, known as "ganging" the cabinets, provides additional stability and creates a unified appearance. Then pre-drill pilot holes through the back of the cabinet into the wall studs and secure with screws as before.
4. Account for Gaps and Overhangs: It is common encounter gaps or overhangs between the units and the wall or ceiling. These imperfections can be addressed using shims and fillers. Shims are thin pieces of wood or plastic that can be inserted between the unit and the wall to fill gaps and create a level surface. Wood filler can be used to fill any small gaps or imperfections in the wood. Apply the filler evenly and allow it to dry completely before sanding it smooth. Touch-up paint can be used to conceal any filled areas and blend them seamlessly with the surrounding surface.
5. Final Inspection and Adjustments: After all the units are installed, conduct a thorough inspection to ensure that they are level, aligned, and securely fastened. Check for any gaps, loose screws, or other imperfections. Make any necessary adjustments to correct these issues. Remove the ledger board. Test the doors and drawers to ensure they open and close smoothly. Adjust the hinges or drawer slides if necessary. Finally, clean the units and remove any debris or dust. A properly installed set of kitchen wall units will not only enhance the aesthetic appeal of the kitchen but also provide years of reliable service.
Essential Safety Considerations
Safety should always be the top priority when undertaking any home improvement project. Installing kitchen wall units involves working with power tools, heavy objects, and potentially hazardous materials. Adhering to essential safety guidelines is crucial for preventing accidents and ensuring a safe working environment.
1. Wear Appropriate Personal Protective Equipment: Always wear safety glasses to protect your eyes from dust, debris, and flying particles. Wear work gloves to protect your hands from cuts and abrasions. Consider wearing a dust mask to prevent inhalation of dust and fumes. Ear protection is also recommended when using power tools for extended periods.
2. Use Ladders and Scaffolding Safely: When working at elevated heights, use a sturdy ladder or scaffold that is properly positioned and stabilized. Ensure the ladder is placed on a level surface and that all locking mechanisms are engaged. Avoid overreaching or leaning while on the ladder. Have someone spot you while working at heights to provide additional support and assistance.
3. Handle Power Tools with Care: Before using any power tools, carefully read and understand the manufacturer's instructions. Ensure the tools are in good working condition and that all safety guards are in place. Use the correct drill bits and screwdriver bits for the task. Avoid using damaged or malfunctioning tools. Disconnect power tools from the power outlet when not in use. Be mindful of electrical hazards and avoid working in wet or damp environments.
4. Secure Heavy Units Properly: When lifting heavy wall units, use proper lifting techniques to avoid back injuries. Bend your knees and keep your back straight. Avoid twisting your body while lifting. If possible, enlist the help of another person to lift and position the units. Ensure the units are securely fastened to the wall studs before releasing them. Use clamps or temporary supports to hold the units in place while you are securing them. Avoid placing excessive weight on the units until they are fully installed.
5. Be Aware of Electrical and Plumbing Lines: Before drilling into walls, be aware of the location of any electrical wiring or plumbing pipes. Use a stud finder with electrical detection capabilities to locate hidden wiring. If you are unsure of the location of electrical or plumbing lines, consult with a qualified electrician or plumber. Avoid drilling into walls where there is a risk of damaging these lines. If you accidentally damage an electrical wire or plumbing pipe, immediately turn off the power or water supply and contact a qualified professional to make the repairs.
By following these safety guidelines, individuals can minimize the risk of accidents and injuries while installing kitchen wall units and other home improvement projects.

Wall Unit Fitting Adjustments Diy Kitchens Advice

How To Install Kitchen Cabinets The Wall And Floor With Ease

How To Install Kitchen Cabinets The Wall And Floor With Ease

Installing Kitchen Cabinets Momplex Vanilla Ana White

How To Install Kitchen Cabinets Diy Family Handyman

How To Install Kitchen Cabinets Interiors

Here S How Install New Upper Kitchen Cabinets

Wall Unit Fitting Adjustments Diy Kitchens Advice

How To Install Cabinets Like A Pro Installing Kitchen Wall

How To Install Kitchen Wall Cabinets Lowe S
Related Posts