How To Build A Corner Kitchen Base Cabinet
Corner kitchen cabinets can be a great way to maximize space and create a more efficient workflow in your kitchen. They can also be a bit tricky to build, but with the right instructions, it's a project that can be completed in a weekend.
In this article, we'll walk you through the steps on how to build a corner kitchen base cabinet. We'll cover everything from cutting the pieces to assembling the cabinet and installing it in your kitchen.
Materials You'll Need
To build a corner kitchen base cabinet, you'll need the following materials:
- 3/4-inch plywood for the cabinet sides, back, and shelves
- 1/2-inch plywood for the cabinet bottom
- 1x4 pine boards for the cabinet frame
- 1x2 pine boards for the cabinet door frames
- 1/4-inch plywood for the cabinet door panels
- Wood screws
- Wood glue
- Clamps
- Measuring tape
- Circular saw
- Miter saw
- Drill
- Countersink bit
- Sandpaper
Step 1: Cut the Pieces
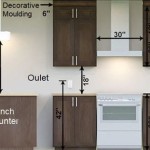
The first step is to cut the pieces for the cabinet. The following are the dimensions for the pieces:
- Sides (2): 30 inches high x 12 inches wide
- Back: 30 inches high x 24 inches wide
- Bottom: 24 inches wide x 24 inches deep
- Shelves (2): 24 inches wide x 12 inches deep
- Frame: 1x4 pine boards cut to length (see diagram below)
- Door frames: 1x2 pine boards cut to length (see diagram below)
- Door panels: 1/4-inch plywood cut to size (see diagram below)
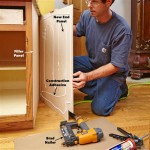
Step 2: Assemble the Cabinet Frame
Once the pieces are cut, it's time to assemble the cabinet frame. The following are the steps on how to assemble the cabinet frame:
- Apply wood glue to the edges of the cabinet sides and back.
- Clamp the cabinet sides and back together.
- Drill pilot holes and drive screws through the sides and back to secure them together.
- Attach the cabinet bottom to the frame using wood glue and screws.
- Attach the cabinet shelves to the frame using wood glue and screws.
- Attach the cabinet frame to the wall using screws.
Step 3: Install the Cabinet Doors
Once the cabinet frame is assembled, it's time to install the cabinet doors. The following are the steps on how to install the cabinet doors:
- Attach the door frames to the cabinet using wood glue and screws.
- Insert the door panels into the door frames.
- Attach the door panels to the door frames using wood glue and screws.
- Install the cabinet doors onto the cabinet frame using hinges.
Step 4: Finish the Cabinet
Once the cabinet is assembled, it's time to finish it. The following are the steps on how to finish the cabinet:
- Sand the cabinet to remove any rough edges.
- Apply a coat of primer to the cabinet.
- Sand the cabinet again.
- Apply a coat of paint or stain to the cabinet.
- Allow the cabinet to dry completely.
Congratulations!
You have now successfully built a corner kitchen base cabinet. Enjoy your new cabinet and the increased storage space it provides.

36 Corner Base Easy Reach Kitchen Cabinet Basic Model Ana White

36 Corner Base Easy Reach Kitchen Cabinet Basic Model Ana White

36 Corner Base Easy Reach Kitchen Cabinet Basic Model Plans New Cabinets

36 Corner Base Pie Cut Kitchen Cabinet Momplex White Ana

Diy Corner Cabinet With No Wasted Space Sawdust Girl

How To Build A Corner Cabinet

Blind Corner Cabinets Step By Guide On How To Install

An Easy Diy Plan For A Kitchen Storage Cabinet

Common Corner Cabinet Types And Ideas Superior Cabinets

Convert A Base Cabinet To Blind Corner Diy Coffee Bar Make It With Kate
Related Posts