How To Build A Home Bar Using Kitchen Cabinets
Creating a home bar can be a rewarding project, providing a designated space for relaxation, entertainment, and showcasing a collection of beverages and barware. Repurposing kitchen cabinets offers a cost-effective and practical solution, as they are readily available, structurally sound, and often come in a variety of styles and finishes. This article will outline the process of building a home bar using kitchen cabinets, covering planning, preparation, construction, and finishing touches to achieve a functional and aesthetically pleasing result.
I. Planning and Design Considerations
The initial phase involves meticulous planning to ensure the home bar meets specific needs and fits seamlessly within the designated space. This stage sets the foundation for a successful project.
Space Assessment: Begin by carefully evaluating the available space. Consider the dimensions, shape, and existing architectural features of the room. Accurate measurements are crucial for determining the size and configuration of the bar. Note the location of electrical outlets and plumbing, as these will influence the placement of appliances and the need for professional assistance. Consider the flow of traffic within the room and ensure the bar does not obstruct pathways or impede movement.
Cabinet Selection: Source kitchen cabinets that are suitable for repurposing. Options include salvaged cabinets from home renovations, discounted models from home improvement stores, or even secondhand cabinets purchased online. When selecting cabinets, prioritize structural integrity and consider the aesthetic appeal. A mix of base cabinets, wall cabinets, and potentially a pantry cabinet can provide ample storage space for bottles, glassware, and bar accessories. Ensure the cabinet styles and finishes complement the overall design of the room. Inspect all cabinets for damage, such as water stains, warping, or loose hinges. Minor repairs can often be made, but severely damaged cabinets should be avoided.
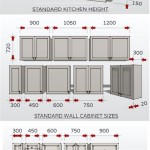
Layout and Configuration: Develop a detailed layout of the bar, taking into account the placement of cabinets, countertops, and appliances. Sketch out several different configurations on paper or use a digital design tool to visualize the final product. Consider the desired functionality of the bar. Will it include a sink, a refrigerator, or specialized storage for wine glasses? The layout should optimize workflow and accessibility. For example, frequently used items should be within easy reach. The height of the bar should also be considered. Standard bar height is typically 42 inches, but this can be adjusted to suit individual preferences. If incorporating bar stools, ensure there is adequate legroom beneath the countertop.
Style and Aesthetics: Determine the overall style and aesthetic of the home bar. This will guide the selection of materials, finishes, and accessories. Options range from classic and traditional to modern and contemporary. Consider the existing décor of the room and choose a style that complements it. Wood finishes, paint colors, hardware, and lighting all contribute to the overall aesthetic. Gather inspiration from magazines, websites, and other sources to refine the design concept.
II. Preparation and Material Acquisition
After finalizing the design, the next step involves preparing the space and acquiring the necessary materials and tools.
Workspace Preparation: Clear the workspace of any obstructions and protect the surrounding areas with drop cloths or plastic sheeting. Ensure adequate ventilation, especially if painting or staining. Gather all the necessary tools, including a drill, screwdriver, saw, level, measuring tape, and safety glasses. A power sander can be helpful for refinishing cabinets. Having all the tools readily available will streamline the construction process.
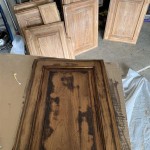
Cabinet Modification and Refinishing: Depending on the condition of the cabinets, some modification and refinishing may be necessary. Remove any existing hardware, such as knobs and pulls. Clean the cabinets thoroughly with a degreaser to remove dirt and grime. Sand the surfaces to create a smooth base for paint or stain. Repair any minor damage, such as dents or scratches, with wood filler. Apply primer to the cabinets to ensure proper adhesion of the finish coat. Choose a paint color or stain that complements the overall design. Apply multiple thin coats, allowing each coat to dry completely before applying the next. After the final coat has dried, apply a clear sealant to protect the finish.
Countertop Selection and Fabrication: The countertop is a key element of the home bar, providing a functional surface for preparing drinks and serving guests. Options include granite, quartz, butcher block, and laminate. Granite and quartz are durable and aesthetically pleasing but can be expensive. Butcher block offers a warm and inviting look but requires regular maintenance. Laminate is a cost-effective option that is available in a wide range of colors and patterns. Measure the dimensions of the countertop carefully and order the material according to the specifications. If fabricating the countertop yourself, use a circular saw or table saw to cut the material to size. Ensure the edges are smooth and even. Apply edge banding to exposed edges to create a finished look.
Plumbing and Electrical Considerations: If the bar will include a sink or refrigerator, consult with a qualified plumber and electrician to ensure the necessary connections are properly installed. Plumbing will be required for water supply and drainage. Electrical outlets will be needed for appliances and lighting. It is important to adhere to all local building codes and regulations. Improper wiring or plumbing can be hazardous and should only be performed by licensed professionals.
III. Construction and Installation
With the space prepared and the materials acquired, the construction phase can begin. This involves assembling the cabinets, installing the countertop, and adding any necessary plumbing and electrical connections.
Cabinet Assembly and Placement: Assemble the kitchen cabinets according to the manufacturer's instructions. Ensure all screws and hardware are tightened securely. Position the cabinets in the designated locations, following the layout plan. Use a level to ensure the cabinets are plumb and square. Shim the cabinets if necessary to compensate for uneven floors. Secure the cabinets to the wall studs using screws. This will provide stability and prevent the bar from tipping over. If the bar includes multiple sections, connect the cabinets to each other using screws or bolts.
Countertop Installation: Apply construction adhesive to the top of the cabinets. Carefully position the countertop onto the cabinets, ensuring it is aligned properly. Use clamps to hold the countertop in place while the adhesive dries. If the countertop is made of multiple pieces, join them together using epoxy or other suitable adhesive. Smooth out any excess adhesive with a putty knife. After the adhesive has dried, seal the edges of the countertop with caulk to prevent water damage.
Plumbing and Electrical Connections: Connect the water supply lines and drainpipe to the sink, following the plumber's instructions. Install the faucet and any other plumbing fixtures. Connect the electrical wiring to the appliances and lighting fixtures, following the electrician's instructions. Install electrical outlets as needed. Test all plumbing and electrical connections to ensure they are functioning properly. Check for leaks and shorts. If any problems are detected, consult with a qualified professional.
IV. Finishing Touches and Customization
The final stage involves adding finishing touches and customizing the bar to reflect personal style and preferences.
Hardware Installation: Install cabinet knobs, pulls, and other hardware to enhance the aesthetic appeal of the bar. Choose hardware that complements the overall design. Options include stainless steel, brass, chrome, and wood. Ensure the hardware is securely attached to the cabinets. Consider adding decorative trim or molding to the cabinets for a more polished look.
Lighting: Install lighting fixtures to illuminate the bar area. Options include recessed lighting, pendant lights, and under-cabinet lighting. Recessed lighting provides general illumination. Pendant lights add a decorative touch and can be used to highlight specific areas. Under-cabinet lighting provides task lighting for preparing drinks. Consider installing dimmer switches to adjust the lighting levels. Proper lighting can enhance the ambiance of the bar and create a more inviting atmosphere.
Storage Solutions: Maximize storage space by adding shelves, racks, and organizers to the cabinets. Install a wine rack to store bottles horizontally. Add shelves for glassware and bar accessories. Use organizers to keep the cabinets tidy and organized. Consider installing a pull-out trash can for easy disposal of waste. Proper storage solutions can help keep the bar clutter-free and functional.
Accessories and Décor: Add accessories and décor to personalize the bar. Display bottles of liquor and wine. Arrange glassware and bar tools. Add artwork, plants, or other decorative items. Consider adding a dartboard, a television, or a sound system to enhance the entertainment value of the bar. Choose accessories that reflect personal style and preferences. The goal is to create a space that is both functional and aesthetically pleasing.
By following these steps, it is possible to construct a professional-looking and highly functional home bar using repurposed kitchen cabinets. The key is careful planning, meticulous execution, and attention to detail. The result will be a customized space that provides years of enjoyment.

How To Create A Home Bar Bertch Cabinet Manufacturing

How To Build A Diy Dry Bar House On Longwood Lane

Build A Home Bar With Semi Custom Cabinets Wf Cabinetry

Raising The Bar Diy Home Basement Designs Building A Kitchen

How To Create A Home Bar Bertch Cabinet Manufacturing

Diy Home Bar Ideas For Every Space

Diy Built In Bar Plans And Measurements Part 2

Creative Built In Bars And Bar Carts For Stylish Home Entertaining

How To Build A Home Bar Out Of Kitchen Cabinets Diy Dry

Diy Built In Cabinet Coffee Bar This Hart And Home
Related Posts