How to Build a Kitchen Carcass
A kitchen carcass forms the foundation of any kitchen cabinetry. It provides the structural support for countertops, shelves, and appliances. Building a kitchen carcass requires precision and attention to detail. This article will guide you through the process, outlining the materials, tools, and steps required to construct a robust and durable carcass.
Materials Required:
The primary material for kitchen carcasses is typically melamine-faced chipboard (MFC), chosen for its affordability and durability. The thickness commonly used is 18mm. Other suitable materials include plywood, especially for areas exposed to moisture, such as under the sink. Additionally, you will need:
- Wood glue specifically designed for use with chipboard or plywood.
- Screws. Pre-drill pilot holes to prevent the material from splitting.
- Edging tape to cover the exposed raw edges of the MFC, providing a finished look and protecting the core from moisture.
- Cabinet hardware like adjustable shelf supports, door hinges, and drawer slides (if applicable).
Tools Required:
Having the right tools ensures efficient and accurate construction. The essential tools include:
- Measuring tape: Accurate measurements are crucial for a well-fitting carcass.
- Pencil: For marking cut lines and pilot hole positions.
- Set square or combination square: Ensuring right angles and accurate cuts.
- Circular saw or panel saw for cutting the MFC sheets to size. A track saw provides the most accurate cuts.
- Drill with appropriate drill bits for pilot holes and screw driving.
- Screwdriver or drill with a screwdriver bit.
- Iron for applying edging tape.
- Clamps to hold the pieces together while the glue dries.
- Safety glasses and dust mask for personal protection.
Step-by-Step Construction:
1. Planning and Measurement:
Begin by carefully planning the dimensions of the carcass. Consider the desired height, width, and depth, accounting for the thickness of the MFC. Create a detailed sketch with accurate measurements for each component: the base, top, sides, and any internal shelves or dividers.
2. Cutting the MFC:
Following the measurements from the plan, cut the MFC sheets to size using a circular saw, panel saw, or track saw. Ensure clean, straight cuts to avoid gaps and instability in the finished carcass.
3. Applying Edging Tape:
Apply edging tape to all exposed edges of the cut MFC pieces. Use a household iron set to a medium heat setting to melt the adhesive on the back of the edging tape. Firmly press the tape onto the edge and trim any excess with a sharp knife or trimming tool.
4. Assembling the Carcass:
Start by assembling the base and sides. Apply wood glue to the edges that will be joined. Then, using clamps to hold the pieces in place, drill pilot holes and screw the pieces together. Ensure that all corners are square.
5. Attaching the Top:
Once the base and sides are securely joined, attach the top piece using the same method of glue, pilot holes, and screws. Ensure the top aligns perfectly with the sides and back.
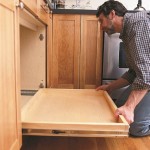
6. Adding Internal Shelves and Dividers (if applicable):
If the design includes internal shelves or dividers, measure and cut the MFC to the required dimensions. Install adjustable shelf supports along the inside walls of the carcass. Then, place the shelves on the supports.
7. Installing Back Panel (if applicable):
While often omitted in frameless cabinetry, some designs incorporate a back panel. This panel can be thinner MFC or hardboard. Cut it to size and attach it to the back of the carcass using glue and nails or screws.
8. Finishing Touches:
Inspect the assembled carcass for any imperfections or gaps. Fill any small gaps with wood filler and allow it to dry before sanding smooth. Once the filler is dry, the carcass is ready for installation and the addition of doors, drawers, and hardware.
Important Considerations:
Accuracy is Paramount: Precise measurements and cuts are essential throughout the construction process. Even small errors can lead to instability and difficulties during installation.
Pre-Drilling: Always pre-drill pilot holes before screwing into MFC to prevent the material from splitting, especially near the edges.
Clamping: Using clamps to hold the pieces together while the glue dries ensures strong, tight joints.
Safety First: Always wear appropriate safety gear, including safety glasses and a dust mask, when working with power tools and wood materials.

Kitchen Base Cabinets 101 Ana White

How To Build Cabinets The Complete Guide Houseful Of Handmade

Three Ways To Build Diy Kitchen Cabinets Sawdust Girl

Diy Cabinet Making Your Guide On How To Build A

22 Easy Diy Kitchen Cabinets With Free Step By Plans Building Makeover

Diy Kitchen Cabinets Made From Only Plywood

21 Diy Kitchen Cabinets Ideas Plans That Are Easy To Build Building Cabinet New

How To Build Base Cabinets The Complete Guide Houseful Of Handmade

How To Build Outdoor Kitchen Cabinets

Kitchen Cabinets The Engineer S Way Finewoodworking
Related Posts