How to Build a Kitchen Island Using Base Cabinets: A Step-by-Step Guide
Building a kitchen island with base cabinets is an excellent way to add functionality and style to your kitchen space. It can provide extra storage, counter space, and even seating, depending on your design. While undertaking such a project may seem daunting, it is entirely possible to achieve professional-looking results with careful planning and execution.
Materials You'll Need:
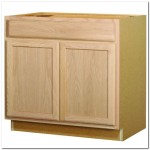
- Base cabinets
- Countertop
- Toe kick molding
- Crown molding (optional)
- Hardware (knobs, pulls, hinges)
- Wood screws
- Wood glue
- Level
- Measuring tape
- Drill
- Circular saw
- Sandpaper or sander
Step-by-Step Instructions:
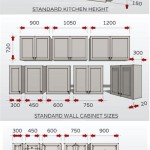
1. Plan and Measure:
Plan the layout of your kitchen island, including the dimensions, shape, and desired features. Measure the space where the island will be placed and ensure it will allow for sufficient walkway clearance.
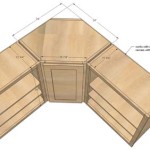
2. Assemble the Cabinets:
Follow the manufacturer's instructions to assemble the base cabinets. Secure the cabinets together using wood screws and glue. Use a level to ensure the cabinets are level and square.
3. Attach the Toe Kick Molding:
Measure and cut the toe kick molding to fit around the base of the island. Secure it to the cabinets using wood screws. This molding will hide the space between the floor and the cabinets.
4. Install the Countertop:
Place the countertop on top of the cabinets and ensure it is level. Secure it to the cabinets using wood screws or countertop clips. Apply a bead of silicone caulk around the edges to seal any gaps.
5. Add Crown Molding (Optional):
If desired, you can add crown molding to the top edge of the island for a decorative touch. Measure and cut the molding to fit and secure it using wood glue and brad nails.
6. Install Hardware:
Install the knobs or pulls to the cabinet doors and drawers. Use a template or carefully measure the placement of each piece for a uniform look.
7. Finishing Touches:
Sand any rough edges and apply a clear finish or paint to protect the island and enhance its appearance. Allow the finish to dry completely before using the island.
Tips for Success:
- Use high-quality materials to ensure durability and a professional finish.
- Take your time and measure carefully throughout the process.
- Get help from a friend or family member if needed, especially when lifting or positioning heavy components.
- Follow all safety precautions, such as wearing safety glasses and gloves.
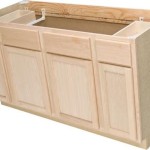
- Don't be afraid to customize your island with unique features, such as a built-in sink or an appliance garage.
Building a kitchen island with base cabinets can be a rewarding project. By following these steps and tips, you can create a functional and stylish addition to your kitchen space that will enhance its functionality and aesthetics for years to come.

Turning Base Cabinets Into A Kitchen Island Just Call Me Homegirl

How To Build A Diy Kitchen Island House By The Bay Design

Turning Base Cabinets Into A Kitchen Island Just Call Me Homegirl

Turning Base Cabinets Into A Kitchen Island Just Call Me Homegirl

How To Build A Diy Kitchen Island House By The Bay Design

Turning Base Cabinets Into A Kitchen Island Just Call Me Homegirl

How To Build A Diy Kitchen Island Budget Dumpster

Creating A Kitchen Island Using Base Cabinets Flynn Haus

How To Build A Diy Kitchen Island Lowe S

A Diy Kitchen Island Make It Yourself And Save Big Domestic
Related Posts