How to Build a Kitchen Island with Seating and Storage
A kitchen island is a versatile addition to any kitchen, offering extra counter space, storage, and seating. Building a custom kitchen island allows you to tailor it to your specific needs and preferences. This comprehensive guide will walk you through the process of constructing a kitchen island with seating and storage, ensuring you have a functional and stylish centerpiece for your culinary space.
Planning and Design
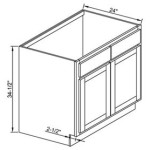
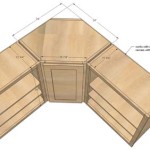
Before diving into construction, meticulous planning is crucial. First, consider the available space in your kitchen. Measure the area where you intend to place the island, ensuring sufficient clearance for movement and opening doors and drawers. Next, determine the desired dimensions of your island, taking into account the seating capacity and storage requirements. Remember to factor in the thickness of the countertop and any overhang for seating.
Draft a detailed plan, including the layout of drawers, cabinets, and shelves. Decide on the desired materials for the island's frame, countertop, and any decorative elements. Consider using a computer-aided design (CAD) program or a simple sketch to visualize the final product. Research different hardware options, including hinges, drawer slides, and cabinet pulls, to ensure they complement the overall design. Lastly, determine the style and materials for the seating, whether it will be bar stools or counter stools.
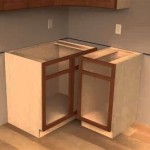
Constructing the Island Frame
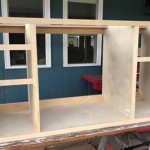
Begin by assembling the frame of the island using sturdy lumber, such as plywood or dimensional lumber. Cut the pieces to size according to your plan and secure them using wood glue and screws. The frame should be robust enough to support the weight of the countertop, storage, and occupants.
Depending on the desired height of your island, consider the use of a base cabinet frame or constructing a custom frame from scratch. If opting for a base cabinet frame, ensure it is properly fitted and securely attached to the island frame. For a custom-built frame, use corner braces or other reinforcement methods to ensure structural integrity.
Adding Storage and Seating
Once the frame is assembled, install the desired storage components. This may include drawers, cabinets, shelves, or a combination thereof. Measure and cut the plywood or other materials for the storage units, ensuring they fit perfectly within the island frame. Attach the storage units using screws, ensuring they are securely fastened and level.
For seating, determine the desired overhang of the countertop and attach it to the island frame. Cut and install the overhang using a router or hand tools, creating a smooth and comfortable surface for seating. Install the desired seating, ensuring it is the appropriate height for the overhang. Consider using bar stools or counter stools, depending on your preference and the height of the countertop.
Finishing and Installation
Once the storage and seating are installed, carefully measure and cut the countertop material to fit the island frame. Securely attach the countertop using construction adhesive and screws, ensuring it is level and flush. Apply a finish to the countertop, such as polyurethane or varnish, to protect it from spills and scratches.
Finish the island by painting or staining the frame and storage units, according to your design preference. Apply a sealant or clear coat to protect the finish and enhance its durability. Finally, install any decorative elements, such as moldings, trim, or decorative hardware, to complete the island's aesthetic.
After the finishing touches are complete, carefully move the island to its designated location in the kitchen. Ensure it fits snugly and is level before fully securing it to the floor using adjustable feet or brackets.
Tips for Success
While the construction process may seem daunting, it can be a rewarding experience. Here are some tips to ensure success:
Plan Carefully:
Take the time to carefully plan and measure every aspect of the island, from the dimensions to the storage configuration, before starting construction. This will minimize mistakes and ensure a seamless build.
Use Quality Materials:
Invest in high-quality materials for the frame, countertop, and storage components. This will ensure the longevity and durability of your kitchen island. Choose materials that suit your design aesthetic and budget.
Safety First:
Always wear safety glasses and hearing protection when working with power tools. Use caution when handling sharp objects, and take breaks when needed to avoid fatigue.
Building a custom kitchen island with seating and storage can add significant value to your kitchen. This comprehensive guide provides the necessary steps to guide you through the construction process, allowing you to create a functional and stylish centerpiece for your culinary space. Remember to plan carefully, use quality materials, and prioritize safety throughout the process.

Incorporating Seating Into A Kitchen Island

Gathering Kitchen Island Ana White

15 Diy Kitchen Islands Unique Island Ideas And Decor

Kitchen Island With Seating And Storage A Diy Ers

Kitchen Island Ideas Christopher Scott Cabinetry

Plan Your Kitchen Island Seating To Suit Family S Needs

How To Build Diy Farmhouse Kitchen Island W Repurposed Furniture

Build A Diy Kitchen Island Basic

7 Best Kitchen Islands With Seating In 2024

40 Diy Kitchen Island Ideas That Can Transform Your Home
Related Posts