How To Build A Kitchen Island With Wheels
A kitchen island with wheels is a great way to add extra storage and work space to your kitchen. It can also be a great place to entertain guests or eat breakfast. However, don't be concerned if you're unsure about how to start when building a kitchen island with wheels.
The following step-by-step instructions will guide you through the process of building a kitchen island with wheels. You'll discover how to make one that's the ideal size for your kitchen and that perfectly complements your decor.
Step 1: Gather Your Materials
Before you begin, you'll need to gather the following materials:
- 3/4-inch plywood (for the top, bottom, and sides)
- 2x4s (for the frame)
- 1-inch dowels (for the legs)
- 2-inch casters
- Wood glue
- Screws
- Nails
- Sandpaper
- Paint or stain
Once you have all of your materials, you can begin assembling your kitchen island.
Step 2: Build the Frame
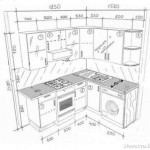
The first step is to build the frame of the kitchen island. To do this, cut the 2x4s to the following lengths:
- Two 2x4s to the length of the kitchen island
- Two 2x4s to the width of the kitchen island
- Four 2x4s to the height of the kitchen island
Next, assemble the frame by attaching the 2x4s together with wood glue and screws. Make sure that the frame is square before you proceed to the next step.
Step 3: Attach the Top and Bottom
Once the frame is assembled, you can attach the top and bottom of the kitchen island. To do this, cut the plywood to the same size as the frame. Then, attach the plywood to the frame with wood glue and screws.
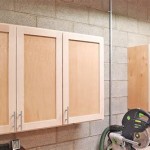
Step 4: Attach the Sides
Next, you need to attach the sides of the kitchen island. To do this, cut the plywood to the same height as the frame. Then, attach the plywood to the frame with wood glue and screws.
Step 5: Attach the Legs
The next step is to attach the legs to the kitchen island. To do this, cut the dowels to the desired length. You can make the legs as long or as short as you want.
Once you have cut the dowels, drill holes into the bottom of the kitchen island. Then, insert the dowels into the holes. Secure the dowels with wood glue and screws.
Step 6: Attach the Casters
The final step is to attach the casters to the legs of the kitchen island. To do this, simply screw the casters into the legs.
Step 7: Sand and Finish
Once the kitchen island is assembled, you can sand it and apply a finish. Sand the entire kitchen island with sandpaper until it is smooth. Then, apply a coat of paint or stain to the kitchen island.
Once the paint or stain has dried, your kitchen island with wheels is complete! Enjoy your new addition to your kitchen.
Tips
Here are a few tips for building a kitchen island with wheels:
- Make sure that the frame is square before you proceed to the next step.
- Use wood glue and screws to secure all of the components of the kitchen island.
- Sand the entire kitchen island with sandpaper until it is smooth.
- Apply a coat of paint or stain to the kitchen island to protect it and give it a finished look.

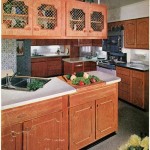
How To Build A Diy Kitchen Island On Wheels

Diy Kitchen Island Cart Deeply Southern Home

Diy Kitchen Island Cart Deeply Southern Home

How To Build A Diy Kitchen Island On Wheels

How To Build A Kitchen Island On Wheels

How To Build A Diy Kitchen Island On Wheels

Cedar Kitchen Island Plans Mobile Decor

Diy Kitchen Island Free Plans
:max_bytes(150000):strip_icc()/KISLAND51-5a81bc963037130036439389.jpg?strip=all "18 Great Diy Plans For Kitchen Islands")
18 Great Diy Plans For Kitchen Islands

Diy Kitchen Island Cart Deeply Southern Home