How To Build Kitchen Cabinets With Drawers
Kitchen cabinets with drawers are fundamental components of a functional and organized kitchen. Designing and building these cabinets from scratch can be a rewarding endeavor, allowing for customization to specific spatial and storage needs. This article details the process of constructing kitchen cabinets incorporating drawers, from initial planning to final assembly.
Planning and Material Selection
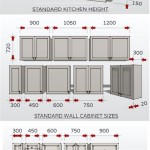
The preliminary stage involves meticulous planning and informed material selection. The first step is to accurately measure the available space in the kitchen where the cabinets will be installed. Record the height, width, and depth of the intended cabinet locations. Consider existing appliances, plumbing, and electrical outlets, ensuring adequate clearance and accessibility.
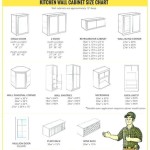
Draw detailed sketches or utilize cabinet design software to visualize the cabinet layout. This includes determining the number of cabinets, their dimensions, and the placement of drawers within each cabinet. Account for the desired number of shelves, drawer sizes, and the overall aesthetic of the kitchen.
The selection of materials significantly impacts the durability and appearance of the cabinets. Popular choices include plywood, medium-density fiberboard (MDF), and solid wood. Plywood offers strength and stability, making it suitable for cabinet boxes. MDF provides a smooth surface for painting and is less prone to warping. Solid wood offers a premium look and feel, but may require more careful handling and finishing.
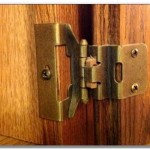
For drawer boxes, consider using plywood, solid wood, or pre-finished Baltic birch plywood. Drawer slides, which facilitate smooth drawer movement, are available in various types, including ball-bearing slides, soft-close slides, and under-mount slides. Select drawer slides based on the desired load capacity and closing mechanism. Hinges for cabinet doors should also be selected at this point, choosing between concealed or decorative options based on desired aesthetic. Finally, consider the selection of knobs and pulls to complement the kitchen design.
Construction of the Cabinet Box
The cabinet box forms the structural foundation for the entire cabinet. Building a sturdy and square cabinet box is critical for ensuring proper alignment and functionality of drawers and doors.
Begin by cutting the cabinet side panels, top panel, bottom panel, and back panel to the precise dimensions specified in the design plans. Use a table saw or circular saw with a guide rail to achieve accurate and clean cuts. Exercise caution and wear appropriate personal protective equipment (PPE), including safety glasses and hearing protection.
Assemble the cabinet box using screws, nails, and wood glue. Apply wood glue to the edges of the panels and then fasten them together using screws or nails. Clamps can be used to hold the panels securely in place while the glue dries. Ensure that the cabinet box is square by measuring the diagonals. The measurements should be equal. If the diagonals are not equal, adjust the cabinet box until it is square and re-clamp it.
Install a back panel to provide additional stability to the cabinet box. The back panel can be made from plywood or MDF. Attach the back panel to the cabinet box using screws or nails. Ensure that the back panel is flush with the edges of the cabinet box.
For base cabinets, install a toe kick. The toe kick is a recessed area at the bottom of the cabinet that allows for comfortable standing while working at the countertop. The toe kick is typically 3 1/2 inches high and 3 inches deep. Construct the toe kick separately and then attach it to the bottom of the cabinet box using screws and wood glue.
Internal shelves can be added to the cabinet box to provide additional storage space. Cut the shelves to the appropriate dimensions and install them using shelf supports or by dadoing the side panels.
Building and Installing Drawers
Drawer construction involves building the drawer box, installing drawer slides, and attaching the drawer front. Precision and accuracy are essential for ensuring smooth drawer operation.
Cut the drawer box sides, front, and back to the dimensions outlined in the design plans. Common drawer construction methods include using rabbet joints, dado joints, or dovetail joints. Dovetail joints offer superior strength and durability but require more advanced woodworking skills.
Assemble the drawer box using wood glue and fasteners. Ensure that the drawer box is square and that the joints are tight. Clamps can be used to hold the drawer box together while the glue dries.
Install the drawer slides in the cabinet box and on the drawer box. Position the drawer slides according to the manufacturer's instructions. Use a level to ensure that the drawer slides are installed straight and parallel. Verify that the drawer slides are properly aligned to ensure smooth drawer operation.
Cut the drawer front to the desired size and shape. The drawer front should be slightly larger than the opening in the cabinet box. Attach the drawer front to the drawer box using screws from the inside of the drawer box. Before permanently attaching the drawer front, ensure that it fits properly and aligns with the other drawer fronts.
Install drawer pulls or knobs on the drawer fronts. Drill holes in the drawer fronts according to the manufacturer's instructions. Attach the drawer pulls or knobs using screws.
Door Construction and Installation
Cabinet doors can be constructed using various methods, including raised panel doors, flat panel doors, and shaker-style doors. The choice of door style depends on the desired aesthetic and the overall design of the kitchen.
For raised panel doors, a router is used to create a decorative profile on the inside edge of the door frame. A raised panel is then inserted into the frame. For flat panel doors, a flat panel is simply inserted into the frame.
Assemble the door frame using wood glue and fasteners. Ensure that the frame is square and that the joints are tight. Clamps can be used to hold the frame together while the glue dries.
Install the hinges on the cabinet door and on the cabinet box. Position the hinges according to the manufacturer's instructions. Use a level to ensure that the hinges are installed straight and parallel. Verify that the hinges are properly aligned to ensure smooth door operation.
Attach door pulls or knobs on the cabinet doors. Drill holes in the cabinet doors according to the manufacturer's instructions. Attach the door pulls or knobs using screws.
Finishing and Installation
The final stage involves finishing the cabinets and installing them in the kitchen. Proper finishing enhances the appearance of the cabinets and protects them from moisture and wear.
Sand all surfaces of the cabinet boxes, drawers, and doors to create a smooth finish. Start with a coarse grit sandpaper and gradually progress to a finer grit sandpaper. Remove all dust and debris from the surfaces before applying the finish.
Apply a primer to the cabinet boxes, drawers, and doors. Primer helps to seal the wood and provides a better surface for the paint or stain to adhere to. Allow the primer to dry completely before proceeding.
Apply the desired finish to the cabinet boxes, drawers, and doors. Options include paint, stain, and varnish. Follow the manufacturer's instructions for applying the finish. Apply multiple coats of finish, allowing each coat to dry completely before applying the next coat.
Install the cabinets in the kitchen, ensuring they are level and securely attached to the wall studs. Use shims to level the cabinets if necessary. Secure the cabinets to the wall studs using screws. Connect adjacent cabinet boxes together using screws.
Install the countertops on top of the base cabinets. The countertops can be made from a variety of materials, including granite, quartz, laminate, and solid surface. Ensure the countertops are properly supported and securely attached to the cabinets.
Install the backsplash behind the countertops. The backsplash protects the walls from water damage and adds a decorative element to the kitchen. The backsplash can be made from a variety of materials, including tile, glass, and stone.
Finally, install any remaining hardware, such as door pulls, knobs, and drawer slides. Adjust the drawer slides and door hinges as needed to ensure smooth operation.

How To Build A Base Cabinet With Drawers Fixthisbuildthat Building Kitchen Cabinets Installing Drawer Slides Diy

Diy Pull Out Cabinet Drawers Love Renovations

21 Diy Kitchen Cabinets Ideas Plans That Are Easy To Build Drawers

Diy Pull Out Cabinet Drawers Love Renovations

Diy Pull Out Cabinet Drawers Love Renovations

How To Build Diy Kitchen Cabinets Dowelmax

How To Easily Add Drawers Kitchen Cabinets Small Stuff Counts

15in 4 Drawer Base Cabinet Carcass Frameless Rogue Engineer

How To Build Kitchen Cabinets Start Finish

How To Build Under Cabinet Drawers Increase Kitchen Storage Diy Family Handyman
Related Posts