How to Build Kitchen Storage Cabinets: A Comprehensive Guide
Kitchen storage cabinets are essential components of any functional and organized kitchen. They provide space for storing cookware, dishes, pantry items, and other kitchen necessities, contributing to a clutter-free and efficient environment. Building custom kitchen storage cabinets allows for optimizing space utilization, tailoring designs to specific needs and preferences, and potentially saving money compared to purchasing pre-made cabinets. This article provides a comprehensive guide to building kitchen storage cabinets, covering everything from planning and design to construction and installation.
Planning and Design Considerations
Before commencing the physical construction of kitchen storage cabinets, meticulous planning and design are crucial. This phase establishes the foundation for a successful project by defining requirements, optimizing space, and ensuring aesthetic compatibility with the existing kitchen decor.
Measuring the Space:
Accurate measurements of the available space are paramount. Measure the width, height, and depth of the area where the cabinets will be installed. Account for any obstructions, such as pipes, electrical outlets, or uneven walls. Precise measurements prevent errors during construction and ensure a proper fit.Determining Cabinet Dimensions:
Based on the available space and desired storage capacity, determine the dimensions of each cabinet. Standard kitchen cabinet dimensions typically include a base cabinet depth of 24 inches, a base cabinet height of 34.5 inches (excluding the countertop), and upper cabinet depths ranging from 12 to 14 inches. However, these dimensions can be customized to suit individual needs and preferences.Choosing Cabinet Styles:
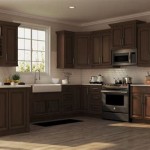
Several cabinet styles are available, each with its own aesthetic appeal and functional characteristics. Common styles include: *Base Cabinets:
These cabinets sit on the floor and typically support countertops. They often feature drawers, doors, or a combination of both. *Upper Cabinets:
These cabinets are mounted on the wall and provide storage for dishes, glasses, and other items. *Pantry Cabinets:
These tall cabinets offer ample storage for food and other pantry items. *Island Cabinets:
These cabinets are freestanding and can be used for additional storage, countertop space, or a seating area.Selecting Materials:
The choice of materials significantly impacts the durability, appearance, and cost of the cabinets. Commonly used materials include: *Plywood:
A strong and stable material that is resistant to warping and cracking. It is a versatile option for cabinet boxes and shelves. *Medium-Density Fiberboard (MDF):
A smooth and uniform material that is ideal for painting or laminating. It is less expensive than plywood but is more susceptible to moisture damage. *Solid Wood:
Offers a classic and elegant appearance. It is durable and can be stained or painted. However, it is typically more expensive than plywood or MDF. *Hardware:
hinges, drawer slides, knobs etc. These should be carefully selected to meet the demands of consistent usage.Creating a Detailed Design:
Use the gathered information to create a detailed design of the cabinets. This design should include dimensions, materials, construction methods, and hardware specifications. Consider using a CAD (Computer-Aided Design) program or online cabinet design software to create a professional-looking design. Alternatively, a simple sketch with accurate measurements can be sufficient.Construction Techniques for Cabinet Boxes
The cabinet box forms the structural foundation of the kitchen storage cabinet. Proper construction techniques are essential for creating a sturdy and durable cabinet that can withstand the rigors of daily use. The following steps outline the fundamental techniques for constructing cabinet boxes.
Cutting the Components:
Using the design specifications, cut the cabinet components to the required dimensions. Precision in cutting is paramount for ensuring a square and accurate cabinet box. A table saw or circular saw with a guide rail provides the most accurate cuts.Assembling the Carcass:
The carcass is the main portion of the frameless cabinet box. Assembly typically involves joining the sides, top, bottom, and back panels. The panels can be joined together using screws, nails, or glue. Using clamps to hold the pieces together during assembly ensures a strong and square joint. Pocket screws offer a strong and concealed method of joining the panels.Adding the Face Frame (Optional):
A face frame is a decorative frame that is attached to the front of the cabinet box. It adds structural rigidity and provides a surface for attaching doors and drawers. Face frames are typically constructed from solid wood and can be attached to the cabinet box using glue and nails or screws. If choosing frameless construction, this step is omitted.Installing Shelves:
Shelves provide storage space within the cabinet. They can be fixed or adjustable. Fixed shelves are permanently attached to the cabinet box, while adjustable shelves can be moved to different positions. Shelf support options include shelf pins, shelf clips, or dadoes (grooves cut into the cabinet sides). Choose an option that allows for the desired amount of flexibility.Reinforcing the Structure:
Depending on the size and weight-bearing capacity of the cabinet, additional reinforcement may be necessary. This can be achieved by adding corner braces, stretchers, or support rails. Reinforcements distribute the load and prevent the cabinet from sagging or warping over time. For example, a tall pantry cabinet may require vertical support members to prevent bowing.Building and Installing Drawers and Doors
Drawers and doors are essential components of kitchen storage cabinets, providing access to the interior space and enhancing the overall functionality. Constructing and installing drawers and doors requires precision and attention to detail to ensure smooth operation and aesthetically pleasing appearance.
Constructing Drawers:
Drawers typically consist of four sides, a bottom panel, and a drawer front. The sides are joined together using dovetail joints, rabbet joints, or screws. The bottom panel is typically made from plywood or MDF and is attached to the sides using glue and nails or screws. The drawer front can be attached to the drawer box using screws or special drawer front fasteners.Installing Drawer Slides:
Drawer slides allow drawers to slide smoothly in and out of the cabinet. Several types of drawer slides are available, including side-mount slides, under-mount slides, and center-mount slides. Choose drawer slides that are appropriate for the drawer size, weight capacity, and desired level of smoothness. Ensure the slides are properly aligned and securely attached to the cabinet box and drawer box.Constructing Doors:
Doors can be constructed from solid wood, plywood, or MDF. Several door styles are available, including slab doors, raised panel doors, and shaker doors. The door style should complement the overall design of the kitchen. Doors can be painted, stained, or laminated to achieve the desired finish.Installing Hinges:
Hinges attach the doors to the cabinet box and allow them to swing open and closed. Several types of hinges are available, including concealed hinges, surface-mount hinges, and self-closing hinges. Concealed hinges provide a clean and modern look, while surface-mount hinges are easier to install. Choose hinges that are appropriate for the door weight and swing direction. Ensure the hinges are properly aligned and securely attached to the cabinet box and door.Adjusting Doors and Drawers:
After installing the doors and drawers, carefully adjust them to ensure they are properly aligned and operate smoothly. Adjust the hinges and drawer slides as necessary to achieve a consistent gap between the doors and drawers. This may require loosening and tightening screws slightly until the desired alignment is achieved. Consistent gapping signifies quality and precision.Installation and Finishing Touches
The final stages of building kitchen storage cabinets involve installation and finishing touches, which are crucial for ensuring the cabinets are securely mounted, aesthetically pleasing, and protected from wear and tear.
Preparing the Installation Area:
Before installing the cabinets, ensure the installation area is clean and level. Remove any obstructions, such as old cabinets, appliances, or flooring. Locate the wall studs and mark them for attaching the cabinets. A stud finder assists with this process.Installing Base Cabinets:
Begin by installing the base cabinets. Start with the corner cabinets and work outward. Use shims to level the cabinets and ensure they are aligned with each other. Attach the cabinets to the wall studs using screws. Verify that the cabinets are securely fastened to the wall. Consider applying construction adhesive between the cabinet and wall for increased stability.Installing Upper Cabinets:
Install the upper cabinets after the base cabinets are in place. Use a ledger board to support the upper cabinets during installation. A ledger board is a temporary support that is attached to the wall below the upper cabinets. Attach the upper cabinets to the wall studs using screws. Verify that the cabinets are level and aligned with the base cabinets. Remove the ledger board after the upper cabinets are securely fastened.Applying Finishing Touches:
Once the cabinets are installed, apply the finishing touches. This includes installing countertops, backsplashes, hardware, and trim. Caulk any gaps between the cabinets and the walls or floor. Sand any rough edges and apply a final coat of paint or stain. These details contribute to the overall aesthetic appeal and functionality of the cabinets.Building kitchen storage cabinets is a rewarding project that enhances the functionality and aesthetics of the kitchen. By following these steps and paying attention to detail, one can create custom cabinets that meet specific needs and preferences, resulting in a kitchen that is both efficient and beautiful.

How To Build A Pantry Cabinet The Handyman S Daughter

Custom Diy Pantry Weekend Project How To Build A Kitchen

How To Build Diy Pantry Cabinets Part 1 Building Base

Pantry Cabinet Plans Pictures Ideas Tips From

Diy Freestanding Kitchen Pantry Cabinet Jaime Costiglio

30 Kitchen Cabinet Add Ons You Can Diy Family Handyman

Diy Freestanding Kitchen Pantry Cabinet Jaime Costiglio

Build A Pantry Part 1 Cabinet Plans Included The Diy Village

150 Diy Kitchen Organization Ideas Prudent Penny Pincher

41 Genius Kitchen Organization Ideas The Family Handyman
Related Posts