How To Build Pull-Out Drawers For Kitchen Cabinets
Maximizing storage space within kitchen cabinets is a common challenge. Pull-out drawers offer an effective solution, providing improved accessibility and organization compared to standard shelving. Constructing these drawers is a manageable project for individuals with basic woodworking skills and tools. This article provides a detailed guide on building pull-out drawers for kitchen cabinets, covering essential steps from planning to installation.
Planning and Preparation
The initial phase involves careful assessment of the existing cabinet space and meticulous planning. Accurate measurements are crucial to ensure a proper fit and smooth operation of the pull-out drawers.
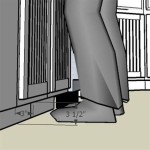
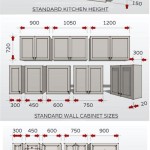
First, measure the interior width, depth, and height of the cabinet opening. These measurements will determine the maximum dimensions of the drawer box. Account for the thickness of the drawer slides and allow sufficient clearance for smooth movement. A general guideline is to subtract approximately 1 inch from the interior width and depth to accommodate the slides and provide necessary wiggle room. For the drawer height, consider the items intended for storage and the overall aesthetics desired.
Next, select the appropriate materials for the drawer boxes. Common choices include plywood, hardwood, and melamine. Plywood offers a balance of strength, stability, and affordability. Hardwood provides a more premium look and feel. Melamine offers a smooth, easy-to-clean surface but may not be as robust as plywood or hardwood. The material thickness typically ranges from ½ inch to ¾ inch, depending on the size and load-bearing requirements of the drawer. Consider using ½-inch plywood for smaller drawers and ¾-inch plywood for larger drawers intended to hold heavier items.
Select drawer slides based on load capacity, extension type, and mounting style. Load capacity refers to the maximum weight the slides can support and should be chosen based on the anticipated weight of the drawer contents. Extension type refers to how far the drawer extends out of the cabinet. Full-extension slides allow the entire drawer to be accessed, while three-quarter extension slides leave a portion of the drawer inside the cabinet. Mounting style refers to how the slides are attached to the cabinet and drawer. Common options include side-mount, bottom-mount, and center-mount. Side-mount slides are typically the most robust and versatile option. Ensure the chosen slides are compatible with the chosen material thickness.
Create a detailed cut list based on the measurements and chosen materials. This cut list will specify the dimensions of each piece required for the drawer boxes. A well-organized cut list minimizes material waste and ensures accurate cuts. Include dimensions for the drawer front, back, sides, and bottom. Double-check all measurements before cutting any material.
Constructing the Drawer Boxes
With the planning phase complete, the next step involves cutting the materials and assembling the drawer boxes. Precision and accuracy are essential during this stage to ensure a square and sturdy drawer.
Use a table saw, circular saw, or miter saw to cut the drawer box components according to the cut list. Ensure the saw blade is sharp and aligned properly to achieve clean, accurate cuts. Take necessary safety precautions when operating power tools, including wearing safety glasses and hearing protection. When cutting plywood, use a scoring blade or apply masking tape to the cut line to minimize splintering.
Assemble the drawer box using wood glue and fasteners. Common fastening methods include screws, nails, and staples. Screws provide the strongest and most reliable connection. Apply wood glue to the edges of the drawer components before joining them together. Use clamps to hold the pieces in place while the glue dries. Drill pilot holes before inserting screws to prevent splitting the wood. Ensure the drawer box is square during assembly. Use a framing square to check the corners and adjust as needed.
Attach the drawer bottom to the assembled drawer box. The drawer bottom can be recessed into a groove in the drawer sides or attached directly to the bottom edges of the drawer sides, front, and back. If recessing the drawer bottom, use a router or table saw to create a groove in the drawer sides before assembly. If attaching the drawer bottom directly, use wood glue and fasteners to secure it to the drawer sides, front, and back. Ensure the drawer bottom is flush with the bottom edges of the drawer sides, front, and back.
Sand the drawer boxes to smooth any rough edges and prepare them for finishing. Use sandpaper with progressively finer grits to achieve a smooth surface. Start with a coarser grit, such as 120-grit, and gradually move to a finer grit, such as 220-grit. Pay particular attention to the edges and corners of the drawer boxes. Clean the drawer boxes thoroughly after sanding to remove any dust or debris.
Installation and Finishing
The final stage involves installing the drawer slides and drawer boxes into the cabinet and applying a finish to protect and enhance the appearance of the drawers.
Install the drawer slides according to the manufacturer's instructions. Most drawer slides consist of two parts: a cabinet member and a drawer member. The cabinet member is attached to the inside of the cabinet, and the drawer member is attached to the outside of the drawer box. Ensure the slides are aligned properly and securely fastened to the cabinet and drawer. Use shims if necessary to ensure the slides are level and parallel. Follow the manufacturer's recommended screw size and spacing for optimal performance.
Attach the drawer front to the drawer box. The drawer front can be attached using screws, glue, or a combination of both. Align the drawer front with the drawer box and ensure it is centered and flush with the surrounding cabinet doors and drawers. Use clamps to hold the drawer front in place while the adhesive dries. Consider using adjustable drawer front fasteners to allow for fine-tuning the alignment of the drawer front.
Apply a finish to the drawer boxes to protect the wood and enhance its appearance. Common finishing options include paint, stain, and clear coat. Choose a finish that complements the existing kitchen cabinetry and provides adequate protection against moisture and wear. Apply the finish according to the manufacturer's instructions. Allow the finish to dry completely before installing the drawers into the cabinet. Consider applying multiple coats of finish for increased durability.
Install the completed drawer boxes into the cabinet by sliding them onto the installed drawer slides. Ensure the drawers slide smoothly and easily. Adjust the drawer slides or drawer front as needed to achieve proper alignment and smooth operation. Test the drawers with a representative load to ensure they can support the intended weight. If necessary, reinforce the drawer box or drawer slides to increase their load capacity.
Following these steps will result in functional and aesthetically pleasing pull-out drawers that enhance the storage capacity and usability of the kitchen cabinets. Proper planning, accurate measurements, and careful execution are crucial for a successful outcome.

Diy Pull Out Cabinet Drawers Love Renovations

How To Make Simple Easy Sliding Shelves

How To Make Pull Out Shelves For Kitchen Cabinets Ron Hazelton

How To Make Simple Easy Sliding Shelves

Diy Pull Out Cabinet Drawers Love Renovations

Kitchen Storage Pull Out Pantry Shelves Diy Family Handyman

Kitchen Organization Pull Out Shelves In Pantry Remodelando La Casa

Diy Pull Out Cabinet Drawers Love Renovations

How To Easily Add Drawers Kitchen Cabinets Small Stuff Counts

10 Roll Outs For Kitchen Cabinets Ana White
Related Posts