How to Build Pull-Out Shelves for Kitchen Cabinets: A Comprehensive Guide
Transform your kitchen cabinets with the convenience of pull-out shelves. These shelves provide easy access to stored items, maximizing space utilization and enhancing organization. This step-by-step guide will empower you with the necessary knowledge and instructions to build your own pull-out shelves.
Materials Required:
- Plywood or MDF for shelves
- 1/2-inch plywood or hardboard for drawer bottoms
- 1x2 or 1x3 pine for drawer sides and backs
- 1/2-inch or 3/4-inch plywood or hardboard for drawer fronts
- Wood screws
- Drawer slides
- Wood glue
- Clamps
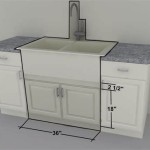
Step 1: Measure and Cut Shelf Frames
Measure the width and height of the cabinet opening where you want to install the pull-out shelves. Cut two identical pieces of plywood or MDF to match these measurements. These will be the top and bottom shelves.
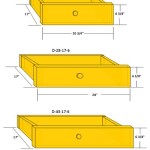
Step 2: Assemble Drawer Boxes
For each drawer, cut four pieces of 1x2 or 1x3 pine to the following lengths: two front pieces and two side pieces. Assemble the drawer boxes using wood glue and screws, ensuring that the corners are square.
Step 3: Cut and Attach Drawer Bottoms
Cut a piece of 1/2-inch plywood or hardboard to fit the inside dimensions of each drawer box. Attach the drawer bottoms to the boxes using wood glue and screws.
Step 4: Cut and Attach Drawer Fronts
Cut a piece of 1/2-inch or 3/4-inch plywood or hardboard to fit the front of each drawer box. Center the drawer fronts on the boxes and attach them using wood glue and screws.
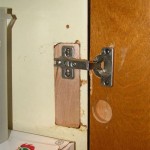
Step 5: Install Drawer Slides
Attach one set of drawer slides to each side of the cabinet opening. Use wood screws to secure the slides. Ensure that the slides are level and extend fully when the drawer is pulled out.
Step 6: Install Pull-Out Shelves
Place the bottom shelf on the drawer slides and secure it with screws. Slide the drawers into place and attach them to the bottom shelf using wood screws.
Step 7: Install Top Shelf
Place the top shelf on the drawers and secure it using wood screws. Make sure that the top shelf is level and flush with the cabinet opening.
Tips:
- Use high-quality drawer slides for smooth and durable operation.
- Countersink the screws slightly to ensure a flush surface.
- Consider adding a stop block to the back of the drawer boxes to prevent them from pulling out too far.
- Finish the shelves with paint or stain to match your kitchen decor.

How To Make Pull Out Shelves For Kitchen Cabinets Ron Hazelton

How To Make Simple Easy Sliding Shelves

How To Make Simple Easy Sliding Shelves

Kitchen Organization Pull Out Shelves In Pantry Remodelando La Casa

How To Make Simple Easy Sliding Shelves

Kitchen Storage Pull Out Pantry Shelves Diy Family Handyman

How To Make Simple Easy Sliding Shelves Diy Pull Out Slide Slides

Diy Pull Out Cabinet Drawers Love Renovations

10 Roll Outs For Kitchen Cabinets Ana White

Diy Pull Out Cabinet Drawers Love Renovations
Related Posts