How To Build Wall Kitchen Cabinets
Building wall kitchen cabinets is a rewarding project for homeowners looking to customize their kitchen space while potentially saving money compared to purchasing prefabricated options. This guide provides a comprehensive overview of the necessary steps, materials, and tools required to construct durable and aesthetically pleasing wall cabinets. Careful planning, precise measurements, and diligent execution are key to achieving professional-looking results.
Planning and Design
The initial phase of building wall kitchen cabinets involves meticulous planning and design. This stage is critical for ensuring that the finished cabinets meet the specific needs of the kitchen and blend seamlessly with the existing décor. Consider the function of the cabinets, the available space, and the desired aesthetic.
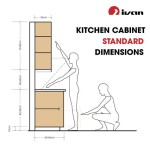
Begin by accurately measuring the available wall space. Note the height, width, and depth restrictions, taking into account any obstructions such as plumbing, electrical outlets, or existing features. Document these measurements precisely, as they will form the basis for the cabinet dimensions.
Next, determine the layout and configuration of the cabinets. Consider the types of items that will be stored in each cabinet and design the interior accordingly. Options include adjustable shelves, fixed shelves, drawers, or specialized storage solutions for specific items such as spices or cookware.
Develop a detailed design plan, including scaled drawings of each cabinet. These drawings should include precise dimensions for all components, including the cabinet box, doors, shelves, and any other features. Consider using computer-aided design (CAD) software or online cabinet design tools to create professional-looking plans.
Select the materials for the cabinet construction. Plywood is a popular choice for the cabinet box due to its strength, stability, and affordability. Hardwood, such as maple or oak, is often used for the face frame and doors, providing a durable and attractive finish. Consider the overall style of the kitchen when selecting materials, ensuring that they complement the existing décor.
Finally, create a comprehensive materials list, including the quantities of each item needed. This list should include plywood, hardwood, screws, nails, hinges, drawer slides, handles, knobs, and any finishing materials such as paint, stain, or varnish. Compile the list and estimate the cost of all materials to ensure that the project remains within budget.
Construction Process
The construction process involves assembling the individual components of the cabinet box and doors. Accuracy and attention to detail are essential during this stage to ensure that the finished cabinets are square, level, and function properly.
Begin by cutting the plywood for the cabinet box according to the dimensions specified in the design plan. Use a circular saw or table saw to make precise cuts, ensuring that all edges are straight and square. Label each piece clearly to avoid confusion during assembly. Cut also the plywood to create the cabinet back.
Assemble the cabinet box by joining the sides, top, bottom, and back pieces. Use wood glue and screws to create a strong and durable bond. Ensure that the joints are flush and square, using clamps to hold the pieces together while the glue dries. Pay particular attention to the alignment of the back panel, as this will provide rigidity to the cabinet.
Install the face frame to the front of the cabinet box. The face frame provides structural support and a finished appearance. Use wood glue and nails or screws to attach the face frame to the cabinet box, ensuring that it is flush and square. Sand the face frame smooth and fill any nail holes or imperfections.
Construct the cabinet doors using hardwood or plywood. Cut the door components according to the dimensions specified in the design plan. Assemble the door frame using mortise-and-tenon joints, dowels, or other suitable joinery techniques. Glue and clamp the frame together, ensuring that it is square and flat. Install a panel insert within the frame, if desired, using glue and brad nails.
Install the hinges on the cabinet doors and the cabinet box. Use a hinge jig to ensure accurate and consistent placement. Attach the doors to the cabinet box, ensuring that they are aligned properly and swing freely. Adjust the hinges as needed to achieve a perfect fit.
Install shelves inside the cabinet box, either fixed or adjustable. For fixed shelves, use wood glue and screws to attach them to the cabinet sides. For adjustable shelves, install shelf supports at regular intervals, allowing the shelves to be repositioned as needed.
Finishing and Installation
The final stage involves finishing the cabinets and installing them on the wall. This stage requires careful planning and execution to ensure that the finished cabinets are aesthetically pleasing, functional, and securely mounted.
Prepare the cabinet surfaces for finishing by sanding them smooth. Use progressively finer grits of sandpaper to remove any imperfections and create a smooth, even surface. Clean the surfaces thoroughly to remove any dust or debris.
Apply a primer to the cabinet surfaces to improve adhesion and provide a uniform base for the finish coat. Allow the primer to dry completely before proceeding.
Apply the desired finish to the cabinets, such as paint, stain, or varnish. Follow the manufacturer's instructions carefully, applying multiple coats as needed to achieve the desired color and sheen. Allow each coat to dry completely before applying the next.
Install handles and knobs on the cabinet doors and drawers. Choose hardware that complements the style of the kitchen and provides a comfortable grip.
Locate the wall studs using a stud finder. Mark the locations of the studs on the wall. Use these marks as guides for mounting the cabinets securely.
Lift the cabinets into position and align them with the wall studs. Use shims to ensure that the cabinets are level and plumb. Secure the cabinets to the wall studs using screws. Use long screws that penetrate deep into the studs to provide a strong and stable connection.
Install trim and molding to conceal any gaps between the cabinets and the wall. Use caulk to seal any seams and create a clean, finished appearance.
Clean the cabinets thoroughly and inspect them for any imperfections. Touch up any areas as needed and ensure that all doors and drawers operate smoothly. The new wall kitchen cabinets are now ready for use.

How To Build Wall Cabinets Houseful Of Handmade

How To Build A Cabinet Diy Guide For Beginners Wall Storage Cabinets Kitchen Shelves

Diy Wall Cabinets With 5 Storage Options Plans Fixthisbuildthat

How To Build Wall Cabinets

How To Install Kitchen Cabinets Diy Family Handyman

How To Build Wall Cabinets Houseful Of Handmade

Diy Kitchen Cabinets Made From Only Plywood

The Wall Of Cabinets Build Is Finished In Cabinet Lights Installed And Upper Heightened To Ceiling Addicted 2 Decorating

Diy Wall Cabinets With 5 Storage Options Plans Fix This Build That

21 Diy Kitchen Cabinets Ideas Plans That Are Easy To Build Building Cabinet New
Related Posts