How to Chalk Paint Kitchen Cabinets
Chalk paint has become a popular choice for transforming kitchen cabinets. Its versatility, ease of use, and ability to adhere to various surfaces make it an ideal choice for a DIY kitchen makeover. This article will guide you through the process of chalk painting your kitchen cabinets, providing step-by-step instructions and helpful tips for achieving a beautiful and durable finish.
Preparation: The Foundation for a Perfect Chalk Paint Finish
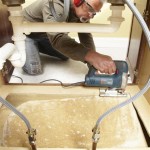
Proper preparation is key to a successful chalk paint project. It ensures that the paint adheres well and provides a smooth, even finish. Begin by thoroughly cleaning the cabinets with a degreaser to remove any grease, grime, or dirt. Once dry, lightly sand the cabinets with fine-grit sandpaper to create a slightly rough surface for the paint to grip. This step is especially important for glossy cabinets as it helps to remove the shine and improve paint adhesion. If you are working with existing paint, it's essential to lightly sand to create a textured surface, promoting better adhesion and preventing the chalk paint from chipping or peeling off. Any loose or peeling paint should be scraped off for optimal results.
After sanding, wipe down the cabinets with a damp cloth to remove dust and debris. Allow them to dry completely before proceeding to the next step. For added protection and to prevent the wood from absorbing the paint's moisture, apply a primer specifically formulated for chalk paint. This primer will seal the surface and provide a smooth base for the chalk paint, ensuring a more even and consistent finish. Apply the primer in thin, even coats, allowing each coat to dry thoroughly before applying the next.
Painting: Applying Chalk Paint with Precision
Once the primer is dry, you can start applying the chalk paint. Choose a good-quality chalk paint designed for furniture and cabinets. It's available in a wide range of colors, allowing you to match your desired aesthetic. For optimal coverage, apply the chalk paint in thin, even coats using a high-quality brush or roller. Avoid overloading the brush or roller, as it can lead to drips and uneven application. Work in small sections, allowing each coat to dry thoroughly before applying the next. This ensures a smooth and consistent finish without any streaking or imperfections.
For a distressed look, consider using a damp cloth or sandpaper to lightly sand the edges of the paint after the first coat. This creates a slightly aged, vintage appearance, adding a touch of character to your cabinets. If you're going for a smooth, flawless finish, use fine-grit sandpaper to lightly sand between each coat. This helps to blend the paint layers and create a seamless surface.
Finishing Touches: Sealing and Protecting Your Chalk Paint
After the final coat of chalk paint has dried completely, it's essential to seal the paint to protect it from wear and tear. A sealant helps to prevent staining and make the paint more water-resistant, ensuring its longevity. There are various sealants specifically designed for chalk paint, such as wax, lacquer, or polyurethane. Choose a sealant that matches your desired finish and the level of protection you require.
Wax is a popular choice as it provides a natural, matte finish and is easy to apply. Apply a thin, even layer of wax using a clean cloth or brush. Allow the wax to dry thoroughly before buffing it to a shine using a clean cloth. Lacquer, on the other hand, provides a more durable and glossy finish. Apply it in thin coats using a brush or spray, ensuring each coat dries completely before applying the next. Polyurethane is another durable sealant option, offering a smooth and glossy finish. Apply it in thin coats using a brush or spray, allowing each coat to dry thoroughly before applying the next.
Key Points to Consider
Choosing the Right Chalk Paint
There is a variety of chalk paint brands available on the market. Consider factors such as color selection, coverage, drying time, and overall quality when choosing a brand. Read reviews and check online resources to find a paint that suits your needs.
Applying Wax for Added Protection
Waxing your chalk paint adds a durable layer of protection and enhances its natural beauty. Choose a wax specifically designed for chalk paint and apply it evenly to the entire surface. Allow the wax to dry and buff it to a shine for a polished look.
Distressing for a Vintage Look
If you're looking for a distressed, vintage look, consider using sandpaper or a damp cloth to lightly sand the edges of the paint after the first coat. This creates a slightly aged, rustic appearance, adding character to your cabinets.

Painting Kitchen Cabinets With Chalk Paint Simply Today Life

Chalk Painted Kitchen Cabinets 2 Years Later Our Storied Home

Step By Kitchen Cabinet Painting With Annie Sloan Chalk Paint Jeanne Oliver

How To Paint A Kitchen With Chalk Maison De Pax

Why I Repainted My Chalk Painted Cabinets Sincerely Sara D Home Decor Diy Projects

Chalk Painted Kitchen Cabinets 2 Years Later Our Storied Home

How 500 And Some Chalk Paint Totally Transformed This Kitchen

Paint Your Kitchen Cabinets With Chalkboard Jessica Rayome

Painted Kitchen Cabinets Chalk Paint Well Groomed Home

Why I Repainted My Chalk Painted Cabinets Sincerely Sara D Home Decor Diy Projects
Related Posts