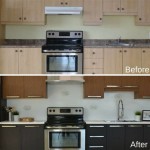
How To Clean And Restain Kitchen Cabinets
Revitalizing kitchen cabinets through cleaning and restaining is a cost-effective way to update a kitchen's appearance. This process requires careful preparation and execution to achieve professional-looking results. This article provides a comprehensive guide to cleaning and restaining kitchen cabinets.
Gathering Necessary Supplies
Before beginning, assemble all required materials. This ensures a smooth and efficient workflow, minimizing interruptions. Having everything at hand prevents unnecessary trips to the hardware store mid-project.
* Cleaning solution (TSP, dish soap, or specialized cabinet cleaner) * Scrubbing pads or sponges * Clean cloths or rags * Screwdriver * Painter's tape * Drop cloths * Sandpaper (various grits) * Wood conditioner * Stain (oil-based or water-based) * Stain applicator (brush, rag, or foam pad) * Polyurethane or other sealant * Safety glasses * GlovesPreparing the Work Area
Proper preparation is crucial for achieving a flawless finish and minimizing cleanup. Protecting surrounding areas from dust and spills is essential.
* Remove all items from the cabinets. * Empty drawers completely. * Cover countertops, floors, and appliances with drop cloths. * Ensure adequate ventilation in the work area. Open windows and doors or use fans.Removing Cabinet Doors and Hardware
Removing doors and hardware allows for more thorough cleaning and even staining. Labeling each piece ensures proper reinstallation.
* Use a screwdriver to remove hinges, knobs, and pulls. * Label each door and drawer front along with its corresponding location on the cabinet frame. * Place hardware in labeled bags or containers.Cleaning the Cabinets
Thoroughly cleaning the cabinets removes grease, grime, and old finishes, creating a suitable surface for the new stain to adhere to. This step is critical for achieving a professional-looking result.
* Mix the cleaning solution according to the manufacturer's instructions. * Use a scrubbing pad or sponge to apply the cleaning solution to the cabinet surfaces. * Work in the direction of the wood grain to avoid scratches. * Rinse thoroughly with clean water. * Allow the cabinets to dry completely before proceeding.Sanding the Cabinets
Sanding prepares the wood surface for better stain absorption and adhesion, creating a smooth and even finish. Using different grits of sandpaper ensures proper surface preparation.
* Begin with a coarser grit sandpaper (100-150 grit) to remove any remaining varnish or finish. * Gradually move to finer grits (180-220 grit) to smooth the surface. * Sand in the direction of the wood grain to avoid scratches. * Wipe away sanding dust with a tack cloth or damp cloth.Applying Wood Conditioner (Optional)
Wood conditioner helps to ensure even stain penetration, particularly on softwoods like pine. This step can prevent blotchiness and create a more uniform finish.
* Apply wood conditioner according to the manufacturer's instructions. * Allow the conditioner to penetrate for the recommended time. * Wipe off any excess conditioner before applying the stain.Applying the Stain
Applying the stain is a crucial step that determines the final color and look of the cabinets. Careful application techniques ensure even coverage and prevent streaks.
* Stir the stain thoroughly before use. * Apply the stain in thin, even coats using a brush, rag, or foam pad. * Work in the direction of the wood grain. * Allow the stain to penetrate for the recommended time, as indicated on the product label. * Wipe off any excess stain with a clean cloth. * Allow the stain to dry completely before applying a second coat, if desired.Sealing the Cabinets
Sealing the cabinets protects the newly stained surface from moisture, scratches, and everyday wear and tear. A sealant ensures the longevity of the refinishing project.
* Apply a thin, even coat of polyurethane or other sealant using a brush or foam pad. * Work in the direction of the wood grain. * Allow the sealant to dry completely before applying subsequent coats. * Lightly sand between coats with fine-grit sandpaper (220 grit or higher) for a smoother finish. * Apply two to three coats of sealant for optimal protection.Reinstalling Cabinet Doors and Hardware
Once the sealant has fully cured, reattach the cabinet doors and hardware. This completes the restoration process.
* Carefully reattach the cabinet doors using the original screws and hinges. * Reinstall the knobs and pulls, ensuring they are securely fastened.
Cabinet Refinishing An 8 Step Guide For Pro Painters Ppc

Refinish Kitchen Cabinets Without Stripping

Kitchen Cabinet Refinishing Guide How We Got A Durable Chip Free Finish

Can You Restain Cabinets A Comprehensive Guide Southwest Kitchen

How I Updated My Oak Cabinets Without Paint By Using Briwax Easy Budget Kitchen Makeover Only 24

Repainting Vs Restaining Kitchen Cabinets Kitchens Redefined

Refinishing Kitchen Cabinets A Beautiful Mess

How To Make Rustic Kitchen Cabinets By Refinishing Them The Best Stain Color Amanda Katherine

How To Refinish Kitchen Cabinets N Hance

Cabinet Refinishing Guide
Related Posts