How To Construct Kitchen Cabinets
Kitchen cabinets are integral to the functionality and aesthetics of a kitchen. Constructing them independently can provide customization, cost savings, and a rewarding sense of accomplishment. Successfully building kitchen cabinets requires careful planning, precise execution, and a solid understanding of woodworking principles. This article outlines the process of constructing kitchen cabinets, emphasizing key steps and considerations for achieving high-quality results.
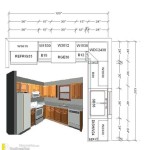
Before commencing any construction, a comprehensive plan is essential. This plan should include precise measurements of the kitchen space, taking into account existing appliances, plumbing, and electrical outlets. Standard cabinet dimensions are a good starting point, but adapting them to the specific kitchen layout is crucial. The plan should detail the types of cabinets to be built (base, wall, pantry), their dimensions (width, height, depth), and the materials to be used. A detailed cut list specifying the dimensions of each component (sides, top, bottom, back, shelves, doors, drawer fronts) is also imperative for efficient material usage and accurate cutting.
Material selection is a critical aspect of cabinet construction. Plywood, hardwood, and melamine are common choices, each offering different characteristics in terms of cost, durability, and aesthetics. Plywood is often used for the cabinet boxes due to its stability and resistance to warping. Hardwood, such as maple, oak, or cherry, is typically used for face frames, doors, and drawer fronts. Melamine, a particleboard or MDF core with a laminated surface, is a cost-effective option for cabinet boxes and shelves, offering a durable and easy-to-clean surface. The choice of materials should align with the budget, desired aesthetic, and expected usage.
Preparing the Materials
Once the plan is finalized and the materials are selected, the next step involves preparing the materials. This includes cutting the plywood and hardwood to the dimensions specified in the cut list. A table saw is the most efficient tool for this purpose, but a circular saw with a guide can also be used. Accuracy is paramount at this stage, as even slight errors can accumulate and affect the overall fit and finish of the cabinets. Ensure the saw blade is sharp and appropriate for the material being cut to minimize splintering and tear-out. After cutting, sand the edges of the plywood and hardwood to remove any rough spots and prepare them for assembly.
For hardwood components, such as face frames and door frames, the lumber needs to be milled to the desired thickness and width. This can be achieved using a jointer and planer. The jointer creates a perfectly flat and square edge, while the planer ensures a consistent thickness. Accurately milled lumber is essential for creating tight joints and a professional-looking finish. If access to a jointer and planer is limited, reputable lumber suppliers can often provide pre-milled lumber to the specified dimensions.
Edge banding is often applied to the exposed edges of plywood or particleboard to conceal the core and provide a more finished appearance. Edge banding can be made of wood veneer, PVC, or melamine. It is applied using an edge banding machine or a household iron. After applying the edge banding, it must be trimmed flush with the surface using an edge trimmer or a utility knife. Sanding the edges ensures a smooth transition between the edge banding and the surface.
Assembling the Cabinet Boxes
Assembling the cabinet boxes involves joining the sides, top, bottom, and back panels. Several methods can be used for this purpose, including screws, nails, dowels, and pocket screws. Screws are a reliable and strong option, especially when used with wood glue. Pocket screws, used in conjunction with a pocket hole jig, create strong and concealed joints. Nails can be used for temporary fastening while the glue dries. Dowels provide a clean and visually appealing joint, but require careful alignment and drilling.
Before assembling the cabinet boxes, it is crucial to apply wood glue to all mating surfaces. Wood glue provides a strong and permanent bond, ensuring the cabinets are durable and long-lasting. Clamps are essential for holding the components together while the glue dries. Use pipe clamps, bar clamps, or strap clamps to apply even pressure across the joints. Check for squareness during assembly using a framing square or a similar tool. Correct any discrepancies before the glue sets.
The back panel of the cabinet box provides additional stability and support. It can be made of plywood, hardboard, or MDF. The back panel is typically attached using screws or nails. Ensure the back panel is square and flush with the edges of the cabinet box. For wall cabinets, consider adding a French cleat or hanging rail to the back panel for easy and secure installation.
Shelves can be fixed or adjustable. Fixed shelves are glued and screwed into place, providing maximum stability. Adjustable shelves are supported by shelf pins inserted into pre-drilled holes. Shelf pin holes can be drilled using a shelf pin jig, which ensures consistent spacing and alignment. Consider the weight capacity of the shelves when determining the thickness of the material and the spacing of the supports.
Constructing Doors and Drawers
Doors and drawers are a key element of cabinet construction, contributing significantly to the overall aesthetic and functionality. Doors can be constructed using various methods, including frame-and-panel, slab, and raised-panel designs. Frame-and-panel doors consist of a frame made of solid wood and a panel made of plywood or MDF. Slab doors are a simple and contemporary option, consisting of a single piece of plywood or MDF with edge banding. Raised-panel doors are more complex to construct, requiring specialized tools and techniques.
Drawer boxes are typically constructed using plywood or solid wood. The sides, front, and back of the drawer box are joined using dovetail joints, rabbet joints, or butt joints with screws. Dovetail joints are the strongest and most aesthetically pleasing option, but they require specialized tools and skills. Rabbet joints are a simpler alternative, providing a strong and durable connection. Butt joints with screws are the easiest to construct but may not be as strong as the other options.
Drawer slides are essential for smooth and easy drawer operation. There are several types of drawer slides available, including side-mount, under-mount, and center-mount. Side-mount slides are the most common and are relatively easy to install. Under-mount slides are concealed beneath the drawer box, providing a clean and modern look. Center-mount slides are less common and are typically used for smaller drawers. Choose drawer slides that are rated for the weight capacity of the drawers.
Door hinges come in various styles, including concealed hinges, surface-mount hinges, and wrap-around hinges. Concealed hinges are hidden when the door is closed, providing a clean and uncluttered look. Surface-mount hinges are visible when the door is closed and are typically used for decorative purposes. Wrap-around hinges wrap around the edge of the door and the cabinet frame, providing a strong and durable connection. Choose hinges that are appropriate for the door style and the cabinet construction.
Once the cabinet boxes, doors, and drawers are constructed, the final step involves finishing. This includes sanding, staining, and applying a protective topcoat. Sanding ensures a smooth and even surface for the finish. Start with a coarse grit sandpaper and gradually work your way up to a fine grit sandpaper. Staining enhances the natural beauty of the wood and provides a uniform color. Apply the stain evenly and wipe off any excess. A protective topcoat, such as varnish, lacquer, or polyurethane, protects the wood from moisture, scratches, and stains. Apply several thin coats of topcoat, allowing each coat to dry completely before applying the next.
Assembly and Installation
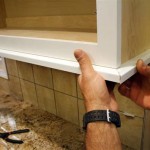
With all components constructed and finished, the final stage involves assembling and installing the cabinets. Begin by installing the base cabinets, ensuring they are level and plumb. Use shims to compensate for any unevenness in the floor. Secure the base cabinets to the wall using screws. For wall cabinets, use a French cleat or hanging rail to support the weight of the cabinets. Ensure the wall cabinets are level and plumb before securing them to the wall.
Install the doors and drawers, adjusting the hinges and drawer slides as necessary to ensure smooth and proper operation. Install the hardware, such as knobs and pulls. The placement of the hardware should be consistent throughout the kitchen. Ensure all hardware is securely fastened.
Safety Considerations
Safety is paramount when constructing kitchen cabinets. Wear appropriate safety gear, including safety glasses, hearing protection, and a dust mask. Work in a well-ventilated area to avoid inhaling sawdust and fumes from finishes. Use caution when operating power tools and follow the manufacturer's instructions. Keep the work area clean and free of clutter. Properly dispose of waste materials.
Constructing kitchen cabinets is a challenging but rewarding project. By following these steps and paying attention to detail, it is possible to build high-quality cabinets that enhance the beauty and functionality of the kitchen.

Kitchen Base Cabinets 101 Ana White

How To Build Cabinets The Complete Guide Houseful Of Handmade

Three Ways To Build Diy Kitchen Cabinets Sawdust Girl

Diy Kitchen Cabinets Made From Only Plywood

Diy Cabinet Making Your Guide On How To Build A

Update Back To Basics Constructing Kitchen Cabinets And How Make From Fox Chapel Publishing Finewoodworking

22 Easy Diy Kitchen Cabinets With Free Step By Plans Building Remodeling Projects

21 Diy Kitchen Cabinets Ideas Plans That Are Easy To Build Building Cabinet New

How To Building A Kitchen Island With Cabinets

How To Build Cabinets The Complete Guide Houseful Of Handmade
Related Posts