How to Cover Kitchen Cabinets: A Comprehensive Guide
Transforming the look of your kitchen without breaking the bank is possible with the art of covering kitchen cabinets. This comprehensive guide will walk you through the essential steps and considerations to ensure a successful and professional-looking finish.
1. Preparing the Cabinets
Before applying any new materials, it's crucial to prepare the cabinets thoroughly. Begin by removing all doors and hardware, then thoroughly clean the surfaces with a degreasing cleaner. Sand any rough edges or imperfections for a smooth base.
2. Choosing the Right Materials
The choice of material for covering your cabinets depends on your desired aesthetic and durability requirements. Consider options such as paint, contact paper, laminate, or veneer. Each material offers unique advantages and drawbacks, so research their characteristics before making a decision.
3. Painting the Cabinets
If painting is your chosen method, ensure you prime the cabinets first to enhance adhesion. Use high-quality paint and apply multiple thin coats for an even finish. Allow ample drying time between coats and consider sanding lightly between coats for a smoother surface.
4. Applying Contact Paper
Contact paper offers a quick and affordable way to cover cabinets. Measure and cut the paper to size, then carefully peel away the backing and apply it to the surface. Use a smoothing tool or credit card to eliminate air bubbles and ensure a seamless finish.
5. Installing Laminate
Laminate provides a durable and budget-friendly option for kitchen cabinets. Cut the laminate to size and apply strong adhesive to the back. Position the laminate carefully and press it firmly to secure it. Trim any excess material with a sharp utility knife.
6. Applying Veneer
Veneer offers a more luxurious option for transforming cabinets. Apply contact cement to both the cabinet surface and the veneer. Allow the cement to become tacky before positioning the veneer and pressing it down firmly. Use a rolling pin or heavy object to ensure a secure bond.
7. Finishing Touches
Once the cabinets are covered, reattach the doors and hardware. Install any necessary decorative elements, such as molding or trim, to complete the look. Consider adding a fresh coat of paint to the walls or backsplash to complement the transformed cabinets.
Additional Tips:
* Sand or scuff the existing cabinet surface lightly before applying new materials to improve adhesion. * Use a level to ensure your measurements and cuts are accurate, resulting in a professional-looking finish. * Take your time and work carefully throughout the process to avoid mistakes or imperfections. * Protect your work area with drop cloths and wear appropriate safety gear, such as gloves and a dust mask.
Er S Cabinet Cover Up Brighten Your Kitchen Cabinets Al

How To Update Cabinets Using Contact Paper Al Kitchen Makeover Cover

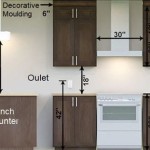
Closing The Space Above Kitchen Cabinets Remodelando La Casa

Diy Spraying Kitchen Cabinets Like A Pro Part Two Made With Grace And Grit

How To Easily Cover Cabinet Bottoms Onegirlmanyideas

L Stick Wood Cabinets Er Friendly

Er S Cabinet Cover Up Brighten Your Kitchen Cabinets Hometalk

Kitchen Cabinet Cover Panels Front Life

Er S Cabinet Cover Up Brighten Your Kitchen Cabinets Hometalk

How To Easily Cover Cabinet Bottoms Onegirlmanyideas
Related Posts