How To Create Kitchen Cabinets in SketchUp
SketchUp is a versatile 3D modeling software widely used by architects, interior designers, and hobbyists. Its intuitive interface and robust features make it an excellent tool for designing and visualizing various elements of a building or space, including kitchen cabinets. This article outlines the process of creating detailed and accurate kitchen cabinets in SketchUp, covering key steps and techniques for achieving professional-looking results.
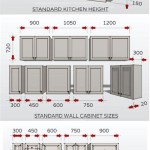
Before embarking on the modeling process, it's crucial to have a clear understanding of the cabinet dimensions. Measurements should include the overall width, height, and depth of the cabinet, as well as the dimensions of individual components such as doors, drawers, and shelves. Accurate measurements are essential for creating a realistic and functional model. Consider using a real-world kitchen cabinet as a reference point or consulting standard cabinet dimensions for guidance.
Furthermore, consider the style and design of the cabinets. Determine the type of door and drawer fronts, the materials to be used (e.g., wood, laminate), and any decorative elements or hardware that will be included. Having a detailed plan will streamline the modeling process and prevent unnecessary revisions later on.
Setting Up the SketchUp Environment
Before beginning the modeling process, it is important to configure the SketchUp environment to ensure accuracy and efficiency. Start by selecting an appropriate template. The "Architectural Design – Feet and Inches" or "Architectural Design – Millimeters" template is generally suitable for creating kitchen cabinets, depending on the preferred unit of measurement. This template provides a pre-configured environment with appropriate units and visual styles.
Next, it is advisable to set up the precision of the model to avoid rounding errors. Navigate to "Window" > "Model Info" > "Units" and specify the desired precision. For detailed cabinet modeling, a precision of 1/16 inch or 1 millimeter is generally recommended. This setting ensures that the model accurately reflects the intended cabinet dimensions.
Consider using layers (or tags in newer versions of SketchUp) to organize the model components. Create separate layers for different parts of the cabinet, such as the cabinet box, doors, drawers, and hardware. This allows individual components to be easily hidden or shown, simplifying the modeling process and improving the overall organization of the model.
Creating the Basic Cabinet Box
The first step in creating a kitchen cabinet is to model the basic cabinet box. This involves creating a rectangular prism representing the overall dimensions of the cabinet. Use the "Rectangle" tool to draw a rectangle on the ground plane representing the width and depth of the cabinet. Refer to the pre-determined measurements to ensure accuracy.
Once the rectangle is drawn, use the "Push/Pull" tool to extrude it upwards, creating the height of the cabinet. Input the desired height value to precisely control the dimension. This creates the basic rectangular box representing the cabinet's overall volume.
Next, create the cabinet sides, top, bottom, and back panels. Use the "Offset" tool to create an offset of the outer edges of the rectangle. The offset distance should correspond to the thickness of the cabinet material (e.g., ¾ inch or 18mm). This creates a smaller rectangle inside the original rectangle.
Use the "Push/Pull" tool again to extrude the inner rectangle upwards. Extrude it to the desired height of the cabinet box, minus the thickness of the top panel. This creates the cabinet sides. Repeat the process to create the top, bottom, and back panels, ensuring they are properly positioned and aligned with the sides.
For the back panel, consider recessing it slightly into the cabinet box for added realism. Use the "Push/Pull" tool to push the back panel inwards by a small distance (e.g., ¼ inch or 6mm). This creates a more realistic representation of how the back panel is typically attached to the cabinet box.
Modeling Doors and Drawers
Once the cabinet box is complete, the next step is to model the doors and drawers. The process involves creating rectangular faces representing the front of the doors and drawers and then adding details such as handles, hinges, and decorative elements.
Start by measuring the opening for the door or drawer. Determine the desired size and position of the door or drawer based on the overall design of the cabinet. Use the "Rectangle" tool to draw a rectangle on the front of the cabinet, representing the size and location of the door or drawer.
Use the "Offset" tool to create an offset around the outer edges of the rectangle. The offset distance should represent the thickness of the door or drawer face. This creates a smaller rectangle inside the original rectangle.
Use the "Push/Pull" tool to extrude the inner rectangle outwards, creating the thickness of the door or drawer face. Input the desired thickness value to precisely control the dimension. This creates the basic door or drawer face.
To add a handle or knob, use the "Circle" tool to draw a circle on the door or drawer face at the desired location. Then, use the "Push/Pull" tool to extrude the circle outwards, creating the handle or knob. Alternatively, import a pre-made handle or knob component from the SketchUp 3D Warehouse for added realism and detail.
For drawers, consider adding drawer slides. Use the "Rectangle" tool to draw a rectangle on the inside of the cabinet box, representing the location and size of the drawer slide. Then, use the "Push/Pull" tool to extrude the rectangle inwards, creating the drawer slide. Alternatively, import a pre-made drawer slide component from the SketchUp 3D Warehouse.
Repeat the process to create additional doors and drawers as needed. Ensure that all doors and drawers are properly aligned and spaced to create a visually appealing and functional cabinet design.
Adding Details and Finishing Touches
Once the basic cabinet components are in place, add details and finishing touches to enhance the realism and visual appeal of the model. This may include adding trim, molding, hardware, and materials.
To add trim or molding, use the "Follow Me" tool to extrude a profile along the edges of the cabinet. Create a custom trim profile or select a pre-made profile from the SketchUp 3D Warehouse. This adds a decorative element to the cabinet and enhances its overall aesthetic.
Add hardware such as hinges, pulls, and knobs. Import pre-made hardware components from the SketchUp 3D Warehouse for a wide selection of realistic and detailed options. Properly position and align the hardware components on the doors and drawers to create a professional-looking finish.
Apply materials to the cabinet components to represent the desired finish. Use the "Materials" browser to select wood, laminate, or paint materials. Adjust the color, texture, and transparency of the materials to achieve the desired look. Apply different materials to different parts of the cabinet to create contrast and visual interest.
Finally, consider adding shadows and lighting to enhance the realism of the model. Adjust the shadow settings in the "Shadows" dialog box to create realistic shadows that define the shape and form of the cabinet. Add artificial lights to the scene to highlight specific areas or create a specific mood.
Pay attention to details such as joint construction, edge banding, and grain direction. These details can significantly impact the realism of the model and demonstrate a thorough understanding of cabinet construction techniques. For instance, showing the orientation of the wood grain on different panels can enhance the visual authenticity of the finished product.
By following these steps and techniques, it is possible to create detailed and accurate kitchen cabinets in SketchUp. With careful planning, precise modeling, and attention to detail, the resulting model can serve as a valuable tool for visualizing and communicating cabinet designs.

Sketchup Tutorial Interior Design Kitchen

How To Design Kitchen Cabinet Manufacturing In 30 Minutes Sketchup Dynamic

Diy Kitchen Cabinets The Sketchup Model Corbin S Treehouse

Sketchup Kitchen Design Dynamic Components Cabinets

Designing Kitchen Cabinets With Sketchup

Expert Session How To Design A Basic Cabinet Using Sketchup

Kitchen Cabinet Collection 3d Warehouse

Top 10 Tips For Modeling Cabinets In Sketchup

How To Sketchup Your Kitchen Nik Kinnaird

Super Fast Cnc Ion Of Kitchen Furniture Only 10 Minutes In Dynamic Sketchup 3dshouse
Related Posts