Crown Molding on Kitchen Cabinets: A Step-by-Step Guide
Crown molding adds an elegant and sophisticated touch to kitchen cabinets, transforming them from ordinary to extraordinary. This decorative element not only enhances the aesthetics but also conceals the gap between the cabinets and the ceiling, creating a seamless and polished look. Installing crown molding on kitchen cabinets is a relatively straightforward task that can be completed in a few steps with the right tools and materials.
Materials You'll Need:
- Crown molding
- Miter saw or hand saw
- Nail gun or hammer and nails
- Caulk gun and caulk
- Measuring tape
- Level
- Sandpaper
- Paint or stain (optional)
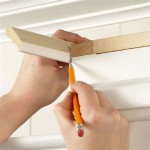
Step 1: Measure and Cut the Crown Molding
Measure the length of each cabinet's top edge, including the overhang. Transfer these measurements to the crown molding and use a miter saw or hand saw to cut the molding at 45-degree angles on both ends. Ensure that the angled cuts are precise to create a seamless joint.
Step 2: Assemble the Crown Molding
Dry-assemble the crown molding around the cabinets to check for fit and alignment. Use a level to ensure that the molding is level and sits flush against the cabinets and ceiling. Adjust the angled cuts as needed for a perfect fit.
Step 3: Secure the Crown Molding
Apply a bead of construction adhesive to the back of the crown molding and press it firmly into place on the cabinets and ceiling. Use a nail gun or hammer and nails to secure the molding. Drive the nails at an angle to prevent them from splitting the wood. Countersink the nail heads slightly to avoid snagging.
Step 4: Caulk and Finish
Apply a bead of caulk along the joints between the crown molding and the cabinets and ceiling. Smooth out the caulk using a finger or caulk tool. Allow the caulk to dry completely before painting or staining the crown molding to match the cabinets.
Step 5: Sand and Finish (Optional)
Once the crown molding is secure and the caulk is dry, sand any rough edges or imperfections with sandpaper. Wipe away the sanding dust and apply a coat of paint or stain to the molding to achieve the desired finish. Allow the paint or stain to dry completely before using the kitchen.
By following these steps, you can successfully install crown molding on your kitchen cabinets, creating a stunning and sophisticated upgrade to your home. With a little patience and precision, you can elevate the look of your kitchen while adding value and character to your space.

Adding Crown Molding To Kitchen Cabinets Young House Love

3 Ways To Enhance Your Kitchen With Crown Molding

Crown Molding For Kitchen Cabinets Fine Homebuilding

Diy Kitchen Cabinet Upgrade With Paint And Crown Molding

Cabinet Crown Molding Rogue Engineer

Kitchen Cabinet Crown Molding Reality Daydream

3 Ways To Enhance Your Kitchen With Crown Molding

Decorative Molding Timberlake Cabinetry

Faq Crown Molding For Cabinets Dura Supreme Cabinetry

Crown Moulding Embellishments Diamond Cabinetry
Related Posts