How to Cut Crown Molding Angles for Kitchen Cabinets
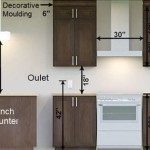
Crown molding is a decorative element that can add a touch of elegance and sophistication to your kitchen cabinets. It can also help to hide any gaps between the cabinets and the ceiling. However, cutting crown molding angles can be a bit tricky, especially if you're not sure how to do it. Here's a step-by-step guide to help you cut crown molding angles for your kitchen cabinets:
Materials you'll need:
- Crown molding
- Miter saw
- Tape measure
- Pencil
- Safety glasses
- Dust mask
Safety first:
Before you start cutting, make sure you're wearing safety glasses and a dust mask. Crown molding can create a lot of dust, so it's important to protect your eyes and lungs.
Measure and mark the angles:
The first step is to measure and mark the angles that you need to cut. To do this, place the crown molding on the cabinet and mark the point where it meets the wall. Then, use a tape measure to measure the distance from the mark to the edge of the cabinet. This measurement will be the length of the miter cut that you need to make.
Once you have the length of the miter cut, you can use a miter saw to cut the angle. To do this, set the miter saw to the correct angle and then place the crown molding on the saw. Hold the crown molding firmly in place and then slowly lower the saw blade into the wood. Be careful not to cut too quickly, as this can cause the wood to splinter.
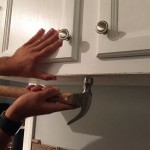
Cut the angles:
Once you have cut the miter cuts, you can fit the crown molding to the cabinet. To do this, place the crown molding on the cabinet and then nail it into place. Make sure to use a nail gun that is appropriate for the type of wood that you are using.
Finishing touches:
Once the crown molding is installed, you can add a touch of paint or stain to match the rest of your kitchen cabinets. You can also add some decorative elements, such as rosettes or appliqués, to give your kitchen cabinets a more custom look.
Tips:
- If you're not sure how to cut crown molding angles, it's always best to practice on a scrap piece of wood first.
- Use a sharp saw blade to get a clean cut.
- Hold the crown molding firmly in place when you're cutting it.
- Be careful not to cut too quickly, as this can cause the wood to splinter.
- Once you have cut the crown molding, fit it to the cabinet and nail it into place.
- Add a touch of paint or stain to match the rest of your kitchen cabinets.
- Add some decorative elements, such as rosettes or appliqués, to give your kitchen cabinets a more custom look.
Cutting crown molding angles can be a bit tricky, but it's not impossible. By following the steps in this guide, you can easily cut crown molding angles for your kitchen cabinets.

How To Miter Crown Molding At Any Angle The Kim Six Fix

How To Install Crown Mouldings American Hardwood Information Center

Installing Crown Moulding The Easy Way Ana White

How To Cut Crown Molding For Kitchen Cabinets Ehow

How To Install Crown Mouldings American Hardwood Information Center

How To Cut Crown Molding Using Easy Templates Sawdust Girl

Adding Height To The Kitchen Cabinets Tempting Thyme

How To Cut Crown Molding Using Easy Templates Sawdust Girl

Master Miter Cuts On Crown Molding Wood

Woodworking Diy Project Installing Crown Molding On A Cabinet
Related Posts