How to Distress White Kitchen Cabinets for a Vintage Charm
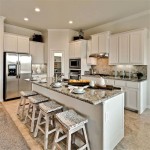
White kitchen cabinets evoke a sense of timeless elegance and clean lines. However, they can sometimes appear too stark or modern for those who prefer a more rustic or vintage aesthetic. Distressing your white kitchen cabinets is a fantastic way to add character, depth, and a touch of history to your space. Here's a comprehensive guide to help you achieve the perfect distressed look:
Gather Your Materials
Before you begin, ensure you have the necessary materials on hand:
- Sandpaper (fine and coarse grit)
- Tack cloth
- Paint stripper or sanding sponge
- White paint
- Clear polyurethane
- Brayer or rolling pin
- Rags
- Gloves
- Mask (optional)
Prepare Your Cabinets
Remove all cabinet doors and hardware. Thoroughly clean the cabinets to remove grease and dirt. Protect your work area by spreading a drop cloth or plastic sheeting on the floor.
Sanding the Cabinets
Using coarse-grit sandpaper, sand the edges, corners, and any areas where the paint may have chipped or peeled naturally. This creates a distressed effect and helps the paint adhere better. Once you're satisfied with the results, switch to finer-grit sandpaper and lightly sand the entire surface.
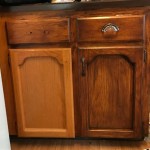
Remove Paint (Optional)
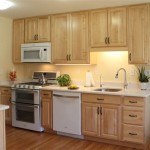
If you want to reveal the original wood grain beneath the paint, you can use a paint stripper or sanding sponge to remove the white paint. Follow the manufacturer's instructions carefully, ensuring adequate ventilation.
Apply White Paint
Apply a thin coat of white paint to the distressed cabinets. Use a brush or sponge for a more textured finish. Once the first coat dries, apply a second coat for better coverage.
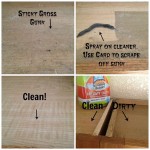
Distressing the Paint
Once the paint dries completely, it's time to distress it. Use a damp rag to wipe away the paint from the edges, corners, and any areas where you want to create a worn look. You can also use a Brayer or rolling pin to gently press and create indents in the paint.
Sanding the Distressed Paint
Lightly sand the distressed areas with fine-grit sandpaper. This will create a more natural-looking patina and remove any excess paint residue.
Protect the Finish
To preserve your distressed cabinets, apply a clear polyurethane finish. Use a brush or spray, ensuring even coverage. Brushstrokes will add additional texture, while spraying will result in a smoother finish.
Reinstall Doors and Hardware
Once the polyurethane dries completely, reinstall the cabinet doors and hardware. Your distressed white kitchen cabinets are now complete and ready to enjoy!

Distressed Kitchen Cabinets How To Distress Your

Rescuing And Reviving A Glazed Distressed Kitchen Bella Tucker

Distressed Kitchen Cabinets How To Distress Your

Rescuing And Reviving A Glazed Distressed Kitchen Bella Tucker

Distressed White Kitchen Cabinets For Paige Looks Great With The Marble Too Rustic

Distressed And Antiqued Kitchen Cabinets

Rescuing And Reviving A Glazed Distressed Kitchen Bella Tucker

Distressed Worn Looking Kitchen Cabinet Designs

Veryyyyyyyyyyry Distressed Cabinets Jennifer Allwood Home

Tired Of Your White Cabinets And Love The French Country Look Watch How She Does This
Related Posts