How to Elevate Your Kitchen Cabinets with Crown Molding
Upgrading your kitchen cabinets with crown molding is a transformative project that can add a touch of sophistication and functionality to your space. Crown molding sits at the top of the cabinets, creating a decorative transition between the cabinets and the ceiling. With careful planning and a bit of DIY know-how, you can achieve this elegant enhancement.
Choose the Right Crown Molding
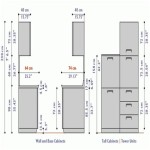
Selecting the appropriate crown molding style and size is crucial. Consider the height of your cabinets and the overall kitchen design. A larger molding will create a more dramatic effect, while a smaller one will blend subtly. You'll also need to determine the angle of the molding, which typically ranges from 30 to 60 degrees.
Prepare the Cabinets
Before attaching the crown molding, ensure the cabinet tops are level and flush. Use a level and shims as necessary. You may also want to caulk any gaps between the cabinets and the ceiling.
Cut the Crown Molding
Precisely measuring and cutting the molding is essential for a professional finish. Measure the length of each section and cut the crown molding using a miter saw at the appropriate angle. You will need to make 45-degree cuts for inside corners and 90-degree cuts for outside corners.
Attach the Molding
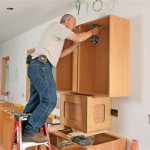
Apply a generous amount of strong adhesive to the back of the molding. Carefully position the crown molding along the top edge of the cabinets, ensuring a snug fit. Use a nail gun to secure the molding every few inches. Conceal the nail holes with wood filler and sand smooth.
Caulk and Paint
Once the molding is installed, fill any gaps with caulk and let it dry completely. This helps prevent moisture from seeping into the joints. Finally, paint the crown molding to match or complement the cabinets for a cohesive look.
Additional Tips
- Use a laser level to ensure the cuts are accurate.
- Practice cutting the molding on scrap pieces before working on the actual cabinets.
- Use a backing block when nailing the molding to prevent splitting the wood.
- If your kitchen has high ceilings, consider using corbels to support the crown molding.
- For a more elaborate look, add additional molding, such as dentil or egg-and-dart, to the bottom edge of the crown molding.
Conclusion
Adding crown molding to your kitchen cabinets is a rewarding project that can instantly elevate the aesthetic and functionality of your space. With careful planning, precise cutting, and attention to detail, you can achieve a professional-looking finish that will enhance the beauty of your kitchen for years to come.

Adding Crown Molding To Kitchen Cabinets Young House Love

3 Ways To Enhance Your Kitchen With Crown Molding

Diy Kitchen Cabinet Upgrade With Paint And Crown Molding

Cabinet Crown Molding Rogue Engineer

Kitchen Cabinet Crown Molding Reality Daydream

3 Ways To Enhance Your Kitchen With Crown Molding

Diy Kitchen Cabinet Upgrade With Paint And Crown Molding

Crown Molding For Kitchen Cabinets Fine Homebuilding

Adding Crown Moulding To Wall Kitchen Cabinets Momplex Vanilla Ana White

Adding Height To The Kitchen Cabinets Tempting Thyme
Related Posts