How To Do Kitchen Cabinet Crown Molding
Crown molding is a decorative element that can add a touch of elegance and sophistication to your kitchen cabinets. It can also help to create the illusion of height and make your ceilings appear taller. If you're thinking about adding crown molding to your kitchen cabinets, there are a few things you'll need to do to prepare. First, you'll need to measure the length of the cabinets and cut the molding to size. You'll also need to decide how you want to attach the molding to the cabinets. Once you have all of your materials and tools, you can follow these steps to install the crown molding.
Materials You'll Need:
- Crown molding
- Miter saw
- Nail gun
- Caulk gun
- Caulk
- Sandpaper
- Paint or stain (optional)
Instructions:
1. Measure and cut the molding. The first step is to measure the length of the cabinets and cut the molding to size. To do this, use a miter saw to cut the molding at a 45-degree angle. Be sure to measure the length of the molding twice before cutting it to ensure that it's the correct length.
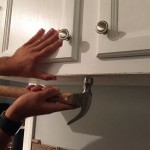
2. Attach the molding to the cabinets. Once the molding is cut to size, you can attach it to the cabinets. To do this, use a nail gun to nail the molding into place. Be sure to use finishing nails that are small enough so that they won't show through the paint or stain.
3. Caulk the seams. Once the molding is attached to the cabinets, you'll need to caulk the seams. To do this, apply a bead of caulk along the seam between the molding and the cabinets. Then, use your finger to smooth out the caulk and remove any excess.
4. Sand and paint or stain (optional). If you want to paint or stain the molding, you'll need to sand it first. To do this, use a fine-grit sandpaper to sand the molding until it's smooth. Once the molding is sanded, you can apply the paint or stain of your choice.
Tips:
- If you're not sure how to cut crown molding, you can ask for help at your local hardware store.
- Be sure to use a nail gun that's specifically designed for finishing nails.
- When caulking the seams, be sure to use a caulk that matches the color of the molding.
- If you're painting or staining the molding, be sure to let it dry completely before reattaching it to the cabinets.
With a little bit of time and effort, you can easily add crown molding to your kitchen cabinets. This simple addition can make a big difference in the overall look and feel of your kitchen.

Adding Crown Molding To Kitchen Cabinets Young House Love

Diy Kitchen Cabinet Upgrade With Paint And Crown Molding

Cabinet Crown Molding Rogue Engineer

Installing Kitchen Cabinet Crown Molding

Kitchen Cabinet Crown Molding Reality Daydream

Diy Kitchen Cabinet Upgrade With Paint And Crown Molding

3 Ways To Enhance Your Kitchen With Crown Molding

Adding Crown Moulding To Wall Kitchen Cabinets Momplex Vanilla Ana White

Crown Molding For Kitchen Cabinets Fine Homebuilding

3 Ways To Enhance Your Kitchen With Crown Molding
Related Posts