How To Draw Kitchen Cabinets in Revit
Revit offers robust tools for creating accurate and detailed kitchen designs, including the ability to model kitchen cabinets. This article outlines the process of drawing kitchen cabinets within Revit, enabling users to create realistic and functional kitchen layouts.
Before beginning, ensure the project’s units are set correctly. Typically, millimeters are used for architectural modeling. Navigate to the “Manage” tab and select “Project Units.” Confirm the length units are set appropriately.
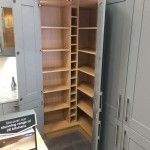
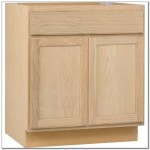
The primary method for creating kitchen cabinets involves utilizing Revit's built-in cabinet families. Revit provides a library of pre-built cabinet families, accessible through the “Insert” tab, then “Load Family.” Navigate to the appropriate library location where cabinet families are stored and select the desired cabinet type. These families offer flexibility and can be modified to suit specific design requirements.
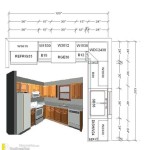
Once the desired cabinet family is loaded, place the cabinet in the model. Select the loaded family and click in the desired location within the kitchen plan view. Cabinet placement often begins with corner cabinets to establish the kitchen layout's boundaries. Subsequently, add wall cabinets and base cabinets, utilizing alignment tools to ensure a cohesive design. Revit’s snapping feature assists in accurately positioning cabinets adjacent to each other and along walls.
Modifying cabinet dimensions is crucial for achieving a precise fit. Select the placed cabinet to access its properties. Within the properties palette, modify parameters like width, depth, and height to match the desired specifications. Manufacturers' specifications should be consulted to ensure accurate representation within the model.
Cabinet materials and finishes can be customized within Revit. Within the family editor, accessible by double-clicking a cabinet, materials can be assigned to individual cabinet components. This allows for realistic visualization and accurate material takeoffs for project estimations. Explore different wood finishes, laminates, and paint colors available within the material library or create custom materials to match specific design choices.
Countertops can be created using the “Model In-Place” tool. This tool allows for creating custom geometry within the project. Sketch the countertop profile based on the cabinet layout, ensuring proper overhangs and clearances. Assign appropriate materials to the countertop surface to represent the chosen material finish.
Handles, knobs, and other cabinet hardware can be added using family instances. Similar to placing cabinets, load the desired hardware family and place instances on the cabinet doors and drawers. Position and align the hardware using Revit's alignment tools to ensure consistent placement across all cabinets.
Appliances, such as refrigerators, ovens, and dishwashers, are essential components of a kitchen design. Load the desired appliance families and position them within the kitchen layout, considering clearances and ergonomic principles. Connect appliances to the electrical and plumbing systems using Revit’s MEP tools for a comprehensive model.
Annotations, including dimensions and tags, are critical for conveying design intent. Add dimensions to indicate cabinet sizes and spacing. Utilize tags to identify cabinet types and materials. Ensure the annotations are clear, concise, and adhere to drafting standards.
Creating schedules in Revit allows for generating organized lists of cabinets and their properties. Schedules can include information such as cabinet type, dimensions, materials, and quantities. This information is valuable for construction documentation and cost estimation.
Views are essential for communicating the design effectively. Create plan views, elevation views, and 3D views to showcase the kitchen design from different perspectives. Utilize rendering tools to generate photorealistic images of the kitchen for presentations and client approvals.
Working with linked models can be beneficial in larger projects. Link the architectural model to the interior design model to coordinate the kitchen design with the overall building design. This ensures consistency and avoids clashes between different disciplines. Regularly coordinate models to ensure accurate integration and address any discrepancies.
Utilizing groups can simplify the selection and modification of multiple cabinets. Create groups of cabinets that are frequently manipulated together, such as a group of base cabinets or wall cabinets. This allows for efficient editing and repositioning of multiple elements simultaneously.
Understanding worksets within Revit is important for collaborative projects. Worksets allow multiple users to work on the same Revit model simultaneously. Assign cabinets to specific worksets based on the team's workflow to facilitate efficient collaboration and avoid conflicts.
Regularly saving the Revit model is crucial to avoid data loss. Save the model frequently and implement a robust backup strategy to protect against unforeseen issues. Utilize Revit's autosave feature for added security.

Revit Tutorial Kitchen Cabinet Part 3 Drawer Design

Revit Tutorial Kitchen Cabinet Part 4 Drawer Design

100 Revit Kitchen Families Free Content

I Don T Have Time To Create Custom Families Therevitkid Com Tutorials Tips S And Kitchen Design Examples Architecture Program Revit Tutorial

Revit For Millwork 5 Ways To Cut The Project Budget Archicgi

Custom Cabinetry System For Revit Rccs Balkan Architect

Tips Tricks Casework In Revit Hayne Architects

Revit Modern Kitchen Cabinet Families 3d Model Cgtrader

Modern Kitchen In Revit Tutorial

3d Printing Of Revit Models 5 Ways To Use In Furniture Manufacturing
Related Posts