How To Finish The Underside Of Kitchen Cabinets
Unfinished undersides of kitchen cabinets can detract from an otherwise polished kitchen design. Addressing this often-overlooked area creates a more cohesive and finished look. Whether opting for paint, veneer, beadboard, or other decorative treatments, finishing the underside offers an opportunity to enhance the kitchen's overall aesthetic.
Before beginning any finishing project, thorough preparation is crucial. This involves cleaning the underside of the cabinets with a degreaser to remove any cooking residue or grime. A mild detergent solution can also be used, followed by a clean water rinse. Allow the surfaces to dry completely before proceeding.
If the cabinet undersides are uneven or have imperfections, sanding them smooth provides a better surface for the chosen finish. Start with a medium-grit sandpaper (around 120-grit) to remove any prominent imperfections and then move to a finer grit (220-grit) to create a smooth, uniform surface. After sanding, wipe away any dust with a tack cloth.
Painting the underside of kitchen cabinets is a popular and relatively simple finishing option. Choose a high-quality paint that is formulated for kitchens and bathrooms, as these paints tend to be more durable and moisture-resistant. Primer is usually recommended, especially if the cabinets are made of raw wood or have a dark existing finish. Apply the primer evenly, allowing it to dry completely before applying the paint.
Apply the paint in thin, even coats using a brush, roller, or sprayer. Multiple thin coats provide a smoother and more durable finish than one thick coat. Allow each coat to dry thoroughly before applying the next. Once the final coat is dry, lightly sand with fine-grit sandpaper to remove any brushstrokes or imperfections, and then wipe clean with a tack cloth.
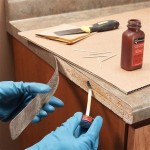
Applying veneer to the underside of cabinets offers a more sophisticated look, particularly if aiming for a wood-grain finish. Measure and cut the veneer sheets to the correct size, ensuring a precise fit. Wood veneer can be adhered using contact cement, following the manufacturer’s instructions carefully. Apply even pressure to the veneer during application to avoid air bubbles and ensure a strong bond.
Beadboard, with its classic, textured appearance, can add architectural detail to the kitchen. Measure the underside of the cabinets precisely to determine the required beadboard dimensions. Cut the beadboard to size using a saw, ensuring clean, straight cuts. Attach the beadboard to the underside of the cabinets using construction adhesive and finish nails. Fill any nail holes with wood filler, sand smooth, and then paint or stain as desired.
For a more decorative finish, consider applying wallpaper or decorative tiles to the underside of the cabinets. This option offers a wide range of patterns and colors to complement any kitchen style. Ensure the surface is clean and smooth before applying wallpaper or tiles. Use a wallpaper adhesive designed for the chosen wallpaper type. For tiles, use a thin-set mortar and follow the manufacturer’s instructions for application and grouting.
Adding decorative molding to the underside of the cabinets can enhance the visual appeal and create a more custom look. Measure and cut the molding to the appropriate lengths, using a miter saw for angled cuts. Attach the molding using wood glue and finish nails, countersinking the nails and filling the holes with wood filler. Sand smooth and then paint or stain the molding to match or complement the cabinets.
Installing under-cabinet lighting can serve both a functional and aesthetic purpose. This type of lighting provides task lighting for food preparation areas and adds ambiance to the kitchen. Various under-cabinet lighting options are available, including LED strips, puck lights, and linear fluorescent lights. Follow the manufacturer’s instructions for installation, ensuring proper wiring and connection to a power source.
Regardless of the chosen finish, protecting the finished surface is essential. Applying a clear sealant or topcoat provides an extra layer of protection against moisture, grease, and everyday wear and tear. Choose a sealant that is compatible with the chosen finish, whether paint, veneer, or another material. Apply the sealant according to the manufacturer’s instructions, ensuring even coverage.
Proper ventilation is important when working with paints, sealants, or adhesives. Open windows and doors to ensure adequate airflow and minimize exposure to fumes. Wearing a respirator or mask is also recommended, especially when working in confined spaces.

How I Finished The Undersides Of My Cabinets Living Well On

How I Finished The Undersides Of My Cabinets Living Well On

How I Finished The Undersides Of My Cabinets Living Well On

How To Easily Cover Cabinet Bottoms Onegirlmanyideas

How I Finished The Undersides Of My Cabinets Living Well On

How I Finished The Undersides Of My Cabinets Living Well On

Moldings Finish And Trim With Gary Striegler Part 14

Should The Underside Of White Painted Semi Custom Upper Cabinets Be Fi

How To Raise Your Kitchen Cabinets The Ceiling Wildfire Interiors

How To Finish Underside Of Kitchen Cabinets 7 Easy Steps
Related Posts