How to Finish the Underside of Wall Cabinets in a Revit Family
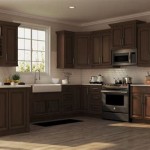
Revit families provide a powerful platform for creating detailed and parametric building components. One specific area where attention to detail significantly impacts the overall realism and usability of a Revit model is the finishing of the underside of wall cabinets. Simply placing a cabinet without addressing the underside often results in an undesirable hollow or unfinished appearance in 3D views and renders, particularly when viewed from below in kitchens, bathrooms, or open-plan spaces. Implementing a proper finish to the underside of a wall cabinet family enhances visual appeal and aligns with real-world construction practices. This article outlines methods to accomplish this within the Revit family editor, focusing on creating parametric solutions for flexibility and ease of use.
The goal is to develop a wall cabinet family that, when placed in a Revit project, displays a realistic and finished underside, regardless of the viewing angle. This involves utilizing various modeling techniques, parameterization, and material assignment within the Revit family editor.
Creating a Solid Underside Panel
The most straightforward method for finishing the underside of a wall cabinet involves creating a solid panel. This panel is essentially a flat, rectangular extrusion that covers the entire bottom surface of the cabinet. This approach is suitable for cabinets where the underside is consistently a flat surface and doesn't incorporate features like lighting or specific component recesses.
To begin, open the desired wall cabinet family in the Revit family editor. It is recommended to work within a reference plane established for the back of the cabinet. This ensures the panel aligns correctly with the overall cabinet dimensions.
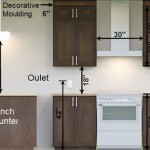
Next, create a new extrusion. Select the "Solid Extrusion" tool under the "Create" tab. Using the rectangle tool, sketch the boundaries of the underside panel. It is crucial to align and lock these sketch lines to the reference planes that define the width and depth of the cabinet. Locking the sketch lines to the reference planes ensures the panel automatically adjusts its size when the cabinet’s dimensions are modified through parameters in the project environment. This approach facilitates parametric behavior.
After sketching the boundaries, define the extrusion start and end points. The start point should typically be at the bottom face of the cabinet's carcass, and the end point should be a short distance below, usually a thickness representing the panel material (e.g., 0.02 meters for a 3/4 inch thick panel). It's vital to associate the extrusion end point (thickness) with a parameter. Create a new family parameter, typically named "Underside Panel Thickness," and assign it to the extrusion end. This enables control over the panel's thickness within the project, offering greater design flexibility.
Apply a material parameter to the solid extrusion. Select the extrusion, then locate the "Material" property in the Properties palette. Click the small rectangle to the right of the property, which opens the "Associate Family Parameter" dialog. Create a new family parameter called "Underside Panel Material." This allows for modifying the material of the underside panel within the Revit project, allowing users to choose different finishes for the cabinet’s underside without needing to edit the family itself.
This solid panel method provides a clean and efficient way to finish the underside of the cabinet. Parameterization ensures adaptability to various design requirements.
Implementing a Reveal or Recess
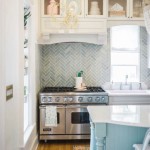
Many high-end or custom cabinets feature a subtle reveal or recess on the underside. This design element adds visual interest and depth, differentiating the cabinet from a simple flat-bottomed box. Reproducing this detail in a Revit family requires a slightly more complex modeling approach, employing voids and potentially nested families.
Begin by following the steps outlined previously for creating a solid underside panel. This panel will serve as the base for the reveal.
Next, create a void extrusion within the solid panel. Select the "Void Extrusion" tool under the "Create" tab. Similar to creating the solid extrusion, sketch the boundaries of the void. The void should be slightly smaller than the solid panel, creating a border or reveal around the perimeter. Align and lock the sketch lines to reference planes that are offset from the edges of the cabinet. These offset dimensions will define the width of the reveal.
Create family parameters for the reveal width. Define two parameters, "Reveal Width (Horizontal)" and "Reveal Width (Vertical)," and assign them to the corresponding offset distances from the cabinet edges. This allows for independent control over the reveal width on different sides of the cabinet, allowing the user to change the reveal’s appearance within the project.
Define the void extrusion's depth. This determines the depth of the reveal. Create a new family parameter named "Reveal Depth" and assign it to the extrusion end point. This parameter allows control over how far the reveal is recessed into the underside panel.
After creating the void extrusion, use the "Cut Geometry" tool under the "Modify" tab. Select the solid panel first, then select the void extrusion. This cuts the void into the solid, creating the desired reveal. Parameterization ensures the reveal adjusts automatically as the cabinet's dimensions andreveal parameters are modified.
For more elaborate reveals, consider using nested families. This involves creating a separate family representing the reveal detail and loading it into the cabinet family. Nested families offer greater flexibility for complex geometries and can be reused across multiple cabinet families. The nested family’s parameters can be linked to the host family’s parameters, allowing for control over the reveal’s appearance within the project environment.
Integrating Lighting Fixtures
Many wall cabinets incorporate integrated lighting, such as under-cabinet lights. Accurately representing these fixtures within the Revit family enhances the realism of the model and allows for proper lighting design within the project.
The most effective method for integrating lighting is to use a nested lighting fixture family. Create a separate Revit family specifically for the lighting fixture. This family should be of the "Lighting Fixture" category.
Within the lighting fixture family, model the physical representation of the fixture, including the housing, lens, and any mounting hardware. Define the light source using the "Light Source Definition" tool under the "Create" tab. Specify the light source's shape, size, color, and intensity. These parameters will impact the rendered appearance of the lighting.
Create instance parameters within the lighting fixture family to control properties such as light color, intensity, and on/off status. These parameters will be accessible and modifiable within the project environment.
Load the lighting fixture family into the wall cabinet family. Place the fixture within the cabinet, typically recessed into the underside panel. Align and lock the fixture to reference planes to ensure its position remains consistent as the cabinet’s dimensions change.
Link the lighting fixture's parameters to the wall cabinet family's parameters. This allows controlling the lighting fixture's properties from within the cabinet family and, ultimately, from the project environment. For example, link the "Light Color" parameter of the lighting fixture to a corresponding parameter in the cabinet family, enabling users to adjust the light color without directly editing the lighting fixture family.
Consider creating multiple lighting options within the nested family, such as different fixture types or light outputs, and use type catalogs to allow the user to select the appropriate lighting within the project. This enhances the family's versatility and caters to various lighting design requirements.
By implementing these modeling and parameterization strategies, users can create Revit wall cabinet families with accurately represented and parametrically controlled underside finishes, including solid panels, reveals, and integrated lighting. These advanced techniques enhance model realism and provide greater design flexibility within the project environment.

Easy Revit Cabinet Crown Molding Applying Technology To Architecture

Wall Cabinet Revit Model Family 2024

Wall Hosted Elements In A Family Autodesk Community

Day 26 How To Model An L Shaped Kitchen Cabinet In Revit

Revit Family Cabinet Families Update

Revit Parametric Family Kitchen Cabinet Design From Zero

Solved What Is The Best Way To Create Casework Families Autodesk Community

Hatching Horizontal Vertical Sections For Families Autodesk Revit Autocad Forums

Kitchen In Revit Tutorial Plug For

Bim Objects Free Wall Cabinets Bimobject
Related Posts