How to Fit Kitchen Wall Unit Brackets
Kitchen wall unit brackets are essential components for supporting your cabinets and ensuring their stability. Proper installation is crucial for the safety and longevity of your kitchen. This article provides a comprehensive guide to fitting kitchen wall unit brackets effectively.
1. Preparation and Tools
Before embarking on the installation process, it is essential to gather the necessary tools and prepare the work area. Here's a checklist:
- Wall unit brackets: Ensure you have the correct number and type of brackets for your cabinets.
- Stud finder: This tool helps locate wall studs for secure bracket attachment.
- Level: A level is essential for ensuring the cabinets are installed horizontally.
- Pencil: Use a pencil to mark the bracket positions on the wall.
- Measuring tape: Accurate measurements are crucial for proper bracket placement.
- Drill: A drill with appropriate drill bits is needed to create pilot holes and install the brackets.
- Screwdriver: A screwdriver will be required to secure the brackets to the wall.
- Safety glasses: Protect your eyes from debris when drilling.
- Work gloves: Gloves provide a better grip and protect your hands from potential injuries.
Clear the area around the installation site of any obstacles to ensure a safe working environment. If necessary, cover the floor with a drop cloth or protective material to prevent scratches.
2. Locating Wall Studs
Wall studs provide the strongest support for your kitchen wall unit brackets. They are typically spaced 16 inches apart, but it's always best to confirm their position using a stud finder.
- Run the stud finder along the wall to identify the locations of the studs.
- Mark the stud positions on the wall using a pencil.
If your brackets cannot directly align with the studs, you can use heavy-duty toggle bolts or drywall anchors to provide secure attachment. However, always prioritize attaching brackets to studs whenever possible.
3. Positioning and Marking Bracket Locations
Once you have located the wall studs, it's time to determine the precise position of your wall unit brackets. This step depends on the specific design of your cabinets and the desired height of the wall units.
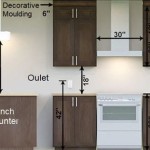
- Measure the distance between the wall and the back of the cabinet. This measurement represents the depth of the bracket you will need to install.
- Measure the width of your wall unit and determine the optimal placement of the brackets. Generally, brackets are placed at the corners of the cabinets and spaced evenly across the unit.
- Use a level to ensure that the brackets are installed horizontally.
- Mark the bracket positions on the wall using a pencil. Be sure to mark the inside edge of each bracket. This will ensure that you accurately position the bracket on the wall.
It's essential to maintain the appropriate spacing between brackets to ensure even weight distribution and stability for the kitchen cabinets.
4. Installing the Brackets
With the bracket positions marked on the wall, you can begin the installation process.
- Drill pilot holes at the marked positions using a drill bit slightly smaller than the screws that came with the brackets.
- Securely attach the brackets to the wall using the provided screws. If using toggle bolts or drywall anchors, follow the product instructions carefully.
- Double-check the level of the brackets to ensure they are properly installed.
It is recommended to use a power drill driver to ensure that the screws are driven in straight and tight. Avoid over-tightening the screws as this can damage the wall or the brackets.
5. Installing the Kitchen Wall Unit
With the brackets securely installed, you are now ready to install the kitchen wall unit.
- Carefully lift the wall unit and position it over the brackets.
- Align the wall unit with the brackets and gently lower it onto them.
- Ensure the wall unit is level and properly secured to the brackets before proceeding.
Consider using an assistant to help you lift and position the wall unit, especially if it is heavy. Always prioritize safety and use proper lifting techniques to avoid injuries.
6. Completing the Installation
Once the wall unit is installed, you can proceed with the finishing touches. This may involve installing doors, shelves, drawers, or other accessories.
- Carefully install all components according to the manufacturer's instructions.
- Ensure that all screws and fasteners are securely tightened.
Finally, double-check the stability of the wall unit by gently pulling on it. If the unit feels secure and stable, you have successfully installed your kitchen wall unit brackets.

Wall Unit Fitting Adjustments Diy Kitchens Advice

Wall Unit Fitting Adjustments Diy Kitchens Advice

How To Install Kitchen Cabinets The Wall And Floor With Ease

Wall Unit Fitting Adjustments Diy Kitchens Advice

How To Install Kitchen Cabinets The Wall And Floor With Ease

How To Install A Wall Unit In Your Kitchen

X2 Kitchen Wall Cabinet Hanger Mounting Plastic 29000740

Wall Unit Fitting Adjustments Diy Kitchens Advice

Wall Unit Fitting Adjustments Diy Kitchens Advice

Hanging Bracket Wall Hanger Plate 63mm Kitchen Cabinet Cupboard Mounting Overhead 150kg Load Capacity Fixing King
Related Posts