How To Fit Wickes Kitchen Plinths: Essential Aspects
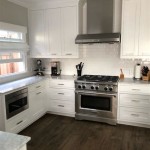
Fitting Wickes kitchen plinths is a crucial aspect of completing your kitchen installation. These plinths serve both functional and aesthetic purposes, protecting your cabinets from moisture and enhancing the overall look of your kitchen. Understanding the essential aspects of fitting Wickes kitchen plinths is key to achieving a seamless and durable installation.
In this guide, we'll delve into the essential aspects of fitting Wickes kitchen plinths, providing you with step-by-step instructions and tips to ensure a successful installation.
### Essential Aspects of Fitting Wickes Kitchen Plinths1. Planning and Measurement
Before beginning the installation, it's essential to plan your layout carefully. Measure the height of your cabinets and the length of the plinth required. Ensure you have all the necessary materials, including plinths, end caps, and adhesive.
2. Preparing the Surface
Clean and dry the surface where the plinth will be fitted. Remove any grease or debris to ensure a strong adhesive bond. Level the surface to prevent gaps or unevenness.
3. Cutting the Plinth
Measure and cut the plinth to the desired length using a miter saw or a sharp utility knife. Make clean, precise cuts to ensure a tight fit.
4. Applying Adhesive
Apply a generous bead of adhesive to the back of the plinth. Use a caulking gun or a squeeze bottle for even distribution.
5. Fitting the Plinth
Align the plinth with the cabinet base and press it firmly into place. Hold it for a few minutes to allow the adhesive to set.
6. Fitting the End Caps
Measure and cut the end caps to the height of the plinth. Apply adhesive to the ends of the plinth and slide the end caps into place.
7. Sealing and Finishing
Once the plinths and end caps are fitted, use a silicone sealant to seal any gaps or joints. This will prevent moisture from seeping in and protect the cabinets.
### ConclusionFitting Wickes kitchen plinths effectively requires careful attention to these essential aspects. By following the instructions provided, you can ensure a seamless and professional-looking installation. Remember to plan, measure, and cut accurately, use high-quality adhesive, and seal any gaps to achieve a durable and visually appealing result.

How To Fit A Kitchen Plinth Pelmet And Cornice With Wickes

How To Fit A Kitchen Plinth Pelmet And Cornice With Wickes

How To Fit A Kitchen Plinth Pelmet And Cornice With Wickes

How To Fit Kitchen Plinths Pelmets Cornices

How To Fit A Kitchen Plinth Pelmet And Cornice With Wickes

Wickes Dakota Continuous Plinth 2 6m Co

How To Fit A Kitchen Wickes

Wickes Adjustable Plinth Feet 135 170mm Black Pack Of 4 Co

Wall Units Kitchen Diy Kitchens

Wickes Central Heating Stainless Steel Plinth Heater 1 6kw Co
Related Posts