How to Fit Wren Kitchen Pelmet
Wren Kitchens are known for their high-quality, stylish designs, and their pelmets are no exception. They add a touch of elegance and sophistication to any kitchen, while also providing practical benefits like hiding unsightly pipes or electrical wiring. However, installing a Wren Kitchen pelmet can seem daunting, but with the right tools and a bit of patience, it is a manageable DIY project.
Preparing for Installation
Before you begin, it is crucial to gather all the necessary tools and materials. You’ll need:
- Wren Kitchen pelmet kit, including the pelmet itself, brackets, screws, and instructions
- Tape measure
- Level
- Pencil
- Drill with appropriate drill bits
- Screwdriver
- Safety glasses
Ensure that the area where you plan to install the pelmet is clean and free of any obstructions. Carefully read through the instructions provided by Wren Kitchens, as they may contain specific details relevant to your particular pelmet model.
Installing the Brackets
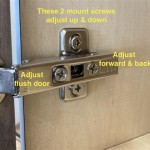
The first step is to install the brackets that will support the pelmet. The Wren Kitchen pelmet kit will come with brackets specifically designed for your pelmet model. These brackets are typically attached to the wall, either above or below the cabinets, depending on the design.
Using your tape measure, determine the exact location for each bracket. Ensure that the brackets are evenly spaced and aligned with the pelmet. Use your level to ensure that each bracket is perfectly horizontal. Mark the wall with a pencil where each bracket will be attached.
Using your drill, create pilot holes at the marked locations. This will make it easier to drive in the screws and prevent the wood from splitting. Attach the brackets to the wall using the screws provided in the kit. Make sure the screws are securely fastened.
Attaching the Pelmet
With the brackets securely installed, you are ready to attach the pelmet. The pelmet itself will usually have slots or grooves on the back that fit over the brackets. Carefully align the pelmet with the brackets, ensuring it is level and centered.
Depending on the design of your pelmet, there may be additional clips or fasteners that need to be attached to the brackets. Follow the instructions carefully to ensure the pelmet is securely attached and will not fall down.
Once the pelmet is in place, check that it is level using your level. If necessary, make minor adjustments to ensure it is perfectly aligned.
Finishing Touches
After the pelmet is installed, take the time to inspect it for any imperfections or gaps. If any issues arise, use the provided screws or other fasteners to make adjustments. You can also use a sealant or caulk to fill in any gaps between the pelmet and the wall.
If your Wren Kitchen pelmet has any decorative elements, such as molding or trim, carefully attach them following the provided instructions. Once the pelmet is completely installed, step back and admire your handiwork. It should add a touch of elegance and functionality to your kitchen.
Wren Kitchens How To Fit A Kitchen Ed Pelmet Installation Guide
Kitchen Installation Guides Wren Kitchens
Wren Kitchens How To Fit A Kitchen Cornice Installation Guide
Kitchen Installation Guides Wren Kitchens
Wren Kitchens How To Fit A Kitchen Ed Pelmet Installation Guide
Wren Kitchens How To Fit A Kitchen Ed Pelmet Installation Guide
Wren Kitchens How To Fit A Kitchen Ed Pelmet Installation Guide
Wren Kitchens How To Fit A Kitchen Ed Pelmet Installation Guide
Kitchen Installation Guides Wren Kitchens
How To Fit Wren Kitchen Wall Units Diy
Related Posts