How To Fit Wren Kitchen Wall Cabinets
Fitting Wren kitchen wall cabinets requires careful planning, precise execution, and adherence to safety guidelines. This article provides a detailed, step-by-step guide to installing these cabinets correctly, ensuring a secure and aesthetically pleasing result. Proper installation is crucial for longevity, functionality, and the overall appearance of the kitchen.
Before commencing the installation, a thorough assessment of the kitchen space is paramount. This involves measuring the wall space accurately, identifying the location of electrical wiring and plumbing, and understanding the composition of the wall itself (e.g., drywall, plaster, brick). This preliminary assessment will inform the selection of appropriate fixings and the overall installation approach.
Wren kitchen cabinets are typically delivered flat-packed and require assembly. This process usually involves connecting the cabinet sides, back, top, and base using cam locks and dowels. It’s essential to follow the manufacturer's instructions explicitly during assembly. Any deviation from these instructions can compromise the structural integrity of the cabinet.
Tools required for the installation include a spirit level, measuring tape, pencil, stud finder, drill with various drill bits, screwdriver (both manual and powered), safety glasses, work gloves, and a wall cabinet hanging rail. The type of drill bits will depend on the wall construction, and it is crucial to use appropriate screws and wall plugs for the chosen fixings.
Preparation: Planning and Marking
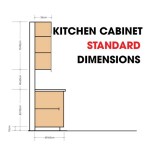
The first key point is the meticulous preparation involved in planning and marking the wall. This stage is crucial for ensuring cabinets are level, aligned, and securely mounted. The process begins with determining the desired height of the wall cabinets. A standard height is typically 50-60cm above the worktop, but this can be adjusted depending on individual preferences and the kitchen layout. A consistent height ensures a visually appealing and ergonomically sound kitchen.
Once the height is determined, a horizontal line should be drawn across the wall at the desired height using a spirit level and pencil. This line serves as a reference point for the top edge of the hanging rail. It is vital that this line is perfectly level, as any deviations will be magnified across the entire run of cabinets.
A stud finder is then used to locate wall studs behind the drywall or plaster. These studs provide the strongest support for the cabinets. Mark the location of each stud along the horizontal line. If no studs can be found at the desired fixing points, appropriate wall anchors or plasterboard fixings must be used to ensure a secure hold.
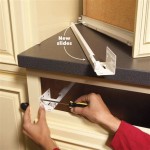
The hanging rail, supplied by Wren, is then attached to the wall along the marked horizontal line. The rail should be positioned so that its top edge aligns with the line. Use appropriate screws to secure the rail to the wall studs. If the rail spans an area where no studs are present, use drywall anchors or appropriate fixings suitable for the wall type. Ensure the rail is securely fixed to the wall, as it will bear the weight of the cabinets.
Before hanging the cabinets, double-check the horizontal line and the security of the hanging rail. Any errors at this stage will propagate throughout the installation, leading to misaligned or unstable cabinets.
Installation: Hanging and Securing the Cabinets
The second key point focuses on the actual process of hanging and securing the cabinets to the hanging rail. This requires careful coordination and attention to detail to prevent damage to the cabinets or the wall.
With the hanging rail securely in place, the cabinets can be lifted and hung onto the rail. Wren cabinets typically have adjustable hanging brackets on the back that hook onto the rail. Ensure the brackets are properly engaged with the rail and that the cabinets are securely seated.
Once a cabinet is hung, use a spirit level to check that it is perfectly level both horizontally and vertically. Adjust the hanging brackets as necessary to achieve a level position. This step is crucial for ensuring the cabinets are aligned and that doors and drawers will operate smoothly.
With the first cabinet level, the next cabinet can be hung. Use clamps to hold the two cabinets together tightly. This will ensure that they are aligned flush with each other. Drill pilot holes through the sides of the cabinets where they meet, and then securely screw them together. This process is known as 'butting and scribing' and creates a seamless and strong connection between the cabinets.
Repeat this process for all remaining cabinets, ensuring each is level, aligned, and securely connected to its neighbor. Take your time and double-check your work frequently. Any errors at this stage will be difficult to correct later.
After all the cabinets are hung and connected, inspect the entire run for any gaps or misalignments. Adjust the hanging brackets or loosen and re-tighten screws as necessary to achieve a perfect finish. Silicone sealant can be used to fill any small gaps between the cabinets and the wall for a clean and professional look.
Finally, install any shelves, doors, and drawers that were removed during the hanging process. Adjust the hinges and drawer runners as necessary to ensure smooth and proper operation. Check that all doors and drawers close fully and evenly.
Finishing Touches: Adjustments and Aesthetics
The third key point encompasses the finishing touches that elevate the installation from functional to aesthetically pleasing. These adjustments and details contribute significantly to the overall appearance and functionality of the kitchen.
Once the main installation is complete, attention should be given to adjusting the cabinet doors and drawers. Wren cabinets typically have adjustable hinges and drawer runners that allow for fine-tuning of their alignment. The goal is to ensure that all doors and drawers close evenly, without rubbing or binding.
Adjust the hinges by loosening the screws and repositioning the door slightly. Tighten the screws when the door is in the desired position. Repeat this process for all doors, checking their alignment with each other and with the cabinet frames. Similarly, adjust the drawer runners to ensure that the drawers slide smoothly and close fully.
Cover plates are provided with Wren cabinets to conceal the adjustable hanging brackets. These plates are typically clipped or screwed into place, providing a clean and finished look to the interior of the cabinets. Install these plates carefully, ensuring they are securely attached and properly aligned.
Consider adding additional features to enhance the functionality and aesthetics of the cabinets. This might include installing under-cabinet lighting, adding door handles or knobs, or fitting internal organizers. These additions can greatly improve the usability and visual appeal of the kitchen.
Finally, thoroughly clean the cabinets and the surrounding area. Remove any dust, debris, or fingerprints. Inspect the entire installation one last time, looking for any imperfections or areas that need further attention. A clean and polished finish will showcase the quality of the cabinets and the care taken during installation.
In summary, fitting Wren kitchen wall cabinets requires careful planning, precise execution, and attention to detail. By following these steps and taking your time, it is possible to achieve a professional and aesthetically pleasing result. Remember to always prioritize safety and to consult the manufacturer's instructions for specific guidance on your chosen cabinets.

How To Fit Wren Kitchen Wall Units Diy

How To Arrange Your Kitchen Cabinets And Cupboards Wren Kitchens

1 Tra

Wren Kitchens Infinity Wall Unit Installation

Kitchen Installation Guides Wren Kitchens

Wall Unit Fitting Adjustments Diy Kitchens Advice

Wren Kitchens Infinity Wall Décor Panel Installation

How To Fit A Wall Unit

How To Arrange Your Kitchen Cabinets And Cupboards Wren Kitchens

How To Fit Wren Kitchen Wall Units Diy
Related Posts