How To Fix A Kitchen Drawer Slide
Kitchen drawer slides, while seemingly simple mechanisms, are crucial for the smooth operation and functionality of a kitchen. These slides, responsible for allowing drawers to extend and retract effortlessly, are subject to wear and tear over time. When they malfunction, sticking, binding, or even complete failure can occur, leading to frustration and inconvenience. Addressing these issues promptly can prevent further damage to the drawer, cabinet, and its contents. Understanding the common problems associated with drawer slides and the methods for fixing them is essential for maintaining a functional and organized kitchen.
Drawer slides come in various types, each with its own strengths and weaknesses. Roller slides, typically made of nylon or plastic rollers, are a common and economical option, but they are prone to wear and can become noisy with age. Ball-bearing slides offer smoother operation and higher weight capacity but can be more susceptible to dirt and debris. Side-mounted slides are attached to the sides of the drawer and cabinet, while bottom-mounted slides are fixed beneath the drawer. Center-mounted slides, often found in older cabinets, use a single slide positioned in the center of the drawer. Identifying the type of slide installed is the first step in diagnosing and repairing any issues.
Before embarking on any repairs, it is crucial to gather the necessary tools and materials. These typically include a screwdriver set (both Phillips head and flathead), a flashlight, a level, a measuring tape, a pencil, lubricant (such as silicone spray or WD-40), sandpaper, wood glue, and potentially replacement screws or slides, depending on the nature of the problem. Safety glasses are also recommended to protect the eyes from debris. A clean workspace is essential for organizing components and preventing loss of small parts. Having a clear understanding of the task at hand and the required tools will contribute significantly to a successful repair.
Key Point 1: Diagnosing the Drawer Slide Problem
The first step in fixing a malfunctioning drawer slide is to accurately diagnose the problem. Several common issues can affect drawer slide performance. A sticking drawer, one that requires excessive force to open or close, may be caused by several factors. First, check for obstructions inside the drawer that may be rubbing against the cabinet frame. Overloading the drawer can also cause it to bind. Secondly, examine the drawer slides themselves for any signs of damage, such as bent rollers, broken ball bearings, or loose screws. Misalignment of the slides is another frequent culprit. This can occur due to loose screws, warped cabinet frames, or simply the settling of the house over time. A thorough visual inspection, aided by a flashlight, is essential for identifying the source of the problem.
Another common problem is a drawer that sags or droops when extended. This is often caused by worn or broken slides, particularly in drawers that frequently hold heavy items. The weight capacity of the slides may have been exceeded over time, leading to premature failure. In such cases, replacing the slides with heavier-duty versions may be necessary. Loose screws connecting the slides to the drawer or cabinet frame can also cause sagging. Tightening these screws or, if the screw holes are stripped, replacing them with longer screws or using wood glue and dowels to reinforce the holes can resolve the issue.
Noise is another indication of a problem with the drawer slides. Squeaking, grinding, or rattling sounds often indicate a lack of lubrication or the presence of dirt and debris within the slides. Ball-bearing slides are particularly susceptible to this issue. Cleaning the slides and applying a silicone-based lubricant can often eliminate the noise. If the noise persists, it may indicate worn or damaged components within the slide mechanism, requiring replacement of the slides. Ignoring the noise can lead to further damage and eventual failure of the slides.
To properly diagnose the problem, remove the drawer completely from the cabinet. This will allow for a detailed inspection of both the drawer slides and the cabinet-mounted tracks. Carefully examine the slides for any signs of damage, wear, or misalignment. Use a level to check the alignment of the cabinet tracks, ensuring they are parallel and plumb. Also, inspect the drawer box itself for any signs of warping or damage that may be contributing to the problem. Once the source of the problem has been identified, proceed with the appropriate repair steps.
Key Point 2: Repairing and Adjusting Drawer Slides
Once the problem is diagnosed, the next step is to repair or adjust the drawer slides. Several simple repairs can often resolve common issues. If the drawer is sticking due to friction, start by cleaning the slides and applying a lubricant. Use a clean cloth or brush to remove any dirt, dust, or debris from the slides and tracks. Apply a silicone-based lubricant, avoiding oil-based lubricants that can attract more dirt. Work the drawer back and forth to distribute the lubricant evenly. In many cases, this simple step can significantly improve the smoothness of the drawer's operation.
If loose screws are the cause of the problem, carefully tighten them using a screwdriver. If the screw holes are stripped, meaning the screws no longer grip the wood, there are several options. One option is to use a slightly longer or thicker screw that can find a better hold in the wood. Another option is to insert wooden toothpicks or small dowels into the screw hole, along with wood glue, to create a tighter fit for the screw. Allow the glue to dry completely before re-tightening the screw. For more extensive damage, consider using wood filler to repair the screw hole before re-drilling a pilot hole and inserting the screw.
Misalignment of the drawer slides can also cause sticking or binding. Use a level to check the alignment of the cabinet tracks. If the tracks are not level or plumb, shim them with thin pieces of wood or cardboard to correct the alignment. Ensure that the shims are securely attached to the cabinet frame. Also, check the alignment of the drawer slides on the drawer box. Loosen the screws holding the slides in place and adjust the position of the slides until they are properly aligned with the cabinet tracks. Retighten the screws securely, ensuring that the drawer operates smoothly.
For drawers that sag, reinforcing the drawer box itself can provide additional support. Add corner braces to the inside of the drawer box to strengthen the joints and prevent warping. You can also attach a thin piece of plywood to the bottom of the drawer to provide additional support. Ensure that the reinforcing materials do not interfere with the operation of the drawer slides. When making adjustments, work incrementally and test the drawer's operation frequently to ensure that the problem is resolved without creating new issues.
Key Point 3: Replacing Drawer Slides
In some cases, repairing the drawer slides may not be possible, and replacement is necessary. This is often the case when the slides are severely damaged, worn, or broken. When replacing drawer slides, it is crucial to choose the correct type and size. Begin by measuring the length of the existing slides. Drawer slides are typically available in standard lengths, such as 12 inches, 14 inches, 16 inches, 18 inches, 20 inches, and 22 inches. Choose a replacement slide that matches the length of the original slide to ensure a proper fit.
Consider the weight capacity of the drawer when selecting replacement slides. If the drawer frequently holds heavy items, choose slides with a higher weight capacity to prevent premature failure. Ball-bearing slides generally offer higher weight capacity than roller slides. Also, consider the type of slide (side-mounted, bottom-mounted, or center-mounted) and choose a replacement that matches the original configuration. Purchasing slides that are not intended for your cabinet style is likely to result in them not fitting correctly.
Before installing the new slides, remove the old slides from both the drawer and the cabinet frame. Use a screwdriver to remove the screws holding the slides in place. If the screws are stripped or difficult to remove, use a screw extractor or a drill to carefully remove them. Clean the mounting surfaces on both the drawer and the cabinet frame to ensure a clean and even surface for the new slides.
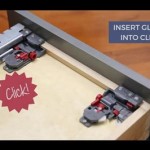
Install the new slides, following the manufacturer's instructions. Typically, the drawer slides are attached to the drawer box first, followed by the cabinet tracks. Ensure that the slides are properly aligned and securely fastened to both the drawer and the cabinet. Use a level to check the alignment of the cabinet tracks before tightening the screws. After installing the new slides, test the operation of the drawer to ensure that it opens and closes smoothly. Make any necessary adjustments to achieve optimal performance. Replacing drawer slides can significantly improve the functionality of a kitchen and extend the lifespan of cabinets.
Preventative maintenance is crucial for extending the lifespan of drawer slides. Regularly clean the slides and apply lubricant to prevent sticking and binding. Avoid overloading drawers with excessive weight. Periodically check the screws holding the slides in place and tighten them as needed. By following these simple maintenance tips, the drawers should continue to smoothly operate.

How To Fix Drawer Slides Repair Guide Connection

Replacing Drawer Slides Extreme How To

How To Replace Kitchen Drawers Shelfgenie

How To Repair A Drawer Slide

How To Replace Old Drawer Slides Only 5 Easy Steps Vadania Home Upgrader

How To Install Drawer Slides The Easy Way

Drawer Won T Stay Closed 3 Simple Ways You Can Make It Tight Again Knockoffdecor Com

How To Fix A Kitchen Drawer Slide That Does Not Close All The Way Ehow

Fixing Drawers How To Make Creaky Glide Diy
:strip_icc()/102326027-c240150e2d95420a85bc45f473f98644.jpg?strip=all "How To Install Soft Close Drawer Slides")
How To Install Soft Close Drawer Slides
Related Posts