How to Fix Base Cabinets Attached to Walls
Base cabinets form the foundational support for kitchen countertops and provide essential storage. Their secure attachment to the wall is critical for both safety and functionality. Over time, due to wear and tear, water damage, or improper installation, these cabinets can become loose or detached. Addressing these issues promptly prevents further damage and ensures the longevity of the kitchen's structure. This article outlines the steps involved in diagnosing and rectifying common problems associated with base cabinets attached to walls.
Before commencing any repair work, it is crucial to prioritize safety. Disconnect any electrical appliances near the work area and turn off the water supply if plumbing connections are nearby. Clear the cabinet interiors to reduce weight and provide unobstructed access to the problem areas. Furthermore, wear appropriate protective gear, including safety glasses and gloves, to prevent injury during the repair process.
Identifying Common Problems
Several indicators suggest that base cabinets require attention. Obvious signs include cabinets pulling away from the wall, sagging, or wobbling. Less obvious issues may involve difficulty opening and closing cabinet doors or drawers, uneven countertop surfaces, or water stains around the cabinet perimeter. A thorough inspection is necessary to pinpoint the root cause of the problem. This examination should include checking the attachment points of the cabinet to the wall, the condition of the wall itself, and the integrity of the cabinet frame.
Inspect the screws used to anchor the cabinets to the wall. Over time, these screws can loosen, strip, or corrode, compromising their holding power. Examine the wall behind the cabinets for signs of water damage, such as discoloration, mold, or softening of the drywall. Water damage weakens the wall's structural integrity and makes it difficult for fasteners to maintain a secure grip. Also, verify that the cabinets are level, as an unlevel condition can place undue stress on the attachment points and contribute to loosening.
Another common problem arises from inadequate installation techniques. Cabinets not properly anchored to wall studs, or relying solely on drywall anchors, are prone to failure over time. The weight of the cabinet and its contents exerts constant force on the fasteners, eventually causing them to pull out of the wall. Furthermore, if the cabinet frame itself is damaged or weakened, it may not provide a secure mounting surface, regardless of the integrity of the wall and fasteners.
Tightening or Replacing Fasteners
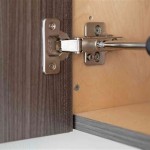
One of the simplest fixes involves tightening or replacing the existing fasteners. If the screws are loose but still in good condition, try tightening them with a screwdriver or drill. If the screws are stripped, meaning the threads are no longer gripping the wood or drywall, they need to be replaced. When replacing screws, select ones that are the same length or slightly longer than the originals, ensuring they penetrate deeply into the wall stud. Choosing screws with a larger diameter can also increase their holding power.
If the existing screw holes are too damaged to hold new screws, consider using screw hole repair kits or wood fillers. Screw hole repair kits typically consist of small plastic or wooden plugs that are inserted into the hole to provide a fresh surface for the new screw to grip. Wood fillers, such as wood putty or epoxy, can be used to fill the hole and provide a solid base for re-drilling. Allow the wood filler to dry completely before drilling a pilot hole and installing the new screw.
In cases where the cabinets were installed using only drywall anchors, it is essential to replace them with screws that are anchored to wall studs. Locate the studs using a stud finder and mark their positions on the wall. Remove the existing drywall anchors and align the cabinets so that the mounting points are centered on the studs. Drill pilot holes through the cabinet frame and into the studs, then install screws that are long enough to penetrate at least 1.5 inches into the stud. This provides a much more secure and reliable attachment point.
Addressing Wall Damage
Wall damage, particularly water damage, requires more extensive repairs. If the drywall is soft or crumbling, it needs to be replaced before the cabinets can be reattached. Remove the damaged drywall section, extending the cutout to the nearest wall studs. Install new drywall, ensuring that it is properly taped and mudded. Allow the mud to dry completely, then sand it smooth and prime the surface before painting to match the existing wall color.
Addressing water leaks is also crucial to prevent further damage. Identify and repair the source of the leak, whether it's a leaky pipe, a dripping faucet, or a roof issue. Once the leak is fixed, allow the area to dry completely before proceeding with any repairs. Consider applying a waterproof sealant around the cabinet perimeter to prevent future water intrusion.
In situations where the wall is severely damaged or structurally unsound, it may be necessary to consult with a professional contractor. A contractor can assess the extent of the damage and recommend appropriate repairs. This may involve reinforcing the wall with new studs, replacing entire sections of drywall, or addressing underlying structural issues.
If the wall studs themselves are damaged, this complicates the repair. This commonly happens if the studs are severely infested with termites or affected by dry rot, and the only solution is often total replacement of the affected wall sections. This is a difficult task that will often remove the entirety of surrounding drywall and electrical wiring, requiring a complete re-installment of those features after.
Leveling and Shimming Cabinets
Before securing the cabinets to the wall, ensure that they are level. Use a level to check the top and front of the cabinets, adjusting their position as needed. If the floor is uneven, use shims to level the cabinets. Shims are thin pieces of wood or plastic that can be inserted under the cabinet base to raise it to the desired height. Place shims at the corners of the cabinet and along the base as needed to achieve a level surface.
Once the cabinets are level, secure them to each other using screws. This helps to create a solid and stable unit. Drill pilot holes through the cabinet frames and install screws that are long enough to penetrate both cabinets. Countersink the screws so that they are flush with the surface of the cabinet frame. Clamping cabinets together during this process will allow for a flush connection.
After the cabinets are leveled and secured together, reattach them to the wall using the appropriate fasteners. Ensure that the screws are anchored to wall studs and that they are tightened securely. Check the level again after tightening the screws to ensure that the cabinets have not shifted during the process.
It's important to check that the cabinets are plumb, meaning they are straight vertically as well as being level. If a cabinet is leaning too far forward, the weight of the countertops and contents can cause the attachment screws to pull from the walls. To rectify this, shims can be inserted behind the upper portions of the base cabinets to force them to be plumb.
Once the cabinets are secure and level, inspect the countertop surface to ensure that it is even. If the countertop is uneven, use shims to adjust the height of the cabinets as needed. Apply a bead of caulk along the seam between the countertop and the wall to prevent water from seeping behind the cabinets.

Fitting Kitchen Units On Uneven Walls Has Never Been Easier

Alternative Easy Way To Hang Cabinets

Setting Kitchen Cabinets Sterling Lumber Serving Colorado Since 1909

Cabinet Installation Plumb And Level Edgewood Cabinetry

The Friendly Survival Guide To Installing Sektion Kitchen Cabinets

How To Install Hang Wall Cabinets Easy Simple

Installing Framed Cabinets

How To Install Kitchen Cabinets The Wall And Floor With Ease

How To Fix A Kitchen Cabinet That Is Loose On The Wall

How To Install Kitchen Cabinets