How to Fix a Broken Kitchen Cabinet Drawer
Kitchen cabinet drawers endure significant wear and tear. They are constantly opened, closed, and often overloaded with kitchen essentials. Over time, this constant use can lead to various types of damage. A broken kitchen cabinet drawer, while frustrating, is often repairable with the right tools, materials, and knowledge. This article provides a guide to diagnosing common drawer issues and outlines the steps for effectively repairing them.
Identifying the Problem
Before attempting any repairs, it is crucial to accurately identify the cause of the damage. Common issues that lead to broken kitchen cabinet drawers include damaged drawer slides, broken drawer boxes, and loose or broken drawer fronts. A careful inspection of the entire drawer assembly, including the drawer box, drawer front, and drawer slides, is necessary. Look for signs of wear, such as splintered wood, stripped screws, loose joints, and bent or damaged hardware.
Drawer Slides:
Examine the drawer slides, both the part attached to the cabinet frame and the part attached to the drawer box. Check for bent metal, missing screws, or loose rollers. Misaligned slides can also cause the drawer to bind or stick, eventually leading to damage.Drawer Box:
Inspect the drawer box for signs of damage. Look for cracks, splits, or breaks in the wood. Check the joints where the sides, front, and back of the drawer box are joined together. These joints are often glued and screwed, and they can weaken over time.Drawer Front:
The drawer front is the visible part of the drawer. Check for loose screws, broken glue joints, or damage to the wood or finish. A loose drawer front can cause the drawer to sag or become difficult to open and close. If the drawer front is simply loose, tightening screws might be sufficient. However, if the wood is damaged or the joints are broken, more extensive repairs may be needed.It is also important to consider the age and quality of the cabinets themselves. Older cabinets may be more prone to damage due to aging materials and construction techniques. Cheaper cabinets might use lower-quality materials that are more likely to fail under stress.
Repairing Damaged Drawer Slides
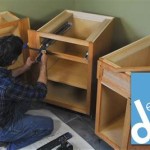
One of the most common issues leading to drawer problems is damaged or malfunctioning drawer slides. Replacing damaged slides is often a straightforward process that can significantly improve drawer functionality. Before beginning, gather the necessary tools and materials: a screwdriver (both Phillips head and flathead might be needed), a measuring tape, replacement drawer slides, and possibly wood shims.
Removing the Old Slides:
Begin by fully extending the drawer and carefully removing it from the cabinet. Most drawer slides have a release mechanism, such as a lever or button, that allows the drawer to be detached from the slides. Once the drawer is removed, unscrew the old slides from both the cabinet frame and the drawer box. Pay attention to the orientation of the slides and note any specific mounting details. Also, clean any debris or old adhesive from the mounting surfaces.Selecting Replacement Slides:
Measure the length of the old slides and the distance from the cabinet opening to the back of the cabinet. Use these measurements to purchase replacement slides of the correct size and type. Drawer slides are available in various lengths and weight capacities. Consider the weight of the items typically stored in the drawer when selecting replacement slides. Ensure the new slides are compatible with your cabinet and drawer construction. Ball-bearing slides are generally more durable and provide smoother operation than roller slides.Installing the New Slides:
Align the new slides with the screw holes on the cabinet frame and drawer box. Use the original screws or new screws of the same size and type to attach the slides securely. Ensure the slides are properly aligned and level. If the screw holes are stripped, use wood glue and toothpicks or small wooden dowels to fill the holes before re-inserting the screws. This will provide a more secure hold. If shims are needed to ensure proper alignment, place them behind the slides before attaching them to the cabinet frame or drawer box.Once the slides are installed, carefully re-insert the drawer into the cabinet and test its operation. The drawer should slide smoothly and easily without binding or sticking. If the drawer does not operate correctly, re-check the alignment of the slides and make any necessary adjustments.
Repairing a Broken Drawer Box
A broken drawer box can compromise the integrity of the entire drawer assembly. Depending on the severity of the damage, a drawer box can be repaired or may need to be replaced entirely. Minor cracks and splits can often be repaired with wood glue and clamps. More significant damage, such as broken corners or completely separated joints, may require more extensive repairs or replacement of the affected parts.
Repairing Minor Cracks and Splits:
Clean the area around the crack or split with a soft cloth and remove any loose debris. Apply wood glue to the crack and carefully clamp the drawer box together. Use enough clamps to ensure even pressure along the entire length of the crack. Wipe away any excess glue with a damp cloth. Allow the glue to dry completely according to the manufacturer's instructions, typically at least 24 hours.Reinforcing Weak Joints:
Weak or loose joints can be reinforced with wood glue and screws or by adding corner braces. Apply wood glue to the joint and clamp it securely. Once the glue is dry, drive screws through the joint at an angle to provide additional strength. Alternatively, install corner braces to the inside corners of the drawer box. These braces provide additional support and prevent the joint from separating. Use screws that are long enough to penetrate the wood securely but not so long that they protrude through the outside of the drawer box.Replacing Damaged Parts:
If a part of the drawer box is severely damaged, such as a broken side or corner, it may be necessary to replace the entire piece. Carefully measure the dimensions of the damaged piece and cut a replacement from plywood or solid wood of the same thickness. Use wood glue and screws to attach the replacement piece to the remaining parts of the drawer box. Ensure the replacement piece is properly aligned and square to the rest of the drawer box. Clamps can be used to hold the pieces together while the glue dries.Once the repairs are complete, sand any rough edges or uneven surfaces and apply a finish that matches the existing drawer box. This will help to protect the wood and improve the appearance of the drawer.
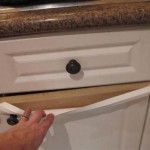
Reattaching a Loose or Broken Drawer Front
A loose or broken drawer front can detract from the overall appearance of the kitchen and make the drawer difficult to use. In many cases, reattaching a drawer front is a relatively simple repair that can be accomplished with basic tools and materials.
Tightening Loose Screws:
Often, a loose drawer front is simply the result of loose screws. Check the screws that attach the drawer front to the drawer box. If the screws are loose, try tightening them. If the screw holes are stripped, use wood glue and toothpicks or small wooden dowels to fill the holes before re-inserting the screws. This will provide a more secure hold.Gluing and Clamping a Broken Joint:
If the drawer front has separated from the drawer box due to a broken glue joint, apply wood glue to the joint and clamp the drawer front to the drawer box. Use enough clamps to ensure even pressure along the entire length of the joint. Wipe away any excess glue with a damp cloth. Allow the glue to dry completely according to the manufacturer's instructions.Using Reinforcement Brackets:
For added strength, consider using reinforcement brackets to attach the drawer front to the drawer box. These brackets can be attached to the inside of the drawer box and screwed into the back of the drawer front. This will provide additional support and prevent the drawer front from coming loose again. Ensure the brackets are properly aligned and do not interfere with the operation of the drawer.Replacing a Damaged Drawer Front:
If the drawer front is severely damaged, such as cracked or splintered, it may be necessary to replace it entirely. Carefully measure the dimensions of the old drawer front and purchase a replacement from a cabinet supplier or home improvement store. Ensure the replacement drawer front is the same size and style as the original. Attach the new drawer front to the drawer box using screws and wood glue, ensuring it is properly aligned and square.After reattaching or replacing the drawer front, it may be necessary to adjust the drawer slides to ensure the drawer operates smoothly. Adjust the slides until the drawer opens and closes without binding or sticking. With careful attention to detail and the proper tools and materials, repairing a broken kitchen cabinet drawer can be a manageable task that can save time and money compared to replacing the entire cabinet.

Kitchen Cabinet Drawer Fix Diy That Dreaded Busted Gone

How To Fix Broken Drawer Fronts Easily Table And Hearth

How To Fix A Broken Kitchen Drawer Bathroom Pull Out Repair

How To Fix Drawer Slides Repair Guide Connection

How To Replace Kitchen Drawers Shelfgenie

Need Help With Broken Kitchen Drawer Someone In North County Decks

How To Fix A Broken Cabinet Drawer Diy Quick And Easy Front Repair

How To Fix A Broken Cabinet Drawer Diy Quick And Easy Front Repair

How To Fix A Broken Drawer The Home Depot

Home Dzine Kitchen Fix Loose Or Broken Drawer Fronts
Related Posts