How To Fix Chipped Kitchen Cupboards
Kitchen cupboards are a prominent feature in any kitchen, and they often bear the brunt of everyday wear and tear. Over time, chips and scratches can appear, marring the aesthetic appeal of the cabinets and diminishing the overall kitchen's appearance. Fortunately, fixing chipped kitchen cupboards is achievable with the right tools and techniques. This guide will outline the steps involved in restoring your kitchen cabinets to their former glory.
1. Assess the Damage
Before embarking on any repair, it is crucial to assess the extent of the damage. Determine the size and depth of the chip, the material of the cabinet, and the type of finish. For minor chips, simple touch-up techniques may suffice. However, for deeper chips or extensive damage, more comprehensive repair methods may be necessary.
2. Gather the Necessary Materials
The materials required will vary depending on the severity of the damage and the desired outcome. However, some essential tools and materials include:
- Fine-grit sandpaper
- Wood filler (matching the cabinet color)
- Putty knife
- Paint scraper
- Paintbrush
- Touch-up paint (matching the cabinet color)
- Clear sealant (optional)
- Masking tape
- Drop cloth
- Safety glasses and gloves
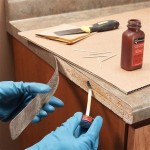
3. Cleaning the Surface
Before applying any repairs, thoroughly clean the chipped area to remove any dirt, grease, or debris. Use a mild detergent and a damp cloth to clean the surface. Allow the area to dry completely before proceeding.
4. Repairing Minor Chips
For minor chips, a simple touch-up approach can effectively conceal the damage. Follow these steps:
- Sand the Chip: Use fine-grit sandpaper to smooth out the edges of the chip, creating a seamless transition with the surrounding surface.
- Apply Touch-Up Paint: Using a small brush, carefully apply touch-up paint to the chipped area, blending it with the existing finish. Apply multiple thin coats, allowing each layer to dry completely before applying the next.
- Seal (Optional): Apply a clear sealant over the repaired area to protect the touch-up paint and enhance its durability.
5. Repairing Deeper Chips
For deeper chips, wood filler is necessary to fill the void and create a smooth surface. Follow these steps:
- Apply Wood Filler: Using a putty knife, apply wood filler to the chipped area, pressing it firmly to ensure even distribution.
- Smooth the Surface: Once the wood filler has dried, use a fine-grit sandpaper to smooth the surface, creating a seamless transition with the surrounding area.
- Apply Touch-Up Paint: As with minor chips, apply touch-up paint to the repaired area, blending it with the existing finish.
- Seal (Optional): Apply a clear sealant to protect the repaired area and enhance its durability.
6. Addressing Larger Damage
For extensive damage, such as deep gouges or significant chips, professional repair is recommended. A skilled craftsman can assess the extent of the damage and employ specialized techniques to restore the cabinets to their original condition.
By following these steps, you can effectively fix chipped kitchen cupboards and restore their beauty. Remember to work in a well-ventilated area, and wear appropriate safety gear.

How To Touch Up Chipped Cabinets With A Paint Pen Exquisitely Unremarkable

How To Touch Up Chipped Cabinets With A Paint Pen Exquisitely Unremarkable

Repair Chipped Paint On Kitchen Cabinets

Kitchen Cabinets Chipped Or Baseboards Ling Here S What To Do Porch Daydreamer

How Do I Fix Laminate Cabinets Hometalk

How To Touch Up Chipped Cabinet Paint

How Do I Fix Chipped Damaged Cabinet Frame Corner Hometalk

How To Touch Up Chipped Cabinets With A Paint Pen Modern Home Furniture Easy Improvement Projects

Scratched And Chipped Kitchen Cabinet Doors Refinishing Touch

How To Touch Up Chipped Cabinet Paint
Related Posts