How to Fix Kitchen Kickboards
Kitchen kickboards, also known as plinths or baseboards, are the horizontal pieces of material that run along the bottom of the kitchen cabinets. They serve a practical purpose, hiding unsightly gaps between the cabinets and the floor, and they can also add a decorative touch to the kitchen. However, over time, kickboards can become damaged or discolored, requiring repairs or replacement.
Fixing kitchen kickboards is a relatively simple DIY project that can be done with basic tools and materials. This article will guide you through the process of repairing and replacing kickboards, ensuring a neat and professional finish.
Assessment and Preparation
Before embarking on any repairs, a thorough assessment of the kickboard's condition is crucial. Start by examining the kickboard for any cracks, chips, scratches, or loose sections. Once you have identified the areas requiring attention, you can proceed to the preparation stage.
For minor repairs, you may need to clean the kickboard with a damp cloth and mild detergent. Remove any debris or loose particles that might interfere with bonding. If the kickboard is heavily soiled or stained, consider using a specialized cleaning solution designed for your specific material.
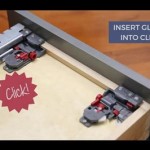
For more extensive repairs or replacements, you may need to remove the kickboard entirely. This can be done by carefully detaching the kickboard from the cabinets using a screwdriver to remove any screws or clips holding it in place. Ensure you are working carefully and avoiding potential damage to the cabinets.
Repairing Damaged Kickboards
If the kickboard is merely cracked or chipped, you can repair it using a suitable wood filler or epoxy resin.
For wood fillers, apply a generous amount to the damaged area, smoothing it out with a putty knife or scraper. Allow the filler to dry completely, then sand it down using fine-grit sandpaper for a smooth finish.
For epoxy resin, mix the resin and hardener according to the manufacturer's instructions. Apply the mixture to the damaged area, ensuring it fills all cracks and crevices. Allow the epoxy to cure before sanding it down to achieve a smooth surface.
Once repaired, you can paint or stain the kickboard to match the existing color. Use brushes or rollers for a uniform application, ensuring complete coverage and a smooth finish. Allow the paint or stain to dry completely before reattaching the kickboard.
Replacing Damaged Kickboards
If the kickboard is severely damaged or beyond repair, it may be necessary to replace it entirely.
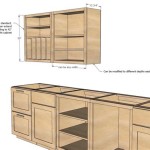
To begin, you will need to purchase a new kickboard that matches the existing size and material. Measure the length and width of the old kickboard to ensure the new piece fits correctly.
If the kickboard is made of wood, you may need to cut the new piece to size using a saw. Ensure the cut is straight and precise for a clean and professional result.
Once the new kickboard is cut to size, attach it to the cabinets using screws or clips. Ensure the screws or clips are long enough to provide secure attachment.
If the kickboard is made of a different material, such as laminate or PVC, follow the manufacturer's instructions for installation. Ensure the new kickboard is securely attached and aligned with the existing cabinets.
Finishing Touches
Once the repairs or replacement is complete, you may need to apply a final coat of paint or stain to match the existing cabinets. This will ensure that the repaired or replaced kickboard blends seamlessly with the rest of the kitchen.
Before applying any paint or stain, carefully clean the surface of the kickboard to remove any dust or debris. Apply the paint or stain in thin, even coats, allowing each coat to dry completely before applying the next.
For a professional finish, use a brush or roller to apply the paint or stain, ensuring complete coverage and a smooth finish. Always follow the manufacturer's instructions for the specific paint or stain you are using, as drying times and application techniques may vary.
By following these simple steps, you can easily fix damaged kitchen kickboards and restore the appearance of your kitchen. With a little effort and the right tools, you can achieve a professional-looking finish that will enhance the overall aesthetics of your kitchen.

How To Fit Kitchen Plinths Halman Thompson

How To Install Toekick In Your Kitchen 2024

How To Install Kickboard Diy At Bunnings

How To Go About Replacing Damaged Kickbo Bunnings Work Community

Easiest Way To Remove A Kitchen Plinth Without Damaging It

How To Diy Your New Kitchen Kickboards The Door Company

How To Fit Plinth Or Kickboards Kitchen Cabinets

How To Fit Kitchen Plinths Pelmets Cornices

Solved How To Replace Kitchen Cabinet Kickboard Bunnings Work Community

Kick Off How To Make The Most Of Kitchen Kickboards Houzz Au
Related Posts