How To Gel Stain Honey Oak Cabinets
Honey oak cabinets, a common feature in many homes built in the late 20th century, often present a design challenge for homeowners seeking a more modern aesthetic. Replacing these cabinets can be a significant investment. Gel stain offers a viable and cost-effective alternative for updating the appearance of honey oak cabinets without the expense and disruption of a full replacement. This article provides a comprehensive guide on how to effectively gel stain honey oak cabinets, covering preparation, application, and achieving a professional finish.
Gel stain is a thick, highly pigmented stain designed for use on non-porous surfaces or surfaces with a pre-existing finish. Unlike traditional stains, gel stain sits on top of the surface rather than penetrating it. This characteristic makes it ideal for use on honey oak cabinets, which typically have a durable factory finish that prevents traditional stains from absorbing properly. Gel stain offers excellent adhesion and provides a uniform color, transforming the appearance of the cabinets.
Key Point 1: Preparing Honey Oak Cabinets for Gel Stain
Proper preparation is paramount for a successful gel stain application. The existing finish on honey oak cabinets, while durable, must be adequately prepared to ensure the gel stain adheres correctly and provides a long-lasting finish. This process involves thorough cleaning, degreasing, and potentially sanding or applying a deglosser.
The initial step is to remove all hardware from the cabinets, including knobs, pulls, hinges, and any other attached fixtures. This ensures a clean, unobstructed surface for staining and prevents accidental staining of the hardware. Store the hardware in a safe place to avoid loss or damage.
Next, thoroughly clean the cabinet surfaces with a strong degreaser. Kitchen cabinets accumulate grease, grime, and food residue over time, which can interfere with the stain's adhesion. Use a dedicated kitchen cleaner or a mixture of warm water and dish soap. Apply the cleaner with a sponge or cloth, scrubbing gently to remove any contaminants. Rinse the surfaces thoroughly with clean water and allow them to dry completely. Failure to adequately degrease the cabinets can result in poor adhesion and an uneven finish.
After cleaning, assess the existing finish. If the finish is glossy and completely intact, it may be necessary to lightly scuff the surface to provide better adhesion for the gel stain. This can be achieved using fine-grit sandpaper, typically between 220 and 320 grit. Sand the surfaces lightly, following the grain of the wood, to create a slightly rough texture. An alternative to sanding is using a chemical deglosser. Deglossers chemically etch the surface, creating a similar effect to sanding without the need for physical abrasion. Follow the manufacturer's instructions for applying the deglosser, ensuring adequate ventilation.
Once the cabinets have been sanded or deglossed, remove any sanding dust or deglosser residue with a tack cloth. A tack cloth is a sticky cloth designed to pick up fine particles, ensuring a clean surface for staining. Repeat this process until the tack cloth comes away clean.
Finally, tape off any areas that you do not want to be stained, such as the inside of the cabinet frames or the adjacent walls. Use painter's tape to create clean, crisp lines. Ensure the tape is firmly pressed down to prevent stain from bleeding underneath.
Key Point 2: Applying Gel Stain to Honey Oak Cabinets
The application of gel stain requires a specific technique to achieve a uniform and professional-looking finish. Gel stain is thicker than traditional stains and can be prone to streaking or blotching if applied incorrectly. Choosing the right application method and using proper techniques are crucial for a successful outcome.
Before beginning, ensure the work area is well-ventilated. Gel stains often contain solvents that can produce strong odors. Open windows and doors or use a ventilation fan to circulate fresh air. Wear appropriate personal protective equipment, including gloves and a respirator, to protect your skin and respiratory system.
There are several methods for applying gel stain, including using a brush, a rag, or a foam applicator. A brush is suitable for intricate details and corners, while a rag or foam applicator is ideal for larger, flat surfaces. Regardless of the chosen method, apply the gel stain in thin, even coats. Avoid applying too much stain at once, as this can lead to runs, drips, and uneven coverage.
When using a brush, choose a high-quality brush with synthetic bristles. Dip the brush into the gel stain and apply it to the surface in the direction of the wood grain. Work in small sections, overlapping each stroke slightly to ensure complete coverage. Immediately after applying the stain, use a clean lint-free rag to wipe away the excess. This helps to blend the stain and create a uniform color. Wipe in the direction of the wood grain, using light pressure to avoid removing too much stain.
When using a rag or foam applicator, apply a small amount of gel stain to the applicator and rub it onto the surface in a circular motion. This helps to work the stain into the surface and create an even layer. After applying the stain, use a clean lint-free rag to wipe away the excess, again in the direction of the wood grain. The rag method often provides better control over the stain's thickness and allows for a more subtle color application. It also minimizes brush strokes.
After applying the first coat of gel stain, allow it to dry completely according to the manufacturer's instructions. Drying times can vary depending on the temperature and humidity. Typically, gel stain requires at least 24 hours to dry thoroughly. Once the first coat is dry, assess the color and coverage. If necessary, apply a second coat of gel stain, following the same application techniques as the first coat. A second coat will deepen the color and provide more complete coverage.
Key Point 3: Achieving a Professional Finish and Protecting Gel Stained Cabinets
Once the gel stain has been applied and allowed to dry, it is essential to apply a protective topcoat to seal the stain and protect it from wear and tear. Choose a topcoat specifically designed for use over gel stain, typically a water-based or oil-based polyurethane. The type of topcoat will influence the sheen (gloss, satin, or matte) and the overall durability of the finish.
Before applying the topcoat, ensure the gel stain is completely dry and free of any dust or debris. Lightly sand the surface with fine-grit sandpaper (320-400 grit) to create a smooth surface for the topcoat. Remove any sanding dust with a tack cloth. Applying the topcoat to a smooth, clean surface will ensure a flawless finish.
Apply the topcoat in thin, even coats using a brush or a spray gun. A brush is suitable for smaller projects and provides more control over the application, while a spray gun is ideal for larger projects and can provide a more uniform finish. When using a brush, choose a high-quality brush with synthetic bristles. Dip the brush into the topcoat and apply it to the surface in the direction of the wood grain. Work in small sections, overlapping each stroke slightly to ensure complete coverage. Avoid applying too much topcoat at once, as this can lead to runs, drips, and an uneven finish.
When using a spray gun, follow the manufacturer's instructions for setting up and operating the gun. Apply the topcoat in thin, even coats, overlapping each pass slightly to ensure complete coverage. Maintain a consistent distance between the spray gun and the surface to avoid creating uneven areas.
Allow the first coat of topcoat to dry completely according to the manufacturer's instructions. Drying times can vary depending on the type of topcoat and the environmental conditions. Typically, polyurethane requires at least 24 hours to dry thoroughly. Once the first coat is dry, lightly sand the surface with fine-grit sandpaper (400-600 grit) to remove any imperfections and create a smooth surface for the second coat. Remove any sanding dust with a tack cloth.
Apply a second coat of topcoat, following the same application techniques as the first coat. A second coat will provide added protection and durability. For high-traffic areas, such as kitchen cabinets, consider applying a third coat of topcoat for maximum protection. After applying the final coat of topcoat, allow it to dry completely before reattaching the hardware and using the cabinets. The longer the topcoat is allowed to cure, the more durable the finish will be.
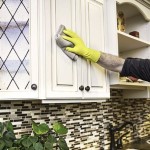
Regular cleaning and maintenance will help to prolong the life of the gel-stained cabinets. Clean the cabinets with a mild soap and water solution, avoiding harsh chemicals or abrasive cleaners. Wipe up spills immediately to prevent staining or damage to the finish. Consider using cabinet protectors or shelf liners to protect the inside of the cabinets from scratches and wear. With proper care and maintenance, gel-stained honey oak cabinets can provide years of beauty and functionality.

How To Gel Stain Cabinets With Ease Diva Of Diy

How To Gel Stain Cabinets With Ease Diva Of Diy

An Easy Fix Honey Oak Cabinets Using Fusion Gel Stain Black

Easy Gel Stain For Those Oak Cabinets 320 Sycamore

An Easy Fix Honey Oak Cabinets Using Fusion Gel Stain Black

How To Gel Stain Cabinets Printable She Buys He Builds

Honey Oak Cabinets Toned With Dye Stain General Finishes Design Center

How To Glaze Cabinets With Gel Stain Adventures Of A Diy Mom

Gel Stain Color Recommendations

Before And After Restyle Of Light Pickled Oak Bathroom Vanity Cabinets Were Transformed With Gener Kitchen Makeover Staining Remodel
Related Posts