How to Glaze Over Painted Kitchen Cabinets
Glazing is a technique that can add depth, richness, and an aged appearance to painted kitchen cabinets. It is a relatively simple process that can be completed in a few hours. However, it is important to follow the steps carefully to achieve the best results.
Step 1: Prepare the Cabinets
The first step is to prepare the cabinets for glazing. This involves cleaning them thoroughly with a degreaser to remove any dirt or grease. Once the cabinets are clean, sand them lightly with a fine-grit sandpaper to create a smooth surface for the glaze to adhere to.
Step 2: Apply a Base Coat of Glaze
Once the cabinets are prepared, you can begin applying the glaze. Use a brush or sponge to apply a thin, even coat of glaze to the cabinets. Be sure to work in small sections and apply the glaze in the direction of the wood grain.
Step 3: Remove the Excess Glaze
Once you have applied the glaze to the cabinets, use a clean cloth to remove any excess glaze. This will help to prevent the glaze from becoming too thick and uneven.
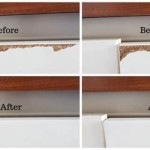
Step 4: Apply a Second Coat of Glaze (Optional)
If you desire a more intense color or a more aged appearance, you can apply a second coat of glaze. Follow the same steps as you did for the first coat, but be sure to apply the second coat in a different direction than the first coat.
Step 5: Allow the Glaze to Dry
Once you have applied the glaze, allow it to dry completely. This may take several hours or even overnight, depending on the type of glaze you are using.
Step 6: Seal the Glaze
Once the glaze is dry, you can seal it with a clear finish. This will help to protect the glaze from wear and tear and make it more durable.
Tips for Glazing Kitchen Cabinets
Here are a few tips for glazing kitchen cabinets:
- Use a high-quality glaze. The quality of the glaze will have a significant impact on the final appearance of the cabinets.
- Apply the glaze in thin, even coats. This will help to prevent the glaze from becoming too thick and uneven.
- Remove any excess glaze immediately. This will help to prevent the glaze from becoming too thick and uneven.
- Allow the glaze to dry completely before sealing it. This will help to ensure that the glaze is durable and long-lasting.

How To Glaze Kitchen Cabinets

How To Glaze Kitchen Cabinets Diyer S Guide Bob Vila

How To Glaze Cabinets At Home With The Barkers

How To Glaze Cabinets At Home With The Barkers

How To Glaze Kitchen Cabinets Diyer S Guide Bob Vila

How To Glaze Cabinets At Home With The Barkers

How To Glaze Kitchen Cabinets Diy Network

Rescuing And Reviving A Glazed Distressed Kitchen Bella Tucker

3 Steps To Glaze Cabinets Correctly Painted Furniture Ideas Distressed Kitchen Glazed Chalk Paint

Porchswings N Honeysuckle Paint And Glaze Cabinet Tutorial Kitchen Renovation Glazed Cabinets Makeover
Related Posts