How To Gloss Kitchen Cabinets
Glossy kitchen cabinets offer a sleek, modern aesthetic and are renowned for their light-reflecting properties, which can make a kitchen feel brighter and more spacious. Achieving a professional-looking gloss finish requires careful preparation and execution. This guide details the process for transforming existing kitchen cabinets into gleaming showpieces.
Preparing the Cabinets
Proper preparation is essential for a flawless gloss finish. Inadequate surface preparation can lead to imperfections in the final coat. This stage lays the groundwork for a smooth and durable finish.
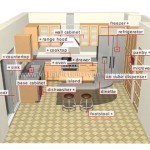
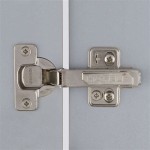
- Remove Hardware: Begin by removing all hardware from the cabinets, including handles, knobs, hinges, and any other attached elements. This allows for unobstructed access to all surfaces and prevents damage to the hardware during the refinishing process.
- Clean the Cabinets: Thoroughly clean the cabinet surfaces using a degreasing cleaner. This removes grease, grime, and any cooking residue that may interfere with the adhesion of the primer and paint. Rinse with clean water and allow the cabinets to dry completely.
- Repair Imperfections: Inspect the cabinets for any dents, scratches, or holes. Fill these imperfections with wood filler, allowing it to dry completely. Once dry, sand the filled areas smooth with fine-grit sandpaper.
- Sand the Surfaces: Lightly sand all surfaces of the cabinets using fine-grit sandpaper (around 220 grit). This creates a slightly rough surface for improved primer adhesion. After sanding, thoroughly wipe down the cabinets with a tack cloth to remove all dust particles.
Priming the Cabinets
Priming is a crucial step that seals the wood and provides a uniform base for the gloss paint. It ensures even color and sheen in the final finish.
- Choose the Right Primer: Select a high-quality primer specifically designed for use with gloss paints. An oil-based primer is often recommended for kitchen cabinets due to its superior adhesion and sealing properties.
- Apply Thin Coats: Apply the primer in thin, even coats, avoiding drips or runs. Allow each coat to dry completely according to the manufacturer's instructions before applying the next coat. Typically, two coats of primer are sufficient.
- Sand Between Coats: After the primer has dried, lightly sand the surfaces again with fine-grit sandpaper to create a perfectly smooth base for the gloss paint. Remove any dust with a tack cloth.
Applying the Gloss Paint
Applying the gloss paint requires patience and attention to detail to achieve a streak-free, mirror-like finish. This stage is where the transformation to high-gloss truly takes effect.
- Select a High-Quality Gloss Paint: Opt for a high-quality gloss paint specifically formulated for kitchen cabinets. Consider using a paint sprayer for the smoothest, most professional-looking finish. Alternatively, a high-quality brush or roller designed for gloss paint can be utilized.
- Apply Thin, Even Coats: Apply the gloss paint in thin, even coats, working in the direction of the wood grain. Avoid overbrushing or over-rolling, which can create brush marks or bubbles. Allow each coat to dry completely before applying the next. Multiple thin coats are preferable to one thick coat.
- Maintain a Dust-Free Environment: Minimize dust in the work area as much as possible. Dust particles can settle on the wet paint, marring the finish.
- Sand Between Coats (Optional): For an ultra-smooth finish, lightly sand between each coat of gloss paint with very fine-grit sandpaper (e.g., 400 grit). This removes any imperfections and ensures a perfectly smooth surface for the subsequent coat. Remember to meticulously remove all dust with a tack cloth.
Finishing and Reassembly
The final steps involve allowing adequate drying time and reassembling the cabinets. This completes the transformation and brings the newly glossed kitchen cabinets to life.
- Allow Ample Drying Time: Allow the final coat of gloss paint to dry completely. This may take several days, depending on the type of paint used and the environmental conditions. Avoid touching or disturbing the cabinets during this period.
- Reinstall Hardware: Once the paint is completely dry, carefully reinstall the cabinet hardware. Ensure all handles, knobs, and hinges are securely fastened.
- Clean Up: Clean the surrounding area and dispose of any used materials appropriately.
Alternative Gloss Finishes
Beyond traditional gloss paint, there are alternative methods to achieve a glossy finish on kitchen cabinets.
- High-Gloss Lacquer: Lacquer provides a durable, high-gloss finish that is resistant to scratches and chipping. It requires specialized equipment and spraying techniques.
- High-Gloss Polyurethane: Polyurethane is available in both oil-based and water-based formulations and offers a protective, glossy finish. It can be applied with a brush or roller.
- Gloss Cabinet Wraps: Vinyl wraps offer a cost-effective and less labor-intensive alternative to painting. They come in various colors and finishes, including high-gloss.

How To Create A High Gloss Kitchen

High Gloss Kitchen Cabinets Or Matte How To Choose Oppolia

High Gloss Kitchen Cabinets Professional Guide Pa

High Gloss Kitchen Cabinets Pros And Cons Oppein

High Gloss Kitchen Cabinets Design By Primehardware Inc

High Gloss Kitchen Cabinets Pros And Cons Fabuwood

The Pros And Cons Of Kitchen Cabinets With A Gloss Finish

High Gloss Kitchen Cabinets Design By Primehardware Inc

High Gloss Cabinets Steal The Show In An Kitchen Renovation

High Gloss Kitchen Cabinets Pros And Cons Oppein