How to Hang a Kitchen Cabinet
Hanging kitchen cabinets is a crucial step in any kitchen remodeling project. While it may seem like a daunting task, with proper planning and execution, you can achieve professional-looking results. This guide will walk you through the essential aspects of hanging kitchen cabinets, ensuring a sturdy and aesthetically pleasing installation.
1. Preparation
Begin by preparing the wall surface. Remove any existing cabinets or shelves and ensure the wall is level and plumb. Install a ledger board, a horizontal support beam that will provide a solid base for the cabinets. Mark the stud locations on the wall and use a level to ensure the ledger board is aligned correctly.
2. Cabinet Assembly
Assemble the cabinets according to the manufacturer's instructions. Pay close attention to the cabinet frame and ensure it is square. Use wood glue and screws to secure the joints for added strength. Install the cabinet doors and drawers, ensuring they operate smoothly.
3. Wall Attachment
Locate the stud locations on the wall and mark their positions on the ledger board. Lift the cabinet into place and align it with the studs. Use 3-inch wood screws to attach the cabinet to the ledger board. Drive the screws through the back of the cabinet frame into the studs. Ensure the cabinet is level and securely fastened.
4. Leveling and Shimming
Use a level to verify that the cabinet is level both horizontally and vertically. If any adjustments are needed, insert shims between the cabinet and the wall. Tap the shims gently with a hammer until the cabinet is level. Secure the shims in place with additional screws.
5. Corner Cabinets
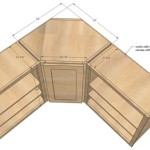
Hanging corner cabinets requires additional support. Install a corner support bracket on the inside corner of the adjacent cabinets. Align the corner cabinet with the support bracket and fasten it using screws. Use shims to level and secure the corner cabinet as needed.
6. Casing and Filler Panels
Once the cabinets are hung, install the casing, which is the decorative trim that covers the gaps between the cabinets and the wall. Measure and cut the casing to fit around the edges of the cabinets. Secure the casing with nails or screws. Filler panels may be necessary to fill any gaps between the cabinets and the wall or ceiling.
7. Drawers and Doors
Finally, adjust the drawers and doors to ensure they open and close smoothly. Use a screwdriver to adjust the hinges and drawer slides as needed. Tighten any loose screws or hardware to complete the installation.
Tips for Success:
* Use a level throughout the installation process to ensure accuracy. * Pre-drill holes for screws to prevent splitting the wood. * Use a stud finder to locate studs accurately. * Allow sufficient time for the cabinets to cure before using them. * If you encounter any difficulties, consult a professional cabinet installer for assistance. By following these steps and incorporating the suggested tips, you can confidently hang kitchen cabinets like a pro, creating a functional and visually appealing space.
How To Install Kitchen Cabinets Diy Family Handyman

How To Install Cabinets Like A Pro The Family Handyman

Installing Kitchen Cabinets Momplex Vanilla Ana White

11 Tricks For Perfect Kitchen Cabinets

How To Install Kitchen Cabinets Hometips Installing Wall

How To Prepare For A Kitchen Cabinet Installation

How To Hang Cabinets

How To Install Kitchen Cabinets

Here S How Install New Upper Kitchen Cabinets

How To Install Kitchen Cabinets
Related Posts


