How To Hang Cabinets In A Mobile Home Walls
Hanging cabinets in a mobile home presents unique challenges compared to standard residential construction. The walls, often thinner and constructed with different materials, require a modified approach to ensure secure and lasting installation. Understanding the specific considerations and employing the correct techniques are crucial for a successful outcome. This article will detail the essential steps and considerations for safely and effectively hanging cabinets in mobile home walls.
Mobile homes are typically built with either 2x3 or 2x4 studs, placed 16 or 24 inches apart. The walls are usually paneled or have a thin layer of drywall over the studs, offering less support than conventional drywall and wood studs. Consequently, directly screwing into the paneling or drywall will not provide adequate holding power for cabinets, especially when loaded with contents. Therefore, identifying the studs and reinforcing the mounting points are critical first steps.
Before starting any project, it’s important to understand the limitations of the walls. Mobile home walls are not designed to hold the same weight as site-built homes. Overloading the cabinets can cause the walls to buckle or the cabinets to fall. Careful planning and weight distribution are essential.
Locating Studs and Assessing Wall Integrity
The first and arguably most important step involves accurately locating the studs within the mobile home walls. Stud finders, both electronic and magnetic, can be helpful tools. However, relying solely on these devices may not always guarantee accurate stud location due to the unique construction of mobile homes. A more reliable method involves combining the use of a stud finder with manual probing.
Start by using a stud finder to identify potential stud locations. Mark these spots lightly with a pencil. Then, carefully drive a small finish nail or a thin drill bit through the wall at the marked locations. If the nail or bit encounters solid resistance, a stud is likely present. If it passes through with minimal resistance, it indicates that the marked spot is between studs. Repeat this process around the initial markings to pinpoint the exact center of the stud.
Once a stud is located, measure 16 or 24 inches from that point (depending on the mobile home's construction) and repeat the process to find additional studs along the intended cabinet mounting line. Mark all confirmed stud locations clearly. It’s crucial to be very accurate, as misalignment can compromise the stability of the installation.
Beyond locating the studs, assess the integrity of the wall material around the stud locations. Look for signs of water damage, rot, or other deterioration. If the wallboard is soft or crumbling, it will not provide adequate support, and the surrounding area needs to be reinforced. This might involve replacing the damaged section or adding additional backing material behind the wallboard. Ignoring these issues can lead to a weak and unstable cabinet installation.
Another aspect to consider is the presence of wiring or plumbing within the walls. Knowing the location of these utilities before drilling or screwing is essential to prevent accidental damage or injury. Utility maps are helpful if available. If not, exercise extreme caution when working near electrical outlets or plumbing fixtures.
In some mobile homes, the studs are made of metal rather than wood. Identifying whether you have wood or metal studs is crucial for selecting the correct fastening hardware. Metal studs require self-tapping screws specifically designed for metal, while wood studs require standard wood screws.
Reinforcing Mobile Home Walls for Cabinet Installation
Given the thinner walls and potentially weaker studs in mobile homes, reinforcing the wall is often necessary to ensure the cabinets are securely mounted. This reinforcement typically involves adding additional support behind the existing wallboard to distribute the weight of the cabinets more evenly. Several methods can be used, depending on the construction of the wall and the desired level of support.
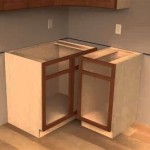
One popular method involves installing a header board or a ledger board. This is a piece of wood, usually a 1x4 or a 1x6, that is securely attached to the studs along the intended cabinet mounting line. The ledger board provides a solid base for the cabinets to rest upon and distributes the weight across multiple studs. The board should be long enough to span at least three studs, ensuring ample support. Secure the ledger board to the studs using long wood screws (at least 3 inches) that penetrate deep into the stud. Pre-drilling pilot holes is recommended to prevent splitting the wood.
Another method involves adding backing material behind the wallboard. This is particularly useful when the wallboard is thin or damaged. Accessing the space behind the wallboard requires cutting out sections of the wall. Then, insert pieces of plywood or solid wood blocking between the studs, flush with the back of the wallboard. These backing pieces act as anchors for the cabinet mounting screws, providing significantly more holding power than the wallboard alone. Secure the backing pieces to the studs with construction adhesive and screws.
For heavier cabinets, it might be necessary to combine both methods: installing a ledger board and adding backing material behind the wallboard. This combination provides the strongest possible support for the cabinets. Ensure the ledger board is installed flush with the wallboard and the backing material, creating a smooth and even surface for the cabinets to mount against.
Regardless of the reinforcement method chosen, ensure that all screw heads are flush with the surface of the ledger board or the backing material. This prevents the cabinets from wobbling or being uneven when mounted. Use a countersinking drill bit to create recesses for the screw heads if necessary.
Hanging the Cabinets and Securing the Installation
Once the studs have been located and the walls have been reinforced, the process of actually hanging the cabinets can begin. This involves carefully positioning the cabinets, leveling them, and securing them to the studs and the reinforcement structures.
Begin by carefully measuring and marking the desired location of the cabinets on the wall. Use a level to ensure that the markings are straight and that the cabinets will be installed at the correct height. Use a laser level for increased accuracy.
If installing upper cabinets, consider using temporary support structures, such as cabinet jacks or temporary ledgers, to hold the cabinets in place while they are being secured. These supports free up your hands and ensure that the cabinets remain level during the installation process. If such supports are not available, enlisting the help of another person is recommended.
Lift the first cabinet into position and align it with the marked location. Use a level to ensure that the cabinet is perfectly level both horizontally and vertically. Insert shims between the cabinet and the wall or the ledger board to make any necessary adjustments. Once the cabinet is level, secure it to the studs using long wood screws. Ensure that the screws penetrate deep into the studs and the reinforcement materials.
For upper cabinets, screws should go through the cabinet's back panel and into the studs or ledger board for secure attachment. Pre-drilling pilot holes is recommended to prevent splitting the cabinet's back panel or the studs. Countersink the screw heads to ensure they are flush with the cabinet's surface.
If installing multiple cabinets, attach them to each other using screws or bolts. This creates a more stable and unified structure. Before attaching the cabinets, ensure that they are perfectly aligned and that the seams between them are tight and even. Clamps can be used to hold the cabinets together during the attachment process.
After all the cabinets are hung and secured, double-check that they are level and that all screws are tight. Remove any shims or temporary supports. Inspect the installation for any signs of weakness or instability. If necessary, add additional screws or reinforcement to strengthen the installation.
Finally, conceal the screw heads and the seams between the cabinets with wood filler or caulk. This gives the installation a clean and professional appearance. Paint or stain the filler and caulk to match the color of the cabinets.
By carefully following these steps and taking the necessary precautions, you can successfully hang cabinets in mobile home walls and create a functional and aesthetically pleasing space. Understanding the unique challenges of mobile home construction and employing the correct techniques are essential for a safe and lasting installation. Remember to prioritize safety, accuracy, and thoroughness throughout the entire process.

How To Hang Wall Cabinets By Yourself Come Stay Awhile Amanda Vernaci Modern Farmhouse Diy Home Renovation

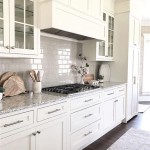
Double Wide Mobile Home Kitchen Cabinets Rocky Hedge Farm

Double Wide Mobile Home Kitchen Cabinets Rocky Hedge Farm

Double Wide Mobile Home Kitchen Cabinets Rocky Hedge Farm

Double Wide Mobile Home Kitchen Cabinets Rocky Hedge Farm

Double Wide Mobile Home Kitchen Cabinets Rocky Hedge Farm

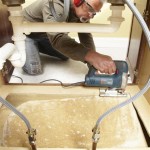
11 Tricks For Perfect Kitchen Cabinets

What Are Strips On Manufactured Home Walls Clayton Studio

Wall Install Recovery Salvaged Mobile Home Rebuild

Complete Mobile Home Kitchen Makeover Only 200
Related Posts