How To Hang Kitchen Cabinet Doors With Exposed Hinges
Hanging kitchen cabinet doors with exposed hinges is a task that requires precision and attention to detail. While it might seem straightforward, proper installation ensures that the doors align correctly, swing smoothly, and maintain their appearance for the life of the cabinets. This article outlines the steps involved in hanging kitchen cabinet doors with exposed hinges, providing a comprehensive guide for achieving professional-looking results.
Before embarking on the installation process, it is crucial to gather the necessary tools and materials. This preparation is essential for a smooth and efficient workflow. The following items are typically required:
- Kitchen cabinet doors
- Exposed hinges (with screws)
- Screwdriver (both Phillips head and potentially a square head, depending on the screws provided)
- Drill (with drill bits slightly smaller than the screw diameter)
- Pencil
- Measuring tape or ruler
- Level
- Shim (optional, for leveling cabinets)
- Safety glasses
Ensuring that all materials are readily accessible reduces the risk of interruptions and simplifies the overall procedure.
Preparing the Cabinet Frame and Door
Before attaching hinges, the cabinet frame and door must be prepared. This step involves marking the hinge locations and pre-drilling pilot holes.
First, determine the desired placement of the hinges on both the cabinet frame and the door. Standard placement typically involves positioning one hinge near the top and another near the bottom of the door. For taller doors, a third hinge might be necessary to provide adequate support and prevent warping. Consistent hinge placement across all doors ensures a uniform appearance throughout the kitchen.
Using a measuring tape or ruler, accurately measure and mark the locations for the hinges on both the cabinet frame and the door. It is vital to ensure that the marks are aligned correctly on both surfaces. Incorrect markings can lead to misaligned doors that do not swing properly.
Once the hinge locations are marked, use a drill with a drill bit slightly smaller than the screw diameter to pre-drill pilot holes at each marked location. Pre-drilling prevents the wood from splitting when the screws are inserted. The depth of the pilot holes should be slightly less than the length of the screws.
When pre-drilling, it's important to hold the drill straight and apply consistent pressure. Angled pilot holes can lead to screws being driven in at an angle, which can compromise the stability of the hinge attachment.
Attaching the Hinges to the Cabinet Door
With the cabinet door and frame prepared, the next step involves attaching the hinges to the door itself. This process requires careful alignment and secure fastening of the hinge plates.
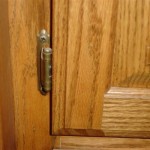
Position the hinge plates on the cabinet door, aligning them with the pre-drilled pilot holes. Ensure that the hinge plates are oriented correctly, with the hinge pin facing the direction the door will swing. The orientation is critical for proper door operation.
Using a screwdriver, carefully drive the screws through the hinge plates and into the pre-drilled pilot holes. Start with the top screw, then the bottom screw, and finally the remaining screws. This sequence helps maintain alignment and prevents the hinge plate from shifting during installation.
When tightening the screws, avoid over-tightening them. Over-tightening can strip the screw holes or damage the wood, compromising the security of the hinge attachment. The screws should be snug but not forced.
Repeat this process for all hinges on the cabinet door, ensuring that each hinge is securely attached and properly aligned. Consistent attention to detail at this stage ensures that the door will hang straight and operate smoothly.
Attaching the Door to the Cabinet Frame
After the hinges are securely fastened to the cabinet door, the final step involves attaching the door to the cabinet frame. This requires precise alignment and careful screw placement to ensure proper door swing and alignment.
Position the cabinet door against the cabinet frame, aligning the hinge plates with the corresponding pre-drilled pilot holes on the frame. It might be helpful to have an assistant hold the door in place while attaching the first few screws, particularly for larger or heavier doors. This can help prevent the door from shifting during installation.
Insert the screws through the hinge plates and into the pre-drilled pilot holes on the cabinet frame. As with attaching the hinges to the door, start with the top screw, then the bottom screw, and finally the remaining screws. This sequence helps maintain alignment and prevents the door from shifting during installation.
Before fully tightening the screws, check the alignment of the door. Ensure that the door is flush with the cabinet frame and that the gap between the door and frame is consistent along the entire perimeter. Use a level to verify that the door is hanging straight.
If the door is not aligned correctly, loosen the screws slightly and adjust the door's position. Shims can be used to adjust the alignment of the cabinet frame if needed. Once the door is properly aligned, fully tighten the screws, ensuring that they are snug but not over-tightened.
Repeat this process for all remaining cabinet doors. Once all doors are installed, carefully inspect each one to ensure that it swings smoothly, aligns properly with the cabinet frame, and closes securely. Make any necessary adjustments to the hinge screws or cabinet frame to achieve optimal performance.
Throughout the entire process, safety is paramount. Wear safety glasses to protect eyes from any debris or wood splinters. Use caution when operating power tools, and always disconnect power tools before making adjustments or changing bits.
Properly hung kitchen cabinet doors with exposed hinges significantly enhance the look and functionality of a kitchen. By following these detailed steps, individuals can achieve professional-looking results, ensuring that the cabinet doors operate smoothly and maintain their appearance for years to come. Precision, patience, and attention to detail are key to a successful installation.
The selection of hinges is another key component often overlooked. There are different types of exposed hinges, each designed for different applications. Some are self-closing, while others are not. The choice depends on the desired functionality and aesthetic. Additionally, the finish of the hinges should match the cabinet hardware and overall kitchen design to create a cohesive look.
Maintenance of exposed hinges is also crucial for prolonging their lifespan. Regularly check the screws for tightness and tighten them as needed. Lubricating the hinge pin periodically with a light oil can help ensure smooth operation and prevent squeaking. Proper maintenance contributes to the longevity of the hinges and the overall functionality of the cabinet doors.

Cabinets With Exposed Hinges Design Ideas Country Kitchen Designs Home Kitchens

How To Install Hinges On Cabinets Young House Love

Concealed And Exposed Cabinet Hinges

Face Framed Cabinets How To Increase Overlay Nieu

Replacing Cabinet Hinges With Overlay Self Closing The Palette Muse

Accessorize The Cabinets A Farmhouse Reborn

Spotlight On Hinges K S Renewal Systems Llc

Stunning Kitchen Cabinet Details You Ll Want To Copy

Should I Keep Exposed Hinges Among Other Questions

Stunning Kitchen Cabinet Details You Ll Want To Copy
Related Posts


