How To Hang Kitchen Cabinets On A Concrete Block Wall
Hanging kitchen cabinets on a concrete block wall presents unique challenges compared to drywall. The solid, unforgiving nature of concrete requires specific tools and techniques to ensure secure and stable installation. This guide outlines the necessary steps and considerations for successfully hanging kitchen cabinets on a concrete block wall.
Planning and Preparation
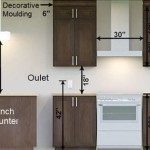
Thorough planning is critical for a successful cabinet installation. Begin by carefully measuring the wall area where the cabinets will be placed. Note the location of any electrical outlets, plumbing lines, and other obstructions. These measurements will determine the exact placement of the cabinets and inform the necessary hardware requirements. Creating a detailed layout on paper can help visualize the finished product and minimize potential issues during the installation process.
Next, inspect the concrete block wall for any irregularities or damage. Fill any cracks or holes with concrete patching compound, allowing ample drying time before proceeding. A smooth and even surface is essential for proper cabinet mounting and will ensure a professional finish. This also allows for better contact between the mounting hardware and the wall, improving overall stability.
Gather all necessary tools and materials before beginning the installation. This includes a stud finder specifically designed for concrete, concrete drill bits, appropriate screws or concrete anchors (e.g., Tapcon screws, sleeve anchors), a hammer drill, a level, safety glasses, a measuring tape, a pencil, and shims. Having everything readily available will streamline the process and prevent unnecessary interruptions.
Choosing the Right Fasteners
Selecting the correct fasteners is crucial for ensuring the cabinets remain securely attached to the concrete block wall. The type of fastener will depend on the weight of the cabinets and the specific characteristics of the concrete block.
Tapcon screws are a popular choice for their ease of use and strong holding power. They are self-tapping, meaning they create their own threads as they are driven into the concrete. Ensure the screws are the appropriate length to penetrate sufficiently into the concrete block for maximum stability. Consult the manufacturer's guidelines for recommended screw lengths and drill bit sizes.
Sleeve anchors offer another robust option, particularly for heavier cabinets. These consist of a threaded stud and an expansion sleeve. As the stud is tightened, the sleeve expands, creating a secure grip within the concrete. Like Tapcon screws, choosing the correct size and length of sleeve anchor is critical for a secure installation.
Marking and Drilling
With the cabinets positioned according to the plan, carefully mark the locations for the mounting hardware. Use a level to ensure the markings are perfectly horizontal. Accurate marking is essential for achieving a level and plumb installation, preventing issues with cabinet alignment and door closure.
Once the locations are marked, use a hammer drill equipped with the appropriate concrete drill bit to create pilot holes. The drill bit size should correspond to the chosen fastener. Ensure the pilot holes are deep enough to accommodate the entire length of the screw or anchor without bottoming out. Wearing safety glasses is crucial during this step to protect the eyes from dust and debris.
If using sleeve anchors, insert the anchor into the pilot hole and tap it lightly with a hammer until it is flush with the wall surface. Then, insert the threaded stud and tighten it with a wrench or socket until the anchor is securely expanded within the concrete.
For Tapcon screws, simply drive the screws into the pilot holes using a drill equipped with the appropriate bit. Apply firm and steady pressure to ensure the screws are driven straight and secure. Avoid over-tightening, which could damage the concrete or strip the screw head.
Mounting and Securing the Cabinets
Once the mounting hardware is in place, carefully lift the cabinets into position, aligning the mounting holes with the installed anchors or screws. Gradually lower the cabinet onto the hardware, ensuring it remains level. Use shims as needed to adjust the cabinet's position and ensure a perfectly plumb and level installation. Shims are essential for compensating for any unevenness in the concrete block wall.
After the cabinet is positioned correctly, secure it to the wall by tightening the screws or anchor bolts. Avoid over-tightening, which can damage the cabinet or the concrete block. Periodically check the levelness of the cabinet during the tightening process to ensure it remains plumb and level. Once secure, remove any excess shim material using a utility knife or similar tool.
Repeat these steps for each cabinet, ensuring proper alignment and spacing between units. After all cabinets are installed, double-check the levelness and stability of the entire installation. This meticulous approach will ensure a professional-looking and long-lasting installation.

Hanging Cabinets On Cinder Block

How To Mount Cabinets On Concrete Wall Hang Install Or Cinder Block

How To Mount Cabinets On Concrete Wall Hang Install Or Cinder Block

How To Install Kitchen Cabinets On Concrete Brick Walls Drywall

How To Mount Cabinets On Concrete Wall Hang Install Or Cinder Block

How To Hang Cabinets On A Brick Wall Fine Homebuilding

Steal This Look A Low Cost Kitchen For Serious Chefs Remodelista

How To Attach Pegboard A Cinder Block If Only April

How To Install Base Cabinets Concrete Hunker

Hanging Cabinets On Cinder Block
Related Posts