How To Hang Kitchen Wall Units
Installing kitchen wall units is a common home improvement project undertaken by homeowners and experienced DIYers alike. Properly mounted wall units are essential for both functionality and safety, ensuring the cabinets can reliably support the weight of stored items. A precise and methodical approach is crucial for achieving a professional and long-lasting installation. This article provides a comprehensive guide to hanging kitchen wall units, covering the necessary tools, preparation steps, and installation techniques.
Key Point 1: Preparation and Planning
Adequate preparation is fundamental to a successful kitchen wall unit installation. This phase involves assessing the space, gathering the required tools and materials, and accurately marking the positions for the units.
Assessing the Space: Begin by thoroughly inspecting the walls where the units will be mounted. Identify any existing electrical wiring, plumbing, or ductwork that might interfere with the installation. Note the location of studs, as these will provide the most secure anchor points. Examine the wall surface for any irregularities, such as unevenness or crumbling drywall, which may require repair before proceeding. The type of wall construction, whether it is drywall, plaster, or masonry, will influence the selection of appropriate fixings and mounting techniques.
Gathering Tools and Materials: A comprehensive toolkit is essential for efficient and accurate installation. The following tools are generally required:
- Stud Finder: To locate and mark the positions of wall studs. An electronic stud finder is recommended for accuracy.
- Level (at least 4 ft): To ensure that the units are perfectly level, both horizontally and vertically. A laser level can be advantageous for longer runs of cabinets.
- Measuring Tape: For accurate measurements and marking.
- Pencil: To mark the wall with precise measurements.
- Drill/Driver: With a variety of drill bits for different materials (wood, drywall, masonry).
- Screwdrivers: Both Phillips head and flathead, in various sizes.
- Safety Glasses: To protect eyes from debris.
- Work Gloves: To protect hands.
- Dust Mask: To avoid inhaling dust particles.
- Construction Adhesive: Can provide additional bonding strength, especially for uneven surfaces.
- Shims: For leveling cabinets on uneven walls.
- Suitable Screws/Fixings: Appropriate for the wall type (e.g., drywall anchors, lag screws for studs).
- Cabinet Hanging Rail (Optional): A metal rail system that simplifies the hanging process.
- Helper (Recommended): Kitchen wall units can be heavy and unwieldy, so assistance is advised.
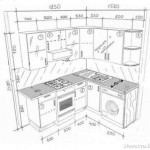
Marking the Positions: Accurate marking is critical for ensuring that the units are aligned correctly. Begin by determining the desired height of the bottom of the wall units. Typically, this is around 18 inches above the countertop. Use a level to draw a horizontal line along the wall at this height. This line will serve as a reference point for positioning the units. Locate the wall studs and mark their locations along the reference line. These marks will indicate where to drive screws for securing the units. If using a cabinet hanging rail, install the rail according to the manufacturer's instructions, ensuring it is level and securely attached to the studs.
Consider the order in which the cabinets will be installed. Corner cabinets often serve as a starting point, followed by cabinets on either side. Account for any appliances, such as range hoods or microwaves, that will be installed between the units. Leave adequate space for these appliances to operate safely and effectively.
Key Point 2: Safely Hanging the Units
Once the preparation is complete, the next step is to carefully lift and secure the wall units to the wall. This requires precise alignment and secure fastening.
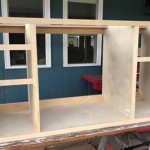
Lifting and Positioning: With assistance, carefully lift the first wall unit into position, aligning the bottom edge with the reference line drawn earlier. Ensure that the unit is level both horizontally and vertically. Use shims, if necessary, to compensate for any unevenness in the wall. If using a cabinet hanging rail, hook the unit onto the rail, ensuring that it is securely engaged.
Securing to the Wall: Once the unit is properly positioned, use a drill/driver to drive screws through the cabinet frame and into the wall studs. Use screws that are long enough to penetrate the studs by at least 1.5 inches. If the cabinet frame does not align with a stud, use appropriate drywall anchors to provide additional support. Ensure that the screws are driven straight and do not strip the screw heads. Over-tightening can damage the cabinet frame or drywall.
Checking for Level and Alignment: After securing the first unit, re-check the level and alignment. Make any necessary adjustments before proceeding to the next unit. It is crucial to maintain a consistent level and alignment throughout the entire installation to ensure a professional and aesthetically pleasing result.
Installing Adjacent Units: Once the first unit is securely mounted, proceed to install the adjacent units. Align the faces of the cabinets so they are flush with each other. Use clamps to hold the cabinets together while driving screws through the cabinet frames to join them. This will create a seamless and integrated appearance. Again, check for level and alignment after each unit is installed. Ensure that there are consistent reveals (gaps) between the cabinet doors and frames.
When hanging multiple cabinets side-by-side, ensure there is adequate support to prevent sagging or shifting during the remaining installation process. Temporary braces or supports can be constructed from lumber to hold the units in place while securing them to the wall and joining them to each other.
Key Point 3: Addressing Potential Challenges
Several challenges may arise during the installation process. Understanding these potential issues and having strategies to address them is crucial for a successful outcome.
Uneven Walls: Walls are rarely perfectly straight or plumb. Unevenness can cause cabinets to appear misaligned or create gaps between the cabinets and the wall. Shims are essential for compensating for these irregularities. Place shims behind the cabinet frame where it contacts the wall, adjusting as needed to achieve a level and flush installation. Construction adhesive can also be used to fill small gaps between the cabinet and the wall.
Locating Studs: Identifying wall studs can sometimes be challenging, especially if the drywall is thick or the stud finder is unreliable. If the stud finder is not working effectively, try using a small nail to probe the wall at regular intervals until a solid resistance is encountered. The spacing between studs is typically 16 inches on center, so knowing this information can help narrow down the search. If all else fails, consider using a long drill bit to probe the wall and determine the location of the studs.
Working with Masonry Walls: Installing cabinets on masonry walls (brick, concrete, or block) requires specialized techniques and fixings. Standard wood screws will not work on these surfaces. Instead, use masonry screws or concrete anchors. Drill pilot holes into the masonry using a masonry drill bit, following the manufacturer's instructions for the chosen fixings. Be sure to wear safety glasses and a dust mask when drilling into masonry, as it can generate a significant amount of dust.
Handling Heavy Units: Kitchen wall units can be quite heavy, especially when fully assembled. Lifting and positioning these units requires considerable strength and coordination. It is strongly recommended to have assistance when handling heavy units. Consider using a furniture dolly or other lifting device to reduce the strain on your back and arms. If you are working alone, break the installation down into smaller steps. Remove the doors and drawers from the cabinets to reduce their weight before lifting. Once the cabinets are mounted, re-install the doors and drawers.
Concealing Fixings: Once the cabinets are installed, it may be necessary to conceal the screw heads for a more professional appearance. Use paintable wood filler to fill the screw holes, sanding smooth once dry. Then, touch up the filled holes with paint that matches the cabinet finish. Decorative screw covers can also be used to conceal the screw heads. These covers are available in a variety of colors and finishes to match different cabinet styles.
Remember to consult the manufacturer's instructions for the specific wall units being installed. Different manufacturers may have different recommendations for installation techniques and fixings. Following these instructions will ensure that the units are installed correctly and that the warranty is valid.
When working with electrical wiring or plumbing, always turn off the power or water supply before proceeding. If you are unsure about any aspect of the installation, consult a qualified electrician or plumber. Safety should always be the top priority when undertaking any home improvement project.
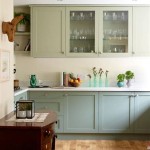
A well-planned and executed installation of kitchen wall units greatly enhances the functionality and aesthetic appeal of the kitchen. By following the steps outlined in this guide, homeowners can confidently tackle this project and achieve professional-looking results.

Wall Unit Fitting Adjustments Diy Kitchens Advice

How To Install Cabinets Like A Pro The Family Handyman

How To Install A Wall Unit In Your Kitchen

Installing Kitchen Cabinets Momplex Vanilla Ana White

Wall Unit Fitting Adjustments Diy Kitchens Advice

How To Hang Wall Cabinets 15 Steps With Pictures Wikihow

How To Install Kitchen Cabinets The Wall And Floor With Ease

Here S How Install New Upper Kitchen Cabinets

How To Install Kitchen Cabinets Diy Family Handyman

X2 Kitchen Wall Cabinet Hanger Mounting Plastic 29000740
Related Posts