How to Install Kitchen Cabinets
Installing kitchen cabinets can be a rewarding DIY project, allowing you to personalize your kitchen and save money. However, it's a task that requires precision and careful planning. This guide will provide a comprehensive overview of the installation process, covering essential steps, tools, and tips to ensure a successful outcome.
Planning and Preparation
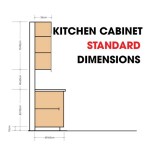
Before embarking on cabinet installation, thorough planning is crucial. This involves measuring the space, selecting cabinets, and gathering necessary materials. Accurate measurements of the kitchen's dimensions, including wall heights, countertop depth, and available space, are essential for determining the ideal cabinet sizes and configuration.
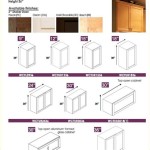
Consider factors such as the layout of appliances, plumbing, and electrical outlets while planning the arrangement of cabinets. Choose cabinets that meet your storage needs and complement the overall kitchen style. When selecting materials, prioritize durability and water resistance.
Gather necessary tools and materials, including a stud finder, level, tape measure, pencil, drill, screwdriver, saw, safety glasses, and appropriate fasteners. Ensure all surfaces are clean and free from debris before installation.
Installing Base Cabinets
Start by installing the base cabinets, which provide the foundation for countertops and other upper cabinets. Begin by marking the location of the first cabinet on the wall using a level and pencil.
Attach mounting brackets or cleats to the wall at the designated location, ensuring they are level and secure. These brackets will support the weight of the cabinets.
Carefully place the first base cabinet onto the brackets and secure it to the wall using appropriate fasteners. Ensure the cabinet is level and plumb before tightening screws.
Repeat the process for subsequent base cabinets, ensuring they are aligned with the first cabinet and spaced appropriately.
Installing Upper Cabinets
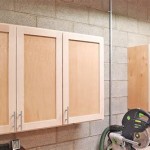
Once the base cabinets are securely installed, proceed to installing the upper cabinets. Begin by marking the location of the first upper cabinet on the wall.
Follow similar steps as for base cabinets, attaching mounting brackets or cleats to the wall and ensuring they are level and secure.
Carefully lift the upper cabinet into place, ensuring it aligns with the lower cabinet and is level before securing it to the wall.
Continue installing upper cabinets, ensuring they are evenly spaced and aligned with the first cabinet.
Finishing Touches
After installing all cabinets, proceed with finishing touches, including attaching doors, drawers, and hardware.
For doors, install hinges and ensure they open and close smoothly. Attach handles and knobs securely.
For drawers, install slides and ensure they extend and retract smoothly. Attach drawer fronts and handles.
Once all hardware is installed, perform a final inspection to ensure all cabinets are securely attached, level, and function properly.

How To Install Kitchen Cabinets Diy Family Handyman

How To Install Kitchen Cabinets Interiors

How To Install Upper Cabinets Like A Pro Cabinetselect Com

Installing Kitchen Cabinets Momplex Vanilla Ana White

How To Prepare For A Kitchen Cabinet Installation

Tips To Get Ready For Kitchen Cabinet Installation

How To Install Cabinets Like A Pro The Family Handyman

Here S How Install New Upper Kitchen Cabinets

Blind Corner Cabinets Step By Guide On How To Install

Important Things To Consider Before Installing New Kitchen Cabinets
Related Posts