How to Install Cabinets in Your Kitchen
Installing kitchen cabinets can be a rewarding DIY project, allowing you to customize your kitchen space and save on installation costs. However, it requires careful planning, precise measurements, and a good understanding of the process. This article provides a comprehensive guide to installing kitchen cabinets, outlining the steps, tools, and considerations for a successful installation.
1. Planning and Preparation
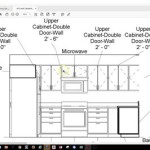
Careful planning is crucial for a successful cabinet installation. Begin by measuring your kitchen space accurately, considering the dimensions of walls, windows, and appliances. Determine the cabinet layout that best suits your needs and space constraints. It's essential to create a detailed plan that includes the number and types of cabinets required, along with their specific locations and dimensions.
Next, gather the necessary tools and materials. This includes a stud finder, level, tape measure, pencil, saw, drill, screws, anchors, shims, and cabinet hardware. Additionally, ensure you have access to power and water sources for the installation process. Before starting, clear the area where you'll be working and protect your floor with drop cloths or plastic sheeting.
2. Installing the Base Cabinets
Begin by installing the base cabinets. Locate the studs in the walls using a stud finder and mark their positions. Install the base cabinets starting from the corner, aligning them with the walls and using shims to ensure levelness. Secure the cabinets to the walls using screws or anchors, depending on the wall construction and the weight of the cabinets.
When installing multiple cabinets, ensure proper spacing between them. Use a level to verify that the cabinets are installed straight and parallel to each other. Connect cabinets together using cabinet clips or screws, depending on the design. Remember to leave a gap between the back of the cabinets and the wall, allowing for ventilation and access to pipes or wires.
3. Installing the Upper Cabinets
After installing the base cabinets, proceed to the upper cabinets. It's recommended to install the upper cabinets directly above the base cabinets for a seamless look and easier alignment. Use a level and shims to ensure that the upper cabinets are level and evenly spaced. Secure the upper cabinets to the walls using screws or anchors.
Consider using a helper to lift and position the upper cabinets, as they can be heavy. Secure each cabinet individually, making sure to use enough screws or anchors to support their weight. When installing upper cabinets, ensure adequate clearance between the top of the cabinets and the ceiling, allowing for proper ventilation.
4. Installing the Countertops and Backsplash
Once the cabinets are installed, you can proceed with installing the countertops and backsplash. Measure the countertop length and width, ensuring proper fit with the cabinet layout. Cut the countertops to size and install them using appropriate adhesives and fasteners. Make sure the countertops are level and secured against the backsplash.
The backsplash is installed after the countertops, protecting the wall behind the sink and stovetop from splashes. Choose a backsplash material that complements your kitchen style and install it according to the manufacturer's instructions. Ensure the backsplash is securely attached to the wall and seamlessly connects to the countertops.
5. Finishing Touches
After installing the cabinets, countertops, and backsplash, you can add the finishing touches. This includes installing cabinet doors and drawers, attaching hardware, and attaching lighting. Ensure all cabinet doors and drawers are properly aligned and operate smoothly. Install cabinet hardware, such as handles and knobs, in a consistent and visually appealing manner.
Finally, install lighting fixtures, both under cabinet and overhead, providing adequate illumination for the kitchen. Consider the type of lighting that best complements the overall design and functionality of the kitchen. With the finishing touches complete, your kitchen cabinets will provide a functional and aesthetically pleasing focal point for your space.

How To Install Kitchen Cabinets Diy Family Handyman

How To Install Kitchen Cabinets Interiors

How To Prepare For A Kitchen Cabinet Installation

How To Install Upper Cabinets Like A Pro Cabinetselect Com

Installing Kitchen Cabinets Momplex Vanilla Ana White

Tips To Get Ready For Kitchen Cabinet Installation

Here S How Install New Upper Kitchen Cabinets

Kitchen Cabinet Installation Ep 120

Kitchen Cabinet Installation

Blind Corner Cabinets Step By Guide On How To Install
Related Posts


